The right workflow and the best tools help streamline your design process and get you more project approvals.
Interior design projects should move fast, not crawl through redraws.
But unfortunately, interior design drafting is where most schedules quietly fall apart.
One missed dimension turns into a site fix, a change order, and a painful round of revisions that can wipe out your profit.
Clients also stare at flat 2D plans, nod politely, then stall, because they can’t picture the space and you lose momentum and sometimes the job.
If you run a solo design studio or a remodeling team this guide walks you from accurate floor plans to photorealistic renderings so you can approve decisions quicker, cut rework, and close more projects!
Key Takeaways
- Interior design drafting turns your design intent into clear, accurate drawings that clients and contractors can act on.
- A reliable workflow moves from scaled floor plans to space planning, furnishing, 3D visualization, material selections, and photorealistic renderings.
- Avoid common drafting mistakes such as wrong scale, poor clearances, or skipping 3D visuals because these mistakes often lead to change orders and lost trust.
- Cedreo helps interior designers create 2D floor plans, instant 3D views, and client-ready renderings faster, so approvals happen sooner without a steep CAD learning curve.
Why trust us? Here at Cedreo, we’ve got 20+ years of experience working with professionals in the home design space. We’ve seen firsthand the kind of software that helps interior designers and contractors design faster and land more jobs!
See How You Can Create Complete Projects with Cedreo
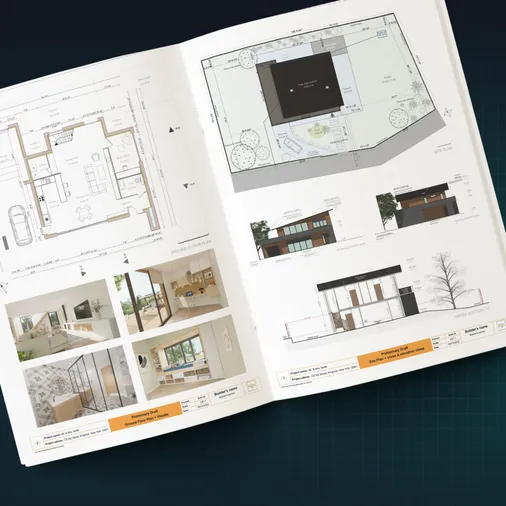
Plans – Get site plans, 2D floor plans, electrical plans, cross sections and elevation views — with all the technical details you need for a comprehensive project overview.
3D Visualizations – Use interior and exterior 3D renderings as well as 3D floor plans to help clients understand the finished project.
Documentation – Manage all your visual documents in one place, so it’s easier to present and sell your projects.
No credit card required, no commitment
What is Interior Design Drafting?
Interior design drafting turns design ideas into clear, buildable drawings (and often 3D views) that show how a space will look and function.
Once clients sign off on a general design direction, designers use it to lock in layouts, placements, and key details before anyone orders materials or starts work.
Use interior design drafting to lock-in details like these:
- Map room layouts and traffic flow
- Place furniture and built-ins
- Set fixture and appliance locations
- Define walls, doors, and windows
- Note key dimensions and clearances
- Communicate the plan to clients and trades
Why is Interior Design Drafting Important?
Interior design drafting is important because it removes guesswork and helps everyone work from the same plan.
Detailed drawings communicate design intent and key details of the interior space, which provides a solid foundation for material takeoffs and estimating.
And architectural plans keep clients, contractors, and architects on the same page.
Most teams now draft inside design software instead of by hand, which helps interior designers to achieve…
- Faster client decisions
- Fewer jobsite mistakes
- Cleaner handoffs to contractors
- Easier revisions and version control
- Better material takeoffs
- More accurate estimates and schedules
Let’s look at some of the key tools designers use for interior drafting.
Essential Tools & Software for Interior Design Drafting
The right tool makes interior design drafting faster, cleaner, and easier for clients to approve.
Here are five of the best interior design software options (Cedreo, Sweet Home 3D, Coohom, HomeStyler, and Foyr Neo) compared side by side.
| Software | Floor plan drawing | Furnishing & Material Library | 3D Rendering Quality | Client Presentations | Learning Curve | Support Quality | Pricing |
| Cedreo | Advanced | Large | Excellent | Excellent | Easy | Excellent | $$ |
| Sweet Home 3D | Good | Small | Good | Basic | Moderate | Average | $ |
| Coohom | Moderate | Large | Excellent | Good | Moderate | Average | $$ |
| HomeStyler | Moderate | Large | Good | Good | Easy | Average | $ |
| Foyr Neo | Moderate | Large | Excellent | Good | Moderate | Excellent | $$ |
Cedreo – Top Pick for Interior Designers
Best for: Interior designers and design-build teams who handle a wide variety of exterior and interior design projects.
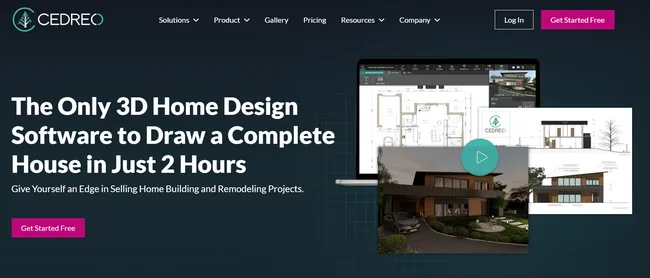
Cedreo is a web-based interior design drafting tool that lets you create 2D floor plans, see instant 3D views, and produce photorealistic renderings.
It helps you replace slow, manual drafting work with a connected workflow that keeps your drawings and visuals aligned.
That means fewer redraws, fewer costly field fixes, and fewer meetings where clients say, “I still can’t picture it.”
It’s our top pick for interior design software because it turns your interior design drafts into clear, client-ready visuals that move projects forward.
Real user review from Capterra: “This was pretty straight forward to use from the beginning. Out of all the products I’ve tried, this has the most options for floor plans, archways and interior options.” – Rachel H., Designer
Ease of Use (Learning Curve)
Cedreo is simple to learn, even if you have zero CAD experience.
- Intuitive tools to draw walls, openings, and rooms fast (draw simple floor plans in minutes)
- Keep measurements consistent with automatic dimensions and surface calculations.
3D Rendering Quality
Fast, realistic visuals help clients approve decisions with less back-and-forth.
- Generate photorealistic interior renderings in 5 minutes.
- Adjust lighting and viewpoints.
- Change the sun orientation for accurate lighting.
Furniture and Material Library
A strong library saves time and reduces “placeholder” choices that trigger revisions later.
- All paid plans get access to the full library of 10,000+ design elements.
- Apply finishes and textures to floors, walls, and surfaces.
- Customize furniture and fixtures.
Client Presentations
Better presentations reduce confusion and protect your project scope.
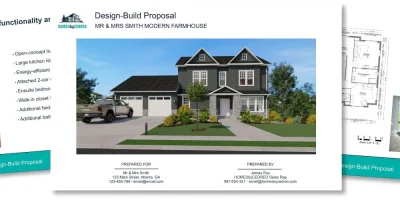
- Combine 2D plans, 3D visuals, and company branding into polished presentation documents.
- Plans automatically update in the presentations as you make edits to the design.
Pricing: $$
Sweet Home 3D
Best for: Designers who want a low-cost, desktop tool for quick 2D layouts with a basic 3D check.
Sweet Home 3D is a simple app for sketching flat 2D floor plans, then flipping to a live 3D view to sanity-check furniture placement and traffic flow.
Since it is free open source software, it’s a popular choice for new designers on strict budgets.
It can absolutely help you avoid early layout mistakes, but it usually falls short for client-facing deliverables and consistent presentation packages compared to Cedreo.
Key features
- Flat 2D drafting with an instant 3D view of the same model
- Import a background image (or plan) and trace over it
- Drag-and-drop furniture, doors, and windows from a built-in catalog
- Export basic plan and image outputs for sharing
Pros
- Great for fast interior drawings when your goal is layout validation, not sales visuals
- Lightweight tool that runs locally on your computer
- Very accessible pricing for solo designers
Cons
- Renderings and presentation outputs look outdated
Pricing: Free with the option to purchase 3D product packs
Coohom
Best for: Designers or showrooms that want to import custom product catalogs.
Coohom is a web-based design and manufacturing platform that is especially strong for kitchen, bath, and furniture workflows.
Designers can import custom product catalogs, which is a nice feature if they want to sell their own line of interior design products.
It also has a custom furniture module with parametric controls, which supports millimeter-level cabinetry and built-in design (a big deal when the sale depends on exact storage and appliance fits).
Key features
- Parametric custom furniture tools for detailed cabinetry and built-ins
- Dedicated kitchen-and-bath module for vanity, storage, and cabinet configuration
- Cloud rendering
- CAD/PDF exports for handoff and documentation (often tier dependent)
Pros
- Fast rendering speed
- Excellent for cabinet-heavy remodels where custom details drive the sale
- Cloud workflow means you do not need a high-end workstation
Cons
- Steeper learning curve once you use advanced cabinetry and custom furniture tools.
- Interior design focused, so it’s not the best choice if you need to create exterior renderings and technical drawings for construction.
Pricing: $$ (More if you are importing custom catalogs)
HomeStyler
Best for: Concept visuals and early client discussions for simple projects.
HomeStyler is a quick way to lay out a room, drop in furniture, and produce simple 3D visuals without a technical setup.
It is most useful when a client needs help visualizing direction early, before you invest time in a full drafting process.
However, for more than the simplest of projects, many designers and contractors hit a wall quickly.
Compared to Cedreo, HomeStyler isn’t as useful for scaled documentation and packaged client presentations, or for full remodels and additions with exterior site work.
Key features
- Browser-based layout tools for quick room planning
- Drag-and-drop furniture and decor staging
- 3D visualization
- Custom textures/assets on paid plans
Pros
- Fast to start for non-technical users
- Helpful for early buy-in when clients struggle with flat 2D plans
- Good for mood and concept visuals on small projects
Cons
- Interior focused, so not a good choice if you need exterior renderings, site plans, and terrain modeling.
- Output control and documentation depth heavily limited by plan tier
Pricing: $
Foyr
Best for: Designers who only need design concepts and visuals for interior projects.
Foyr is a browser-based interior design tool built to move quickly from a simple 2D layout to a furnished 3D space.
Designers often use it to present finish options, furniture layouts, and option sets when the client needs visuals before the next meeting.
It is strong for interior visualization and early approvals, but it is not built for full plan sets, elevations, and sections.
Unlike Cedreo, it has a limited exterior toolset, so site plans, terrain, and exterior renderings are not a focus.
Key features
- 2D layout tools tied to a 3D model
- Large drag-and-drop library for furniture, fixtures, and decor
- Photorealistic rendering options (tier dependent)
- Walkthrough-style presentations for client reviews
- Sharing tools for client review and feedback
Pros
- Strong for selling finishes, lighting mood, and material choices
- Cloud software, so fewer hardware headaches
- Presentation formats go beyond still images
Cons
- Limited construction documentation and technical detailing, so trade coordination may require another tool
- Interior-only focus means less flexibility than Cedreo for exterior views and site-related work
Pricing: $$
Types of Interior Design Drawings

Architectural drafting for interior design involves a few core drawing types, and each one plays a different role in approvals, pricing, and construction.
- Flat 2D floor plans: These top-down plans show room layout, wall placement, openings, and dimensions and surface areas so contractors can plan framing, and flooring.
- Elevations and sections: Elevations show walls straight on, while sections cut through the space to confirm heights, clearances, and how built-ins, tile, and trim details stack.
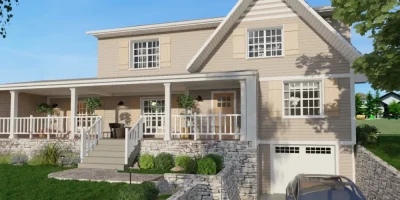
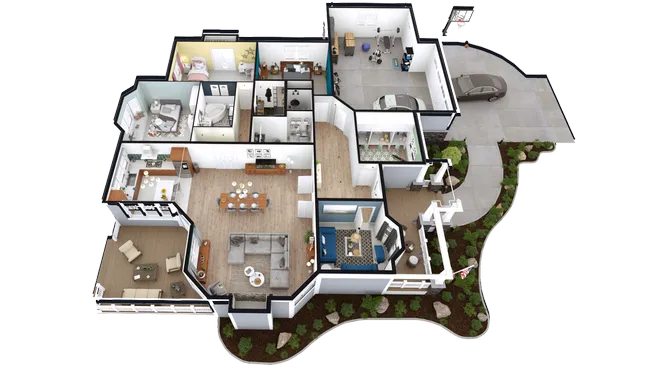
- 3D floor plans: A 3D plan helps clients understand the layout and traffic flow at a glance, which reduces “I can’t picture it” delays during reviews.
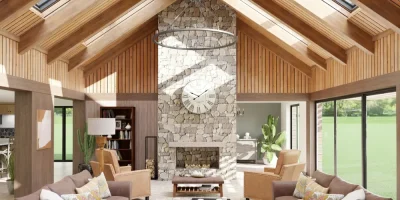
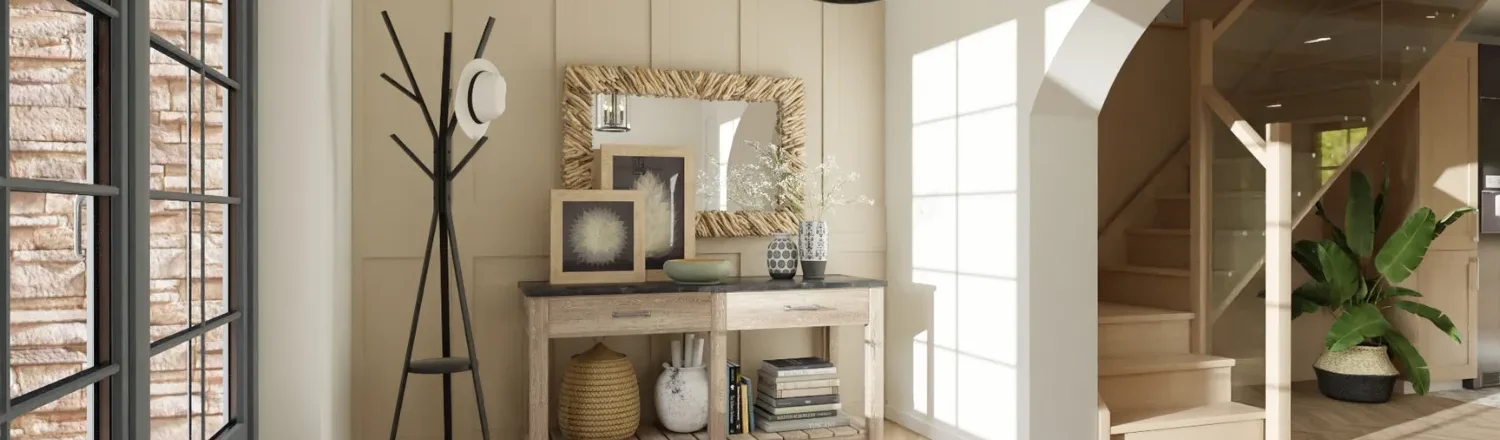
- 3D renderings: Photorealistic renders communicate lighting, finishes, and materials, so clients approve selections sooner and change less once ordering starts.
Together, these interior design drawings turn your intent into clear instructions that clients can approve and trades can build.
How can you make these plans?
See how to make these drawings without CAD tools in the next section.
The Interior Design Drafting Process: 6 Key Steps
Here are the six essential steps to complete an interior design drafting project, plus the Cedreo moves that help you work faster at each stage.
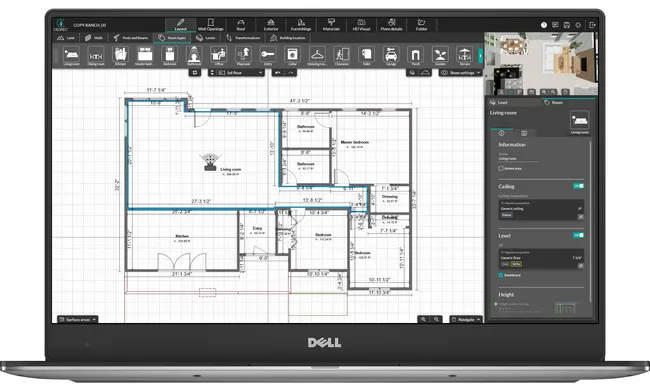
1. Draw a 2D Floor Plan to Scale
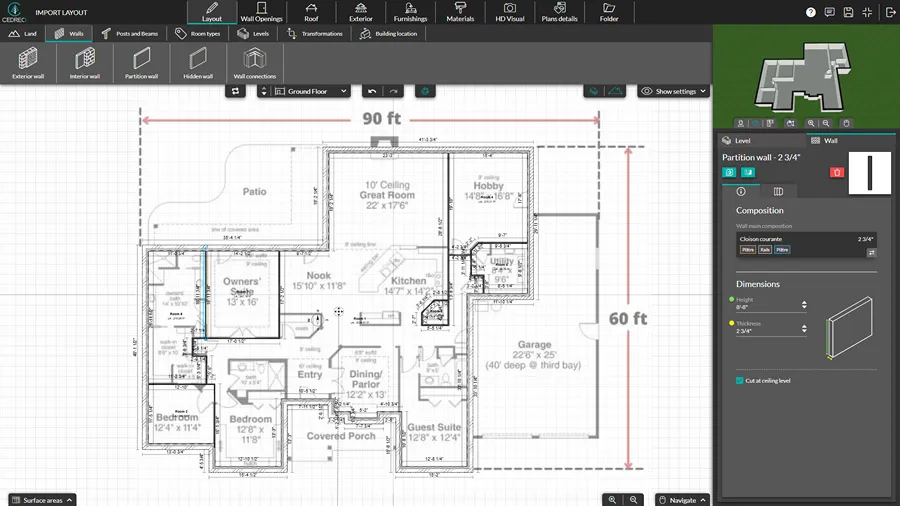
Start with a scaled 2D floor plan so every decision you make later stays accurate.
In Cedreo, you can draw from scratch, or go to the drawing step, import a plan in PDF, PNG, JPEG, DWG, or DXF format.
Set the scale by placing the on-screen ruler on a known measurement, then trace the walls with magnetism turned on so corners stay clean.
PRO TIP: Turn on Cedreo’s repeat action (continuous wall drawing) so you can chain wall segments with a few clicks instead of restarting the tool for every partition.
2. Plan the Spatial Layout
Now you lock in room flow, clearances, and the way people actually move through the space.
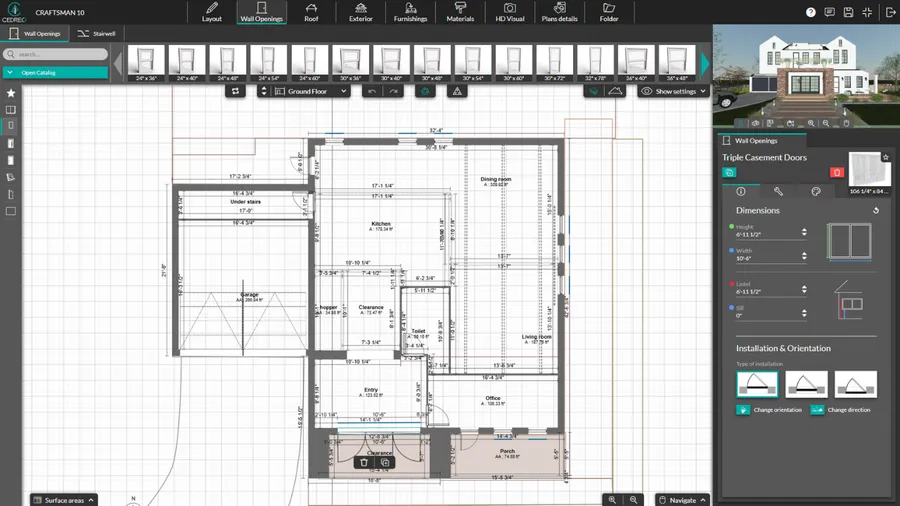
Adjust partitions by selecting a wall and moving it, or click a dimension and type the exact length so the layout stays precise.
Add doors and windows from the wall openings tools, then refine angles and wall thickness as needed.
Cedreo’s advantage here is speed: edits update quickly, and you can test alternate layouts without redrawing from scratch.
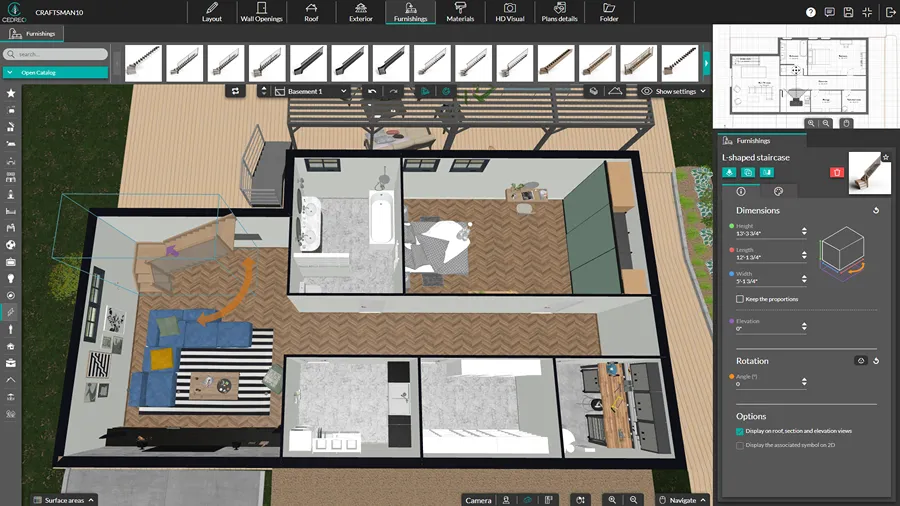
3. Place Furniture and Decor
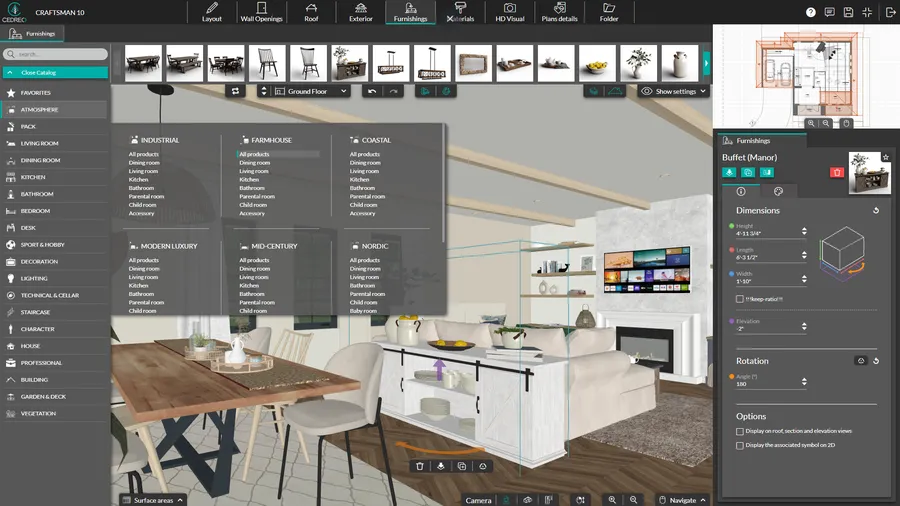
This is where your interior design drawings start to feel real to both you and your client.
Go to the furnishings step, search the built-in catalog (10,000+ items), and drag-and-drop furniture, fixtures, and decor into the plan.
Resize pieces, maintain proportions, and adjust colors from the right-hand settings so clearances and style choices match the brief.
Cedreo’s advantage is iteration: you can stage a room fast, then swap options during a client call without rebuilding the space.
4. Visualize in 3D
A 2D plan explains the layout, but 3D is what gets clients to say “yes.”
As you draft in Cedreo, you can view the 3D model alongside the 2D plan, then switch to a full-screen 3D view in one click to review the space from eye level.
Use 3D to catch issues early (tight walkways, awkward door swings, blocked sightlines) before they become expensive revisions.
Cedreo’s advantage is instant feedback: you test changes and see the result right away.
5. Customize Surfacing and Materials
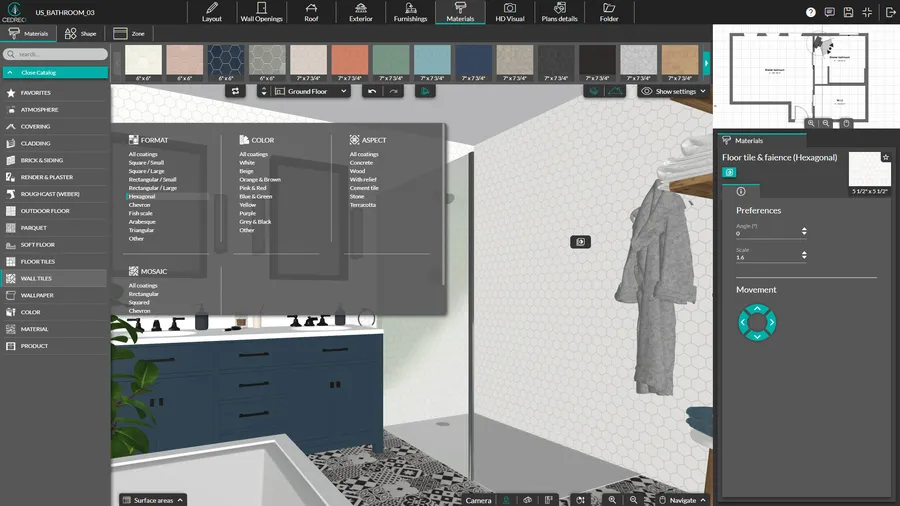
Materials turn a layout into a finish-ready design that a client can approve.
Apply surface finishes and materials from the built-in library, then adjust colors and textures until the room reads the way you want.
Keep selections consistent across floors, walls, and key surfaces so the design looks intentional, not pieced together.
Cedreo’s advantage is clarity: realistic finishes reduce client confusion and reduce those awkward “I didn’t realize it would look like that” moments.
6. Generate Photorealistic Renderings
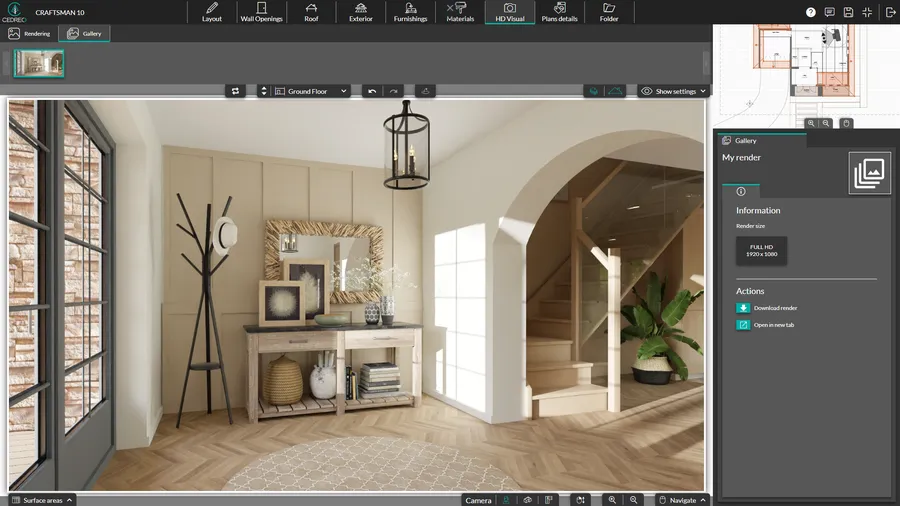
Finish with a photorealistic interior render so clients can visualize the final space and approve faster.
Go to the HD Visual step, choose a rendering environment, set your camera viewpoint, then generate a photorealistic image in a single click.
You can fine-tune realism by adjusting sun orientation and lighting settings, then reuse saved viewpoints to create quick variations for side-by-side comparisons.
Cedreo’s advantage is speed: each image renders in less than five minutes, so you can present options and move to sign-off without delays.
Common Interior Drafting Mistakes

Even experienced designers get tripped up by small drafting misses that turn into big jobsite problems.
- Incorrect scale or measurements: One wrong dimension can force field rework, trigger change orders, and damage trust.
- Insufficient furniture clearances: When you skip real walkways and door swings, the space may look fine on paper but fails the first time someone moves through it.
- Unclear annotations and symbols: Vague labels slow subcontractors, increase calls and site questions, and raise the odds that someone installs the wrong item.
- Ignoring electrical and plumbing constraints: If outlets, switches, drains, or supply lines are not mapped early, your design update can become a costly mid-project correction.
- Not documenting material specifications: Missing finish names, sizes, and locations leads to wrong orders, delays, and substitutions that throw off the design.
- Skipping 3D renderings: Without a realistic 3D visual, clients often misread scale and finishes, which causes stalled approvals or late redesigns.
PRO TIP: Cedreo helps you avoid most of these issues by keeping measurements consistent, supporting clear plan documentation, and giving instant 3D views that reduce confusion for clients and contractors.
Streamline Your Interior Design Drafting Services With Cedreo
Interior design drafting doesn’t have to steal your week.
When you can draft faster and show clearer visuals, clients decide sooner and projects stay profitable.
Cedreo gives you a simple, connected workflow for the exact deliverables that move approvals forward:
- True-to-scale 2D floor plans that stay accurate as you revise
- Instant 3D views to catch layout issues early
- Photorealistic interior renderings that help clients say “yes” faster
- Client-ready presentation documents for clean handoffs
Ready to speed up your next project?
Drafting in Interior Design FAQ
What is drafting in interior design?
Drafting in interior design is the drafting process of creating technical interior drawings that show the layout, dimensions, and spatial relationships of a space.
These drawings help contractors and clients stay on the same page and convey design ideas before the construction process starts.
What is the difference between interior design and interior drafting?
Interior design is the full creative journey from conceptual ideas and mood boards to installation.
Interior drafting is one essential part focused on scale drawings, accurate measurements, and 3D views that support buildable plans.
What software do interior designers use for drafting?
In the past, designers used CAD software like AutoCAD or outsourced design services.
Now, most interior designers use modern building design software like Cedreo to draw 2D plans and create 3D images that support their creative vision.
How long does interior design drafting take?
Traditional hand drafting can take days or weeks.
But with intuitive software like Cedreo, designers can complete the full drafting workflow in just a few hours, from designing 2D floor plans with dimensions and surface areas, to generating realistic 3D renderings.
What types of drawings are included in interior design drafting?
Interior design drawings typically include flat 2D floor plans, elevations and sections, and 3D renderings that help confirm materials needed and key architectural elements.