Here’s how to understand and use elevation drawings to provide design clarity that helps you sell more projects.
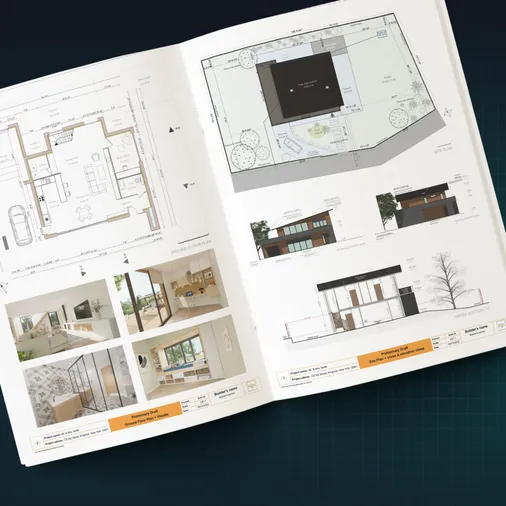
Every building design starts as a collection of drawings.
Floor plans, site plans, elevation views… each one reveals something different about the structure.
But here’s the challenge.
If you can’t read or create these architectural drawings quickly, you lose time and risk miscommunication with clients.
Architectural elevation drawings show what a building looks like from the outside, while plan view drawings show the layout from above.
Both are essential for selling projects and helping clients visualize the finished home.
In this guide, we break down the different types of elevation drawings and plan views, their key elements, and how to create them faster.
Key Takeaways
- Elevation drawings show a flat, 2D view of one side of a building’s exterior, while plan views show the structure from above.
- The most common types of elevation view drawings include front, back, left, and right elevations, plus interior elevations and elevation details.
- Plan view drawings include site plans, floor plans, roof plans, and landscape plans, each displaying different details of the project.
- With Cedreo, builders and contractors can create elevation views, floor plans, and photorealistic 3D renderings in a fraction of the time it takes with traditional methods.
Why trust us? Here at Cedreo, we’ve got 20+ years of experience working with housing pros in the home design space. So we know what it takes for builders & contractors to create professional elevation drawings and plan views that help them land more clients!
See How You Can Create Complete Projects with Cedreo
Plans – Get site plans, 2D floor plans, electrical plans, cross sections and elevation views — with all the technical details you need for a comprehensive project overview.
3D Visualizations – Use interior and exterior 3D renderings as well as 3D floor plans to help clients understand the finished project.
Documentation – Manage all your visual documents in one place, so it’s easier to present and sell your projects.
No credit card required, no commitment
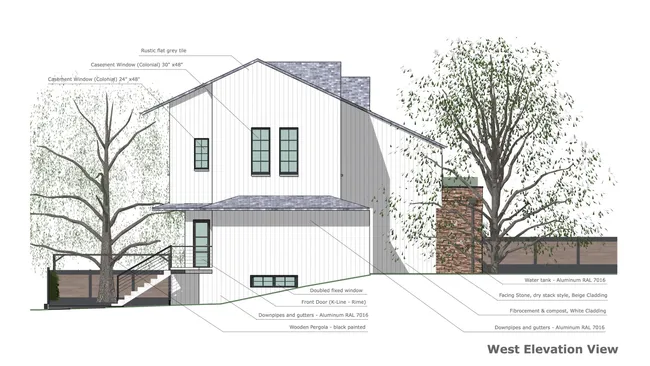
What is Elevation View?
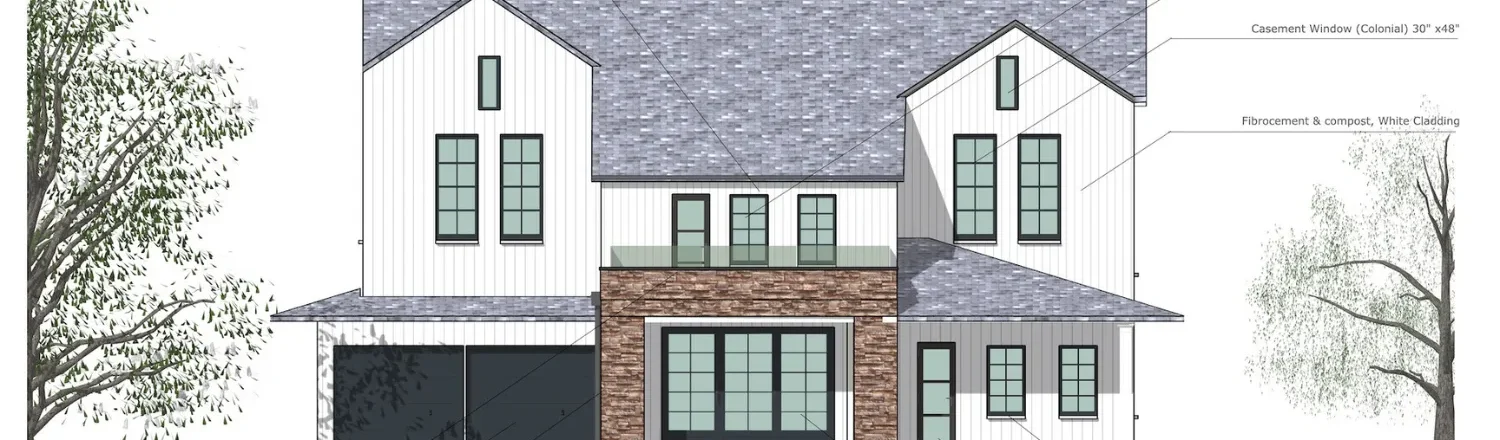
An elevation view is a 2D drawing of a building’s face.
Picture yourself standing a few dozen yards away from a house, looking straight at it.
That flat, head-on perspective is essentially what an elevation drawing captures.
Unlike a photograph, there’s no depth or perspective distortion.
Everything is drawn to scale so that dimensions, proportions, and details are accurate and easy to measure.
A single elevation drawing only shows one face of the structure.
So for a standard home, you typically need four elevations to get the full picture.
These exterior elevations are usually labeled front, back, left, and right, or by compass orientation (north, south, east, west) when the building’s position on the site is known.
Different Types of Housing Elevations
Not all elevation drawings serve the same purpose.
Here are the main types that builders and contractors use in residential architecture.
Front Elevation
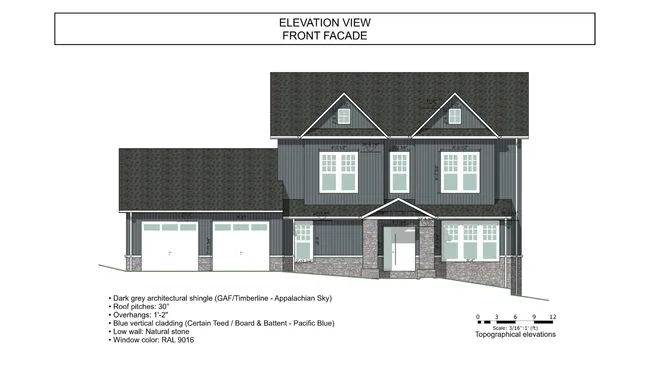
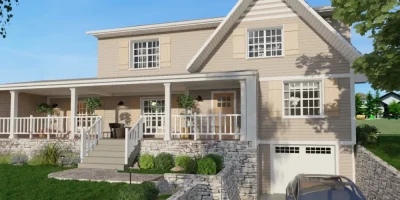
The front elevation shows the main entrance, front porch, and any design elements visible from the street.
For many homes, this drawing also displays the garage, facades, and other features that define the building’s curb appeal.
It’s often the first elevation drawing that clients want to see because it shows the architecture of the home from the most important angle.
Back Elevation
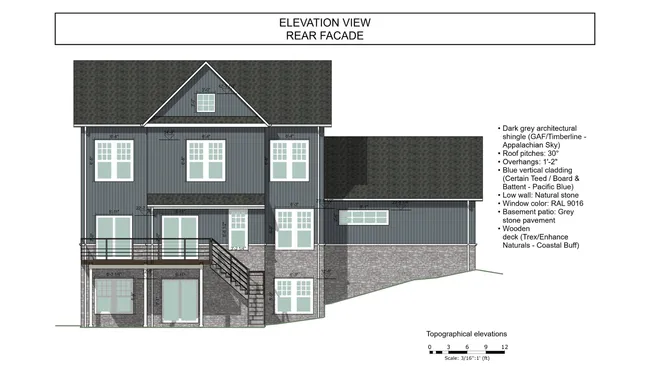
The back elevation gives an exterior view of the home’s rear.
You’ll typically find rear entrance doors, a patio or deck, and in homes with walkout basements, the slope of the ground relative to the foundation.
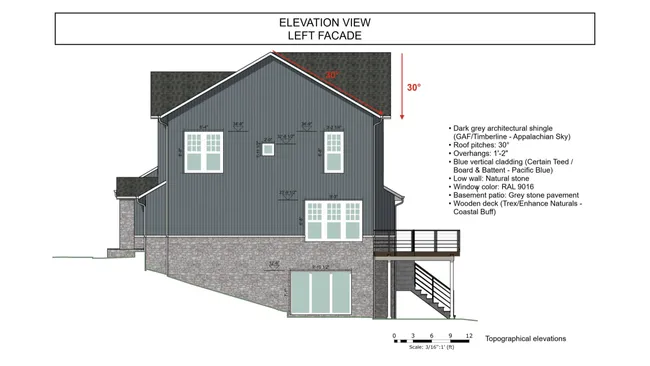
Left and Right Elevations
The side elevations show design elements from each side of the house.
Depending on the building design, you might see windows, side doors, or garage doors on these drawings.
Combined with the front and back, all four elevations give you a complete picture from every angle.
Other types of architectural elevation drawings go beyond the standard exterior elevations.
Elevation Detail
An elevation detail drawing zooms in on a specific area to illustrate materials, finishes, and structural details at a larger scale.
This type of architectural drawing gives a much better picture of how the completed building will look and feel from specific angles.
In the field of architecture, these drawings and section drawings are often used together to communicate construction specifics to the build team.
What Is a Plan View?
A plan view gives you an entirely different perspective of a building.
Instead of looking at it from one side, you’re looking down from above, typically with the roof removed.
From this bird’s eye view, you can see the interior walls, rooms, and how spaces connect.
Plan drawings often include documentation for doorways, windows, fixtures, staircases, and dimensions.
There are several different types of plan views, and each one shows specific details about the project:
Here are the details on each one.
Site Plans
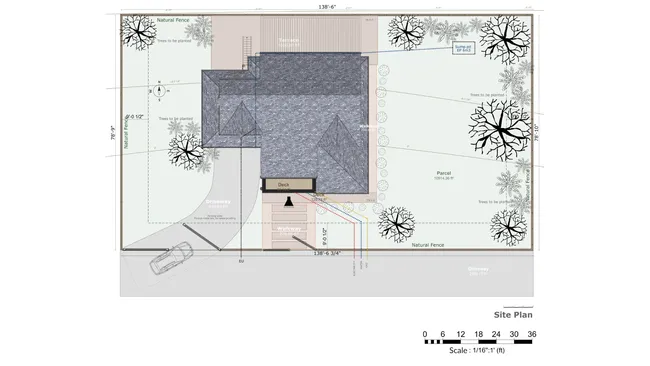
A site plan displays the entire property from a bird’s eye view, showing every structure on the lot and their spatial relationships.
Of all types of plan view drawings, site plans give you the broadest perspective.
You might see the outline of the house, a detached garage, a pool, or other features across the entire property.
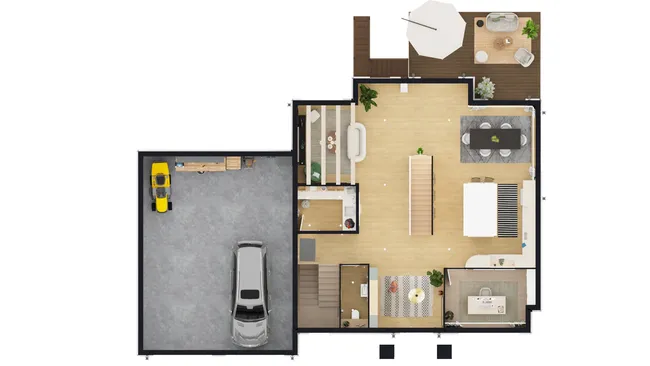
Floor Plans
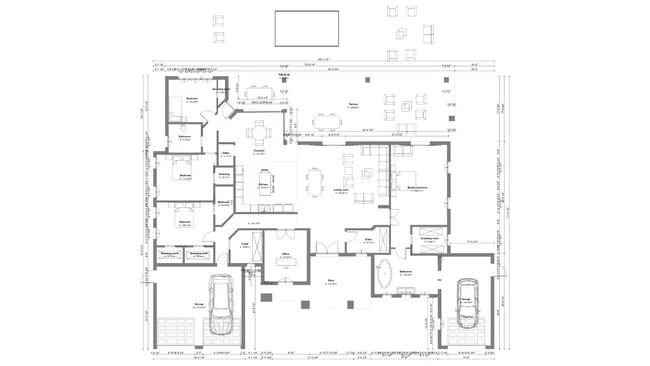
A 2D floor plan shows rooms, doorways, windows, and dimensions from above.
Floor plans may be the most familiar type of plan view.
The level of detail can vary widely depending on the intended use.
- A basic 2D plan drawing might show nothing more than the rooms and their dimensions.
- On the other end, a detailed 3D plan can show everything down to the furniture, surface materials, and decor used in each space.
Roof Plans
A roof plan view shows the building’s roof as it looks from above.
This drawing gives you a complete picture of its complexity, angles, pitch, and materials.
Roof plan drawings are useful for creating construction plans and for generating ideas about how different sections connect at various angles.
Landscape Plans
A landscape plan provides a top-down view of the outdoor space and details surrounding the structure.
These plan drawings help clients visualize the outdoor space (including the yard, gardens, driveways, patios, decks, pools, and other landscape features).
The Differences Between Elevation Views and Plan Views
When designing a home, the question shouldn’t be plan view vs. elevation view.
Both are essential to truly understand a building design.
The key difference is the orientation of the viewpoint.
Here’s how they compare:
- Elevation view shows the building from ground level, looking at one face of the structure. It reveals the appearance of facades, windows, doors, pitch, and materials from one side.
- Plan view shows the building from above, giving you a bird’s eye view of the layout. It reveals the interior: rooms, walls, dimensions, and how spaces flow together.
- Section views and section perspectives add depth by cutting through the building vertically to show interior heights and how floors relate to each other.
One thing we’ve noticed from working with builders and contractors is that clients need multiple perspectives to truly connect with a design.
- Elevation drawings help them picture what the house will look like from the curb.
- Plan views help them understand how they’ll live in the rooms and spaces inside.
- Together, these plan drawings and elevation drawings give the full picture of any architecture project.
PRO TIP! – If you use Cedreo software, you can add 3D floor plans and photorealistic renderings as well.
Five Main Elements of Elevation View Drawings
To properly create and read elevation drawings, you need to understand these five main elements.
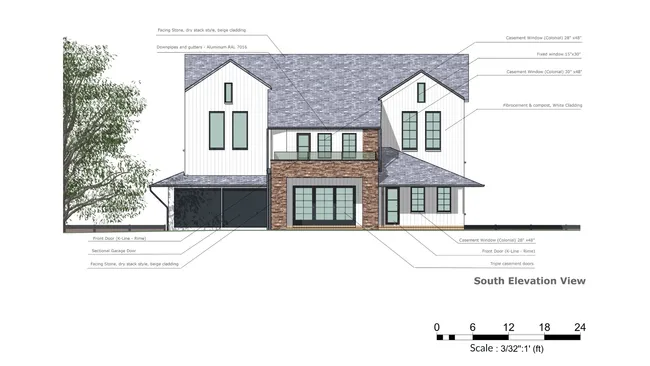
1. Title and Scale
The title tells you which side of the building you’re looking at (for example, “Front Elevation” or “North Elevation”).
The scale shows how the drawing on paper compares with the actual structure, so that every dimension is accurate and measurable.
The most common scale used for residential construction is 1/4”=1’0”. That means every 1/4-inch on the printed drawings represents 1 foot in reality.
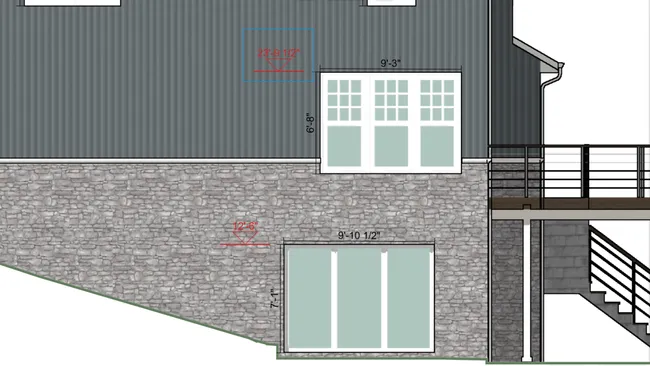
2. Doors and Windows
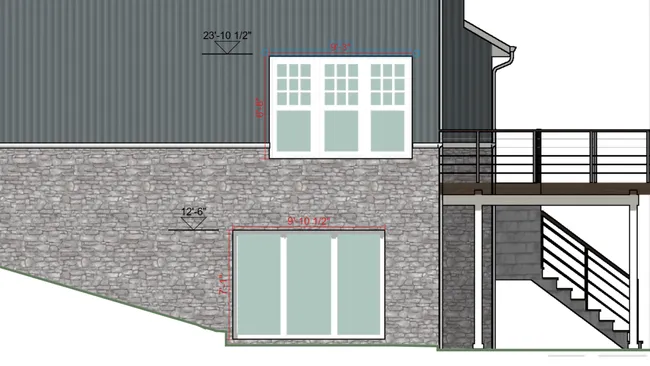
Elevation drawings always show the exact size, locations, and appearance of doors and windows.
Details like trim, grills, and shutters are also included in these plan drawings.
3. Roof Type and Pitch
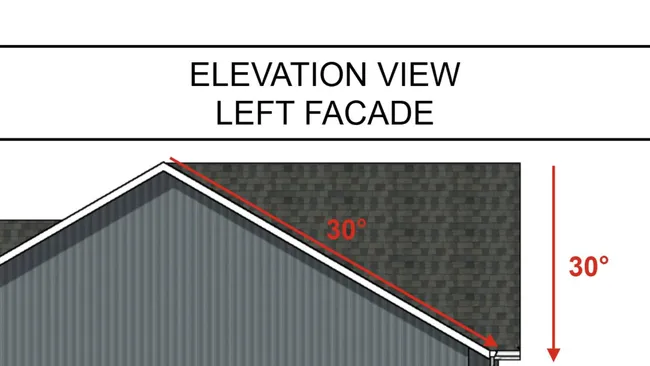
The elevation shows the pitch to illustrate how steep the roof is.
Section drawings and elevation details can also show primary roofing materials like shingles, metal, or tile.
4. Elevation Markers
Elevation markers show the height of each level in the building.
They’re typically drawn as dashed lines at the top of framed walls and subfloor locations on each story.
PRO TIP! – Use Cedreo’s “Elevation Dimension” tool to automatically put elevation markers anywhere on your elevation plans.
5. Ground Plane

The ground plane shows the approximate location of the ground next to the building.
This helps illustrate how the structure sits relative to the terrain, which is an important detail for construction planning and site work.
At that point, experienced pros will also reference section views to check ceiling heights, floor-to-floor dimensions, and other details that the drawings alone don’t capture.
PRO TIP! – When presenting elevation drawings to clients, pair them with 3D renderings. From what we’ve seen work for contractors, flat 2D elevation views can be difficult for clients to interpret. But a photorealistic rendering of the same angle makes the architecture click instantly.
How to Create an Elevation Plan
There are several methods for creating elevation drawings, and the right one depends on your tools and the complexity of the project.
The right approach depends on how much depth you need and how quickly you need to present to clients.
Hire a Design Professional (Expensive)
Some builders outsource the production of these drawings to a draftsperson or design office.
This is a solid option for complex projects.
But it adds cost and extends your timeline.
Use CAD Software (Time-Consuming)
Creating plan drawings with traditional CAD software like AutoCAD is an option, but it demands significant time and technical skill.
For teams comfortable with those tools, it’s flexible, but it’s not optimized for creating drawings at speed.
Use Cedreo (Fast & Budget Friendly)
The builders we work with who move fastest from design to signed contract tend to use purpose-built home design software.
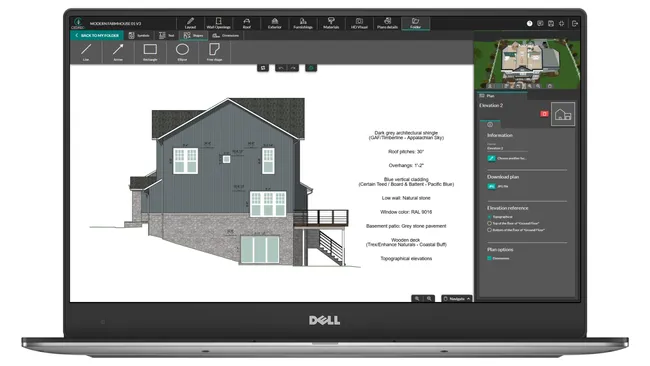
With a tool like Cedreo, elevation views and cross sections are generated automatically from your 3D model.
There’s no separate drafting step for creating elevation views or even for creating a 3D model.
Here’s how it works:
- Use Cedreo’s intuitive tools to design the house. As you draw in 2D, Cedreo automatically creates a 3D model.
- Customize materials, apply siding, textures, and landscape materials from the design library.
- To generate the elevation view, go to the Folder tab, and select “Add an elevation view”.
- Select the side of the house you want the elevation to show.
- Add notes, elevation markers, and dimensions as needed.
- In the Folder tab you can also generate floor plans, site plans, roof plans, and cross-section views.
- Anytime you make changes to the overall design, the elevation views in the folder update automatically.
- Download and print to scale as a JPG or PDF.
Cedreo Speeds Up Plan Edits and Creates Great Customer-Ready Elevations
“I love Cedreo because it lets me modify house plans quickly and then show customers exterior elevations and views of the home. It’s a fantastic tool for closing.”
The result is professional elevation plan drawings, section views, and 3D renderings that clients can actually understand and get excited about.
For a detailed walkthrough with examples, check out our guide on how to draw an elevation.
How to Choose the Right Tool for Elevation Plans
To produce professional elevation drawings quickly, the right software makes all the difference.
Here are the key criteria to consider:
- Quick to learn: Interior designers, builders, and contractors shouldn’t need specialized training to start creating elevation view drawings and testing ideas.
- Complete plan coverage: Look for a tool that produces all your architectural drawings in one place: elevation views, section views, floor plans, site plans, and landscape plans.
- 3D visualization: Flat elevation drawings show construction details, but 3D renderings and section perspectives sell projects. The right tool generates both from the same model.
- Speed: We’ve noticed with builders and contractors we work with that turnaround time is the point where they win or lose competitive bids.
Cedreo checks all of these boxes.
It’s cloud-based home design software built for housing professionals who need to create complete projects (including elevation views, section views, plan drawings, 3D renderings, and presentation documents) without CAD complexity.
Create Better Elevation Drawings in Less Time
Plan drawings and elevation views are critical tools for every builder and designer.
They help you design detailed rooms and spaces, and give clients the perspective they need to say yes.
With Cedreo, you can:
- Draw 2D and 3D plans in minutes
- Generate elevation views and sections automatically from your design
- Create photorealistic 3D renderings from any angle that close deals
- Produce professional project presentations with all your drawings in one place
Stop spending days on drawings that should take hours.
Sign up for a FREE Cedreo account today!
Elevation Drawing FAQs
What is an elevation drawing?
An elevation drawing is a flat, 2D representation of one side of a building that shows its exterior appearance, dimensions, and architectural details without perspective distortion.
With home design software like Cedreo, you can generate elevation drawings and interior elevation views automatically from your 2D floor plan drawing.
What is the difference between an elevation view and a plan view?
An elevation view shows a building from one side at ground level, while a plan view shows it from above with the roof removed to reveal the rooms and interior layout.
Both are essential for any home design project, and designers use them at every point in the process.
How many elevation plan drawings do you need for a house?
Most homes require four elevations (one for each side of the building) to display the complete exterior.
Exterior elevations are typically labeled as front, back, left, and right, or by compass direction: north, south, east, and west. With Cedreo, you can generate as many as you need.
What are the different types of architectural drawings?
The most common types of architectural drawings include site plans, floor plans, roof plans, cross-sections and landscape plans.
Each type of plan shows different details about the project, from the interior layout to the entire property.
Can you create exterior elevations without CAD software?
Yes, home design tools like Cedreo are built specifically for housing professionals and don’t require CAD experience.
You draw your plan, and Cedreo automatically generates elevation views, section views, and a 3D model from your design.