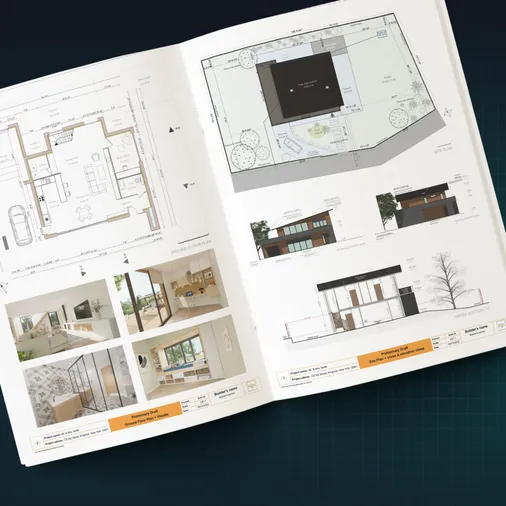
A flat 2D plan is no longer enough to impress clients and sell a project.
Your clients want a realistic render that feels close to reality and shows the fine details they care about.
In this step-by-step guide, you’ll see how to make 3D renders fast without complex settings or long tutorials.
You’ll also see how home builders, remodelers, and interior design professionals can learn how to render a drawing with modern design software in just a few minutes.
Key Takeaways
- The entire process for 3D renderings starts with a clear client brief so your visuals match your client’s lifestyle, project needs, and priorities.
- Accurate plans, smart material choices, and thoughtful furniture layout are important factors that keep your 3D model, lines, and surfaces consistent with reality.
- Camera angles, light sources, shadows, and background turn a simple 3D scene into a final image your clients remember.
- Cedreo is a powerful tool that lets you create complete 3D rendering projects in minutes, so you can present projects faster with fewer mistakes along the way.
Why trust us? Here at Cedreo, we’ve got 20+ years of experience working with housing pros in the 3D home design space. We know what it takes for home builders, contractors, and designers to create 3D renders that land them more jobs!
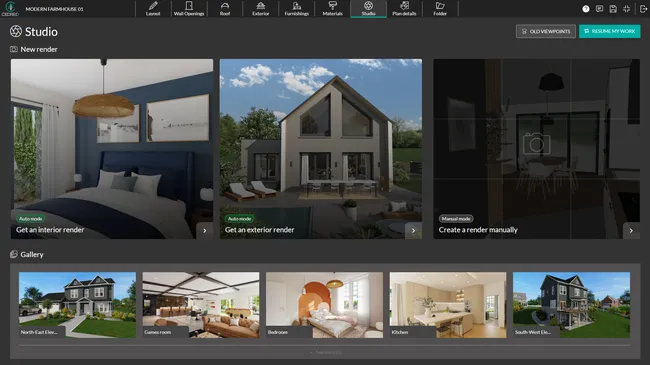
See How You Can Create Complete Projects with Cedreo
Plans – Get site plans, 2D floor plans, electrical plans, cross sections and elevation views — with all the technical details you need for a comprehensive project overview.
3D Visualizations – Use interior and exterior 3D renderings as well as 3D floor plans to help clients understand the finished project.
Documentation – Manage all your visual documents in one place, so it’s easier to present and sell your projects.
No credit card required, no commitment
Realistic Renders Start with a Clear Client Brief

A strong 3D render starts with a clear client brief.
Take time to learn how your client lives each day.
When you meet with them, focus your questions on a few key points.
- Ask about the architecture style they like.
- Ask which rooms they use most each day.
- Ask what matters most, such as a home office, a big kitchen, or space for kids.
Use these answers to build a short written brief you can follow.
Keep in mind that different clients need different layouts.
- A young family may want open living spaces and easy access to the garden.
- A retired couple may want a comfortable kitchen and quiet bedroom suite.
- A remote worker may need a dedicated, quiet home office.
If your client loves to entertain, show a large living room with a big table and wide openings to the terrace.
If they want privacy, focus on quiet spaces like the master suite or a snug TV room.
Create a simple questionnaire you can review in meetings or send by email.
Ask clients to share a few inspiration images so you can see the style, ideas, and mood they like.
Step by Step Guide: How To Create 3D Renders
Step 1: Draw Complete Plans
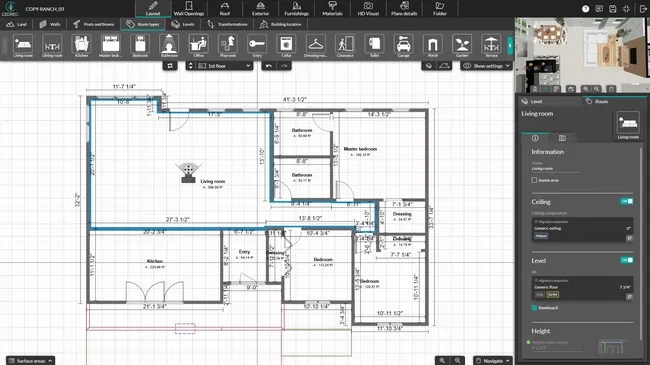
With Cedreo and similar design tools, the 3D images are generated automatically from your 2D plan.
So if the 2D plan is incomplete, the 3D model will also lack details.
Wrong window placement, bad elevations, or a flat lot that should be sloped all make it harder for your client to visualize the design.
That’s why a realistic render always starts with detailed and accurate plans.
- Draw all exterior and interior walls and partitions, either from a blank page or by tracing over an imported plan.
- Check line weight, edges, and main geometry so the basics of your design stay clean and easy to read.
- Move walls, resize the whole house, or add a lower or upper level with a single click when you need changes.
- Place doors and windows with the right size, style, and color by choosing from Cedreo’s library of more than 1,500 openings.
TIME-SAVING TIP! Apply the same settings to all doors and windows at once to keep a consistent look and save time.
- Add the roof, set its pitch, and create valleys and dormers based on the rooms under the roof.
- Model the terrain using the site plan and adjust elevation points or lines so slopes and levels match real life.
- Place the house on the lot, add a compass for orientation, and draw driveways, terraces, parking areas, and retaining walls.
IMPORTANT! Assign a room type to every room in the drawing step. That’s what lets Cedreo calculate the best camera point-of-view for each space in automatic mode. A bedroom doesn’t call for the same camera height and focal length as a big open kitchen and living room.
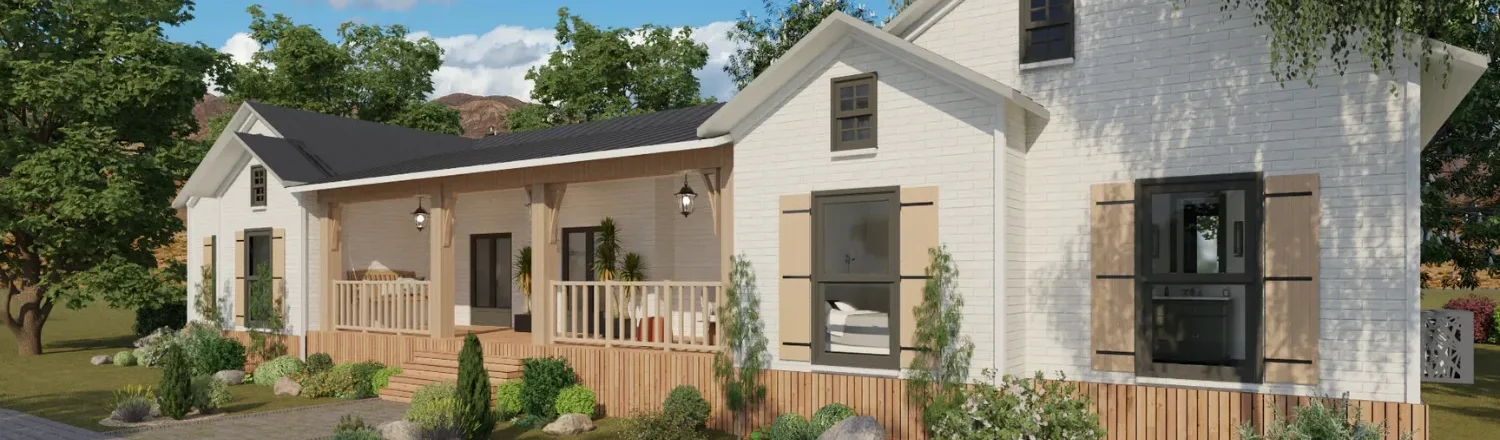
Step 2: Add Materials and Finishes
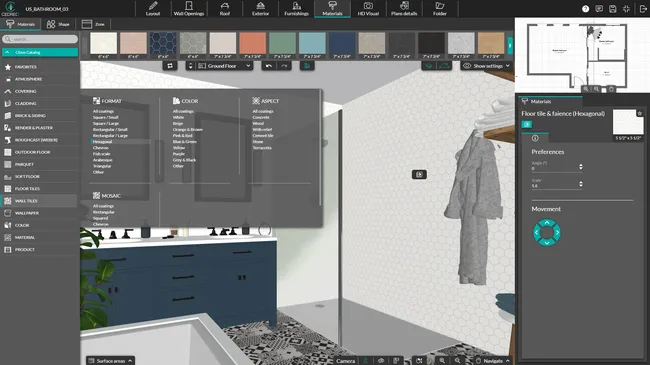
The look of your 3D image depends heavily on the textures you choose.
Small details like wood grain, tile joints, and reflections on shiny surfaces make a big difference in a realistic render.
Use materials to support the story you want to tell in each room.
- Mix a variety of materials on facades and inside rooms to add depth and increase perceived quality.
- Use Cedreo’s catalog of more than 2,500 interior and exterior finishes and click to add materials to walls, floors, and other surfaces.
- Use the zone tool to create bands, frames, or accent areas on facades, then change the material in that zone for contrast.
- Choose a roof color that matches local style and industry standards, such as dark slate or warm clay tiles.
- Set tile size or define plank flooring direction based on room size and window placement so patterns feel natural.
- Use invisible walls to split one room into two zones when you need different floor finishes.
For faster design decisions, test several variants of the same project by changing only the materials so clients can compare two realistic render options side by side.
IMPORTANT! Remember to turn on your light fixtures in the furnishing step. In both automatic and manual mode, fixtures stay off by default in your renders.
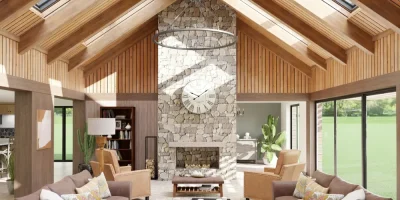
Step 3: Furnish Interior and Exterior
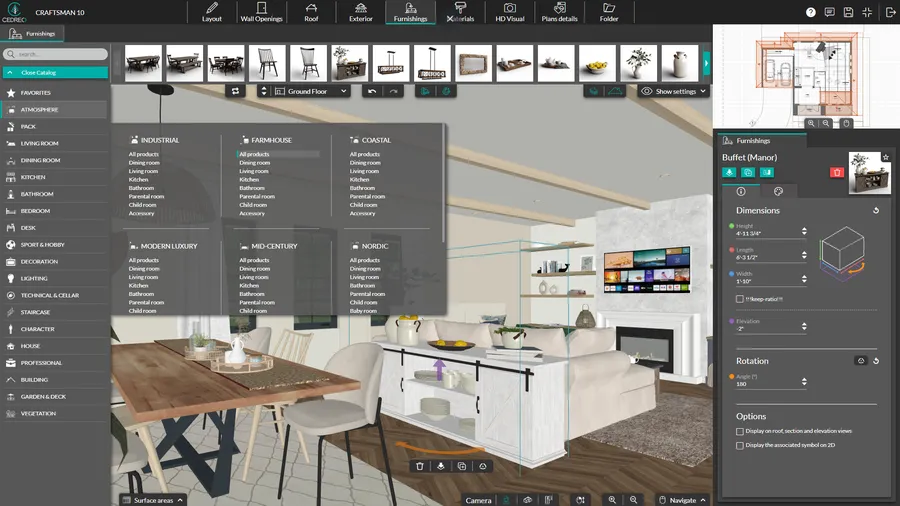
Once the volumes are drawn, the layout and décor bring the scene to life.
Furniture, lighting, and accessories show how your client will use each space day to day.
- The Cedreo advantage: Cedreo gives you a large library of more than 6,000 high-quality furniture and décor objects you can customize in size, color, and texture.
- You can also use ready-made furniture packs to speed-up your workflow by furnishing a living room, bedroom, or kitchen in just a few clicks.
- Pay close attention to light fixtures because they guide the eye, add reflections, create shadows, and highlight textures in your environment.
- A common mistake is to skip interior light sources and rely only on daylight.
- A render without lighting often looks flat, and you lose the ability to enhance key details in the scene.
- Outside, think about the house in its full environment, not as an object alone.
- Use planters and low hedges in the foreground.
- Place lawn, garden furniture, and planting beds in the middle ground.
- Add trees and simple building shapes in the background.
Step 4: Create the 3D Rendering in Automatic or Manual Mode
This is where you create your photorealistic 3D renderings in Cedreo.
You get two modes, so there’s one for every skill level.
Automatic mode picks the interior and exterior viewpoints, sets the natural lighting, and frames every shot for you, so you get a professional result with zero technical settings.
Manual mode hands you full control over every setting.
Automatic Mode: Quality Renders in a Few Clicks
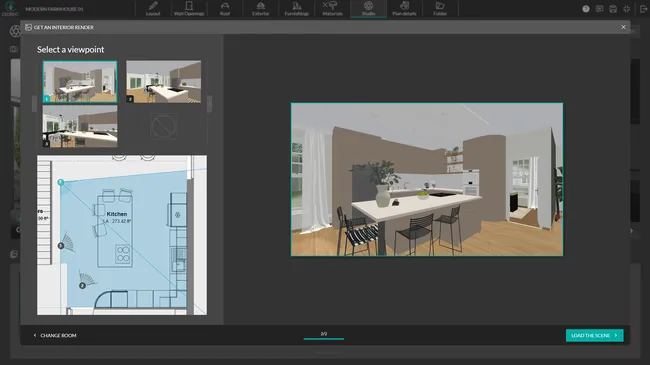
Create an Interior Render
Pick the room, and Cedreo does the rest.
The software automatically calculates the best viewpoints based on the room’s type and size, and it handles the natural lighting too.
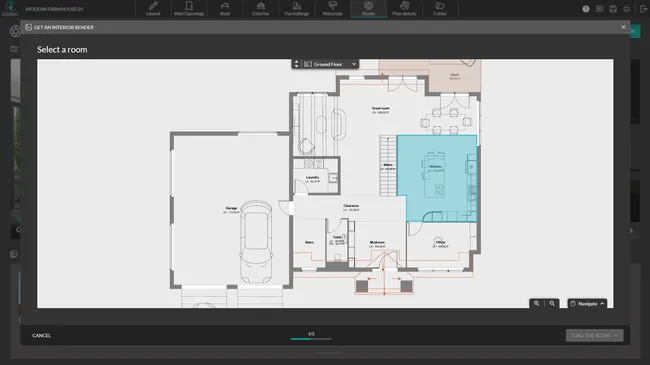
- Select your room on the floor plan (you can move between levels at any time).
- Choose the most appealing viewpoint from the ones Cedreo suggests.
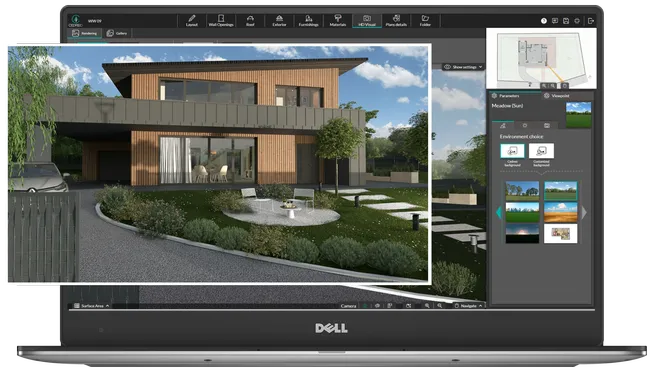
- Pick the outdoor environment (meadow, mountain, coast…) that shows through the room’s windows. Your background choice sets the interior lighting automatically.
- Generate your image in HD or Full HD definition.
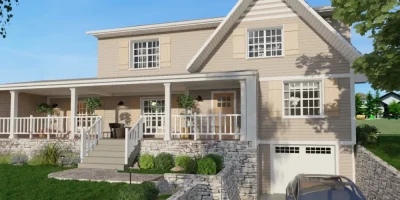
Create an Exterior Render
Pick the facade, and Cedreo does the rest.
Exterior automatic mode suggests the best viewpoints for every side of the building and sets up the lighting for you.
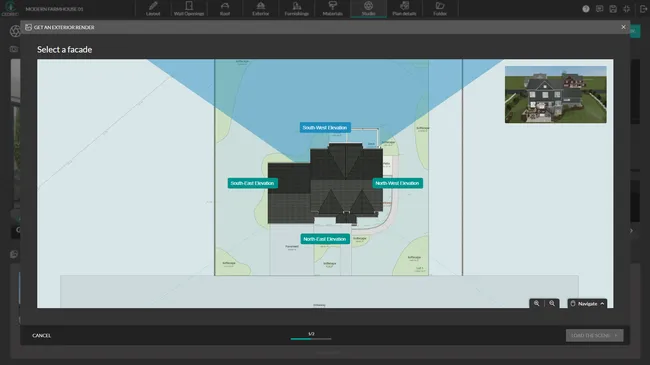
- Select one of the building’s 4 facades (North, South, East, or West), then pick from the suggested viewing angles. The 3D view updates in real time, so you see the result before you launch the render.
- Choose the outdoor environment (meadow, mountain, coast, small city…). The background you pick sets the time of day and the sunlight automatically.
- Generate your image in HD or Full HD.

The Cedreo advantage: You can go back to the furnishing step at any time to add, move, or remove a piece of furniture, a light fixture, or an exterior element. When you return to the Studio tab, every framing and environment setting is right where you left it. No lost time. No rework.
Manual Mode: Total Control for Experienced Users
Want to stay in control of every setting?
Manual mode gives you total control.
Set the camera, focal length, viewing angle, and sun position yourself for fully custom shots.

- Camera: Move the camera and adjust the focal length freely to frame your project at the height and angle that shows it off best.
- Visibility: Choose what to show or hide (all levels, infinite ground, terrain levels, roof)… handy for creating 3D floor plans.
- Environment: Select the background and adjust the lighting by hand, or import a photo of the actual lot to set the project in its real surroundings.
- Sun: Fine-tune the sun’s position with the longitude and latitude values to control the direction and intensity of the natural light.
Then export your visual in the resolution that fits your needs: Web, HD, or Full HD.
PRO TIP! Use automatic mode to go fast and manual mode to fine-tune. The two modes aren’t separate worlds. Start in automatic mode to grab the suggested viewpoints, then switch to manual mode to tweak a specific setting.
Step 5: Generate and Share 3D Renders
Whether you’re using Automatic or Manual mode, generating and sharing more renderings is fast and easy.
- Use HD format for quick previews you share by email or during a client meeting.
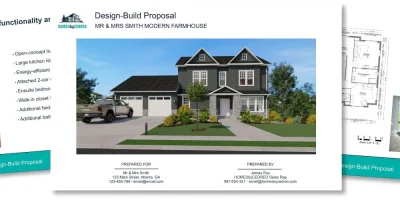
- Use Full HD format for brochures, sales documents, and design proposals.
The Cedreo advantage: Because Cedreo runs online, you don’t need a powerful computer to create high quality renders.
Once your images are ready, download them or add them to your presentation documents.
If you change the project, remember that the 3D model updates but the rendered image does not.You will need to generate a new realistic render so it reflects your latest design choices.
The Cedreo advantage: There’s no need to wait for one image to finish before starting the next. Launch up to 2 renders at the same time and keep designing while they process. Cedreo also saves your scene automatically, so there’s no risk of losing your settings.
Choose the Right 3D Rendering Software
The right rendering software helps you master a simple workflow from 2D plan to final image.
Cedreo combines easy tools, automatic 3D rendering, and professional quality visuals.
It is essentially an all in one design platform where you draw plans, add materials, and create 3D renders in one place.
You save time, present a clear vision of your ideas, and help clients make confident decisions faster.
Try Cedreo 3D home design software today for FREE!
FAQ
What is the best 3D rendering engine for professionals?
Use Cedreo’s automatic rendering mode: it frames the shot, sets the lighting, and generates the render for you.
Cedreo takes you from 2D plan to 3D model and HD render fast, so architects and designers can test more ideas with less effort.
How can you make a 3D model more realistic?
Focus on precise plans, good light, and materials with believable textures, surfaces, edges, and lines.
Cedreo’s library of furniture, lights, and finishes helps you build interior design scenes that feel like real life.
How can you get a 3D house render without spending too much time on it?
Use intuitive 3D rendering software that automates most of the process.
Cedreo takes you from 2D plan to 3D model and HD render fast, so architects and designers can test more ideas with less effort.
What types of 3D renders should you show clients to convince them?
Show a few key views that match client priorities, such as a main living area or terrace, with lighting conditions that enhance important details.
Add at least one night render to show mood lighting, soft shadows, and a more polished final result.
What is the easiest 3D rendering software?
The easiest 3D rendering software keeps the process simple so you can go from a basic model to a polished image without complex techniques.
Cedreo software lets architects and builders quickly blend light, textures, and objects to enhance their architectural visuals, even if they’re still learning the basics of home design software.