Ever get that last-minute call from a client who wants to add more outlets? Or how about dealing with switches that end up in the wrong place?
These costly frustrations often have one thing in common: a house electrical plan drawing that was poorly planned, presented, or understood.
To prevent these headaches, modern design tools help you create easy-to-read electrical plans that are immediately understood by everyone on the project.
In this guide, we’ll walk through the five essential steps to creating an accurate and effective electrical plan that gets you ahead of the challenges and keeps your projects running smoothly.
Key Takeaways
- Client needs assessment: The foundation of a good plan is a thorough interview with your clients about their daily habits. This helps identify specific needs upfront and prevents costly, late-stage changes on the job site.
- Adherence to the NEC: Every electrical plan must comply with the National Electrical Code (NEC), the U.S. standard for safety. This includes following codes for things like receptacle spacing and the proper use of GFCI and AFCI safety devices.
- Integrated electrical plan software: Using a tool like Cedreo that integrates architectural and electrical plans in one environment is essential to prevent critical errors.
- Clarity and legibility: A comprehensible plan with a limited number of symbols, clear color-coding, and detailed annotations is vital for fast client approval and accurate execution by your on-site teams.
Why trust us? Here at Cedreo, we’ve got 20+ years of experience working with housing pros in the home design space. We know what it takes for home builders, contractors, and designers to create accurate electrical plan drawings faster than ever!
See How You Can Create Complete Projects with Cedreo
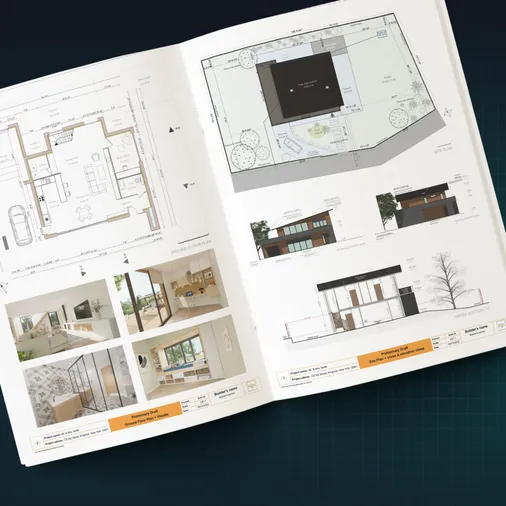
Plans – Get site plans, 2D floor plans, electrical plans, cross sections and elevation views — with all the technical details you need for a comprehensive project overview.
3D Visualizations – Use interior and exterior 3D renderings as well as 3D floor plans to help clients understand the finished project.
Documentation – Manage all your visual documents in one place, so it’s easier to present and sell your projects.
No credit card required, no commitment
Why Use Online Electrical Plan Drawing Software?
The main reason to produce your electrical plan online with modern cloud software is the massive amount of time you’ll save compared to traditional drawing methods. Unlike generic CAD programs, specialized electrical plan drawing software offers a faster, more accurate, and collaborative workflow from start to finish.
With software accessible from any web browser, you benefit from:
- An intuitive, job-specific interface: You get a clean interface that’s adapted to the needs of a residential construction business.
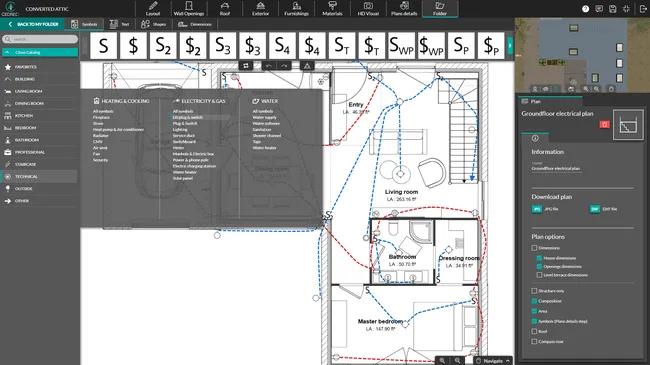
- Ready-to-use symbol libraries: Access a complete library of pre-made, standardized U.S. electrical symbols for receptacles, switches, lights, and more.
- Contextual visualization: See electrical equipment in the context of the floor plan. An advanced electrical plan maker like Cedreo lets you instantly visualize the layout in 3D to check for conflicts with furniture or fixtures.
- Easy sharing and collaboration: Plans are easy to share by email and are designed to be understood by all stakeholders, not just technical experts. A centralized workspace ensures every team member is working from the most current version.
How to Draw Electrical Plans in 5 Simple Steps
Whether you’re creating an electrical system layout for a home addition or a bathroom remodel, here are the 5 basic steps you’ll follow.
Step 1: Gather Client Needs for a Relevant Electrical Plan
In this business, electrical needs are often considered far too late in the design process. They get treated as a final touch rather than what they truly are: an integral part of the home’s daily function.
To avoid discovering at the last minute that your client expected USB outlets in every room, you need to ask targeted questions early.
Prompt your client to walk through their daily routines. Go beyond the basics and ask questions that reveal how they actually live:
- What does their current home lack from an electrical standpoint?
- Where does everyone charge their phones and laptops?
- What are their cooking habits, and have they already planned a kitchen layout?
- Does anyone work from home? (Make sure you have the necessary outlets for computer equipment. Consider USB outlets for easy device charging.)
- Do they have hobbies that need specific connections, like workshop tools or a high-end media center?
- Will they need a 240V circuit in the garage for a future Electric Vehicle?
This conversation helps uncover those implicit needs that clients often forget to mention until the last minute. Documenting these answers room-by-room gives you a clear roadmap for both the electrical layout drawing and the cost estimate.
Step 2: Ensure Compliance with the National Electrical Code (NEC)
Once you have the client’s wish list, your next step is the most critical: validating the plan against the National Electrical Code (NEC).
The NEC provides the official rules for residential electrical installations to ensure safety standards and the proper functioning of all electrical systems. Compliance with code requirements is enforced by the local Authority Having Jurisdiction (AHJ) or electrical inspector and is mandatory to pass inspection and get a Certificate of Occupancy.
While the full NEC is extensive, here are some key requirements that your base plan must meet:
- General receptacle spacing: In living spaces, the NEC has a “6-foot/12-foot rule.” This means no point along a wall can be more than 6 feet from a receptacle. Any wall space 24 inches or wider requires an outlet.
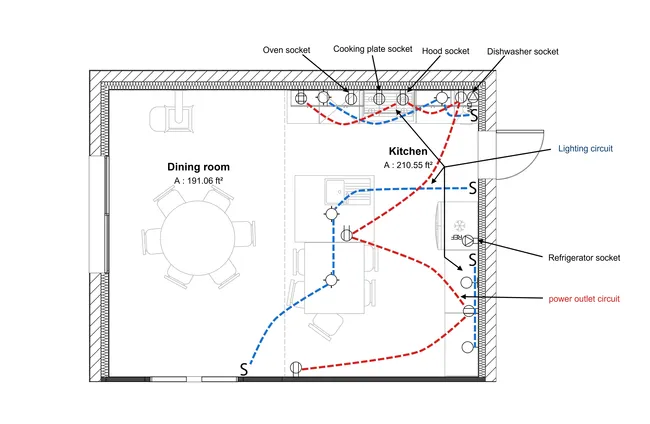
- Kitchen requirements: The kitchen has some of the strictest rules. The kitchen requires a minimum of two 20-amp circuits for all small appliance receptacles (blender, toaster oven, coffee maker) in the countertop and eating areas. For safety, nearly all receptacles in the kitchen must have GFCI protection.
- Bathroom requirements: Each bathroom must have at least one 20-amp circuit. This circuit can supply power to both receptacles and other equipment, such as lighting, as long as the circuit doesn’t feed anything beyond the same bathroom. All bathroom receptacles must have GFCI protection.
- AFCI protection: To prevent electrical fires, AFCI (Arc-Fault Circuit Interrupter) protection is now required on circuits supplying nearly all living areas, including bedrooms, living rooms, hallways, and kitchens.
PRO TIP Always start your electrical plan with a layout that meets all minimum NEC requirements. Then, work with the client to add or move equipment as needed. Never remove an outlet or a device if it’s required by code.
Step 3: Choose the Right Electrical Plan Software
It’s easy to waste loads of time and struggle with an electrical planning tool that isn’t meant for the job.
If you go with most generic drawing software, you’ll have to create your own symbols from scratch. On the other hand, highly technical engineering software is overly complex for most home builders. And trying to juggle separate programs for interior layouts and electrical plans is a recipe for inconsistencies and errors.
A platform like Cedreo is designed to avoid these problems by allowing you to create the entire project in one place. You can:
- Draw your 2D floor plans.
- Add electrical components and fixtures from a built-in library.
- Instantly visualize the layout and furniture placement to check clearances in 3D.
- Access projects and collaborate with your team from anywhere.
- See how ambient lighting, task lighting, and accent lighting will look with realistic visualizations.
Step 4: Choose and Place Electrical Symbols on the Floor Plan
The right software provides a library with the main types of electrical symbols ready to be placed on your plans.
To work efficiently, follow these best practices:
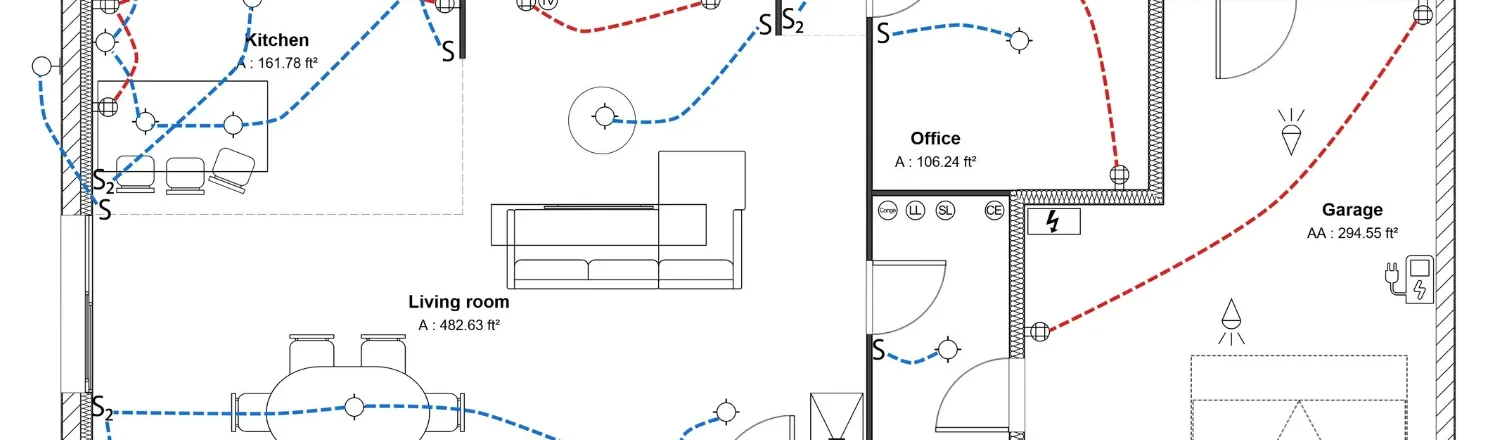
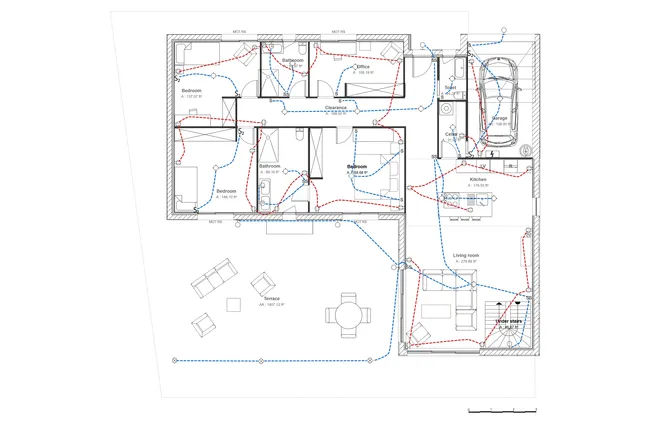
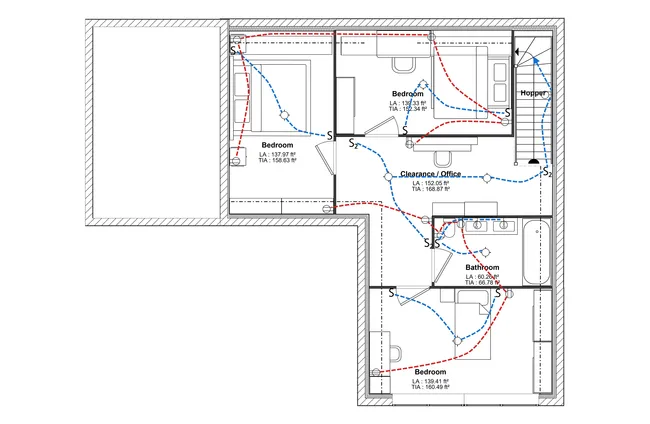
- Wiring paths: To show which switch controls which luminaire(s), use curved dashed lines to connect the switch symbol to the corresponding lighting fixtures. Do not draw lines for the entire circuit path back to the panel. Instead, use ‘homerun’ arrows annotated with the circuit number.
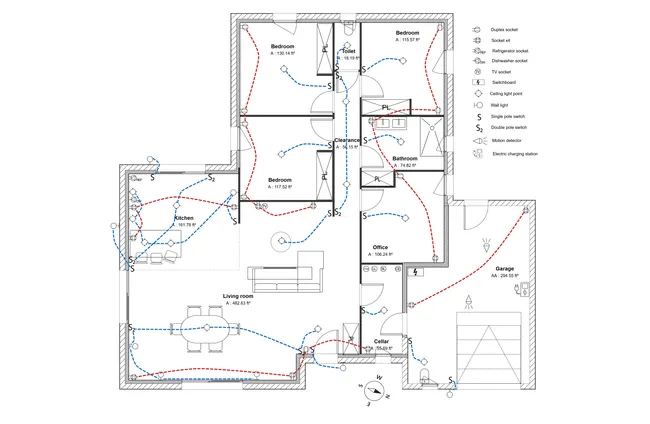
- Use standard symbols: Make sure your software uses symbols compliant with electrical symbols commonly used in the U.S., such as those from ANSI/IEEE. This ensures they are universally recognized by your clients, contractors, and inspectors. And always include a legend on your plans that clearly defines every symbol you use.
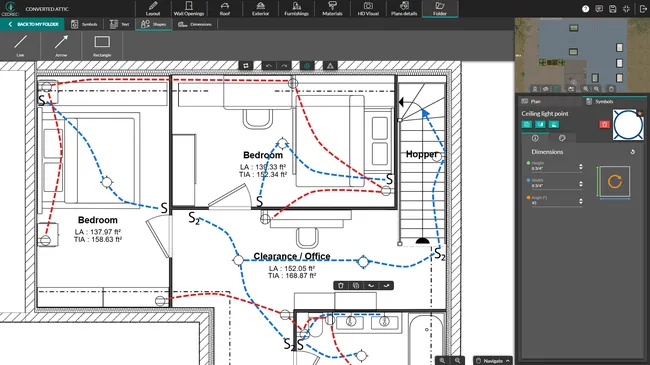
- Customize Your Workflow: Save the symbols you use most often as favorites to avoid searching the library every time. You can also adapt the size and color of symbols to match your company’s branding.
PRO TIP! Use the 3D rendering tool with furniture in place to spot layout issues before they become problems. This is an easy way to see if a light switch will be hidden behind an open door or if an outlet will be inaccessible behind a bed.
Step 5: Create a Legible Electrical Layout Drawing for Easier Client Approval
An electrical plan is only useful if it can be easily understood by your client for approvals and by your on-site team for installation. An overly technical or dense plan is hard to read for the untrained eye, which leads to a client who fails to approve it or asks for expensive changes down the road.
Make your plans easy to read by following these guidelines:
- Limit symbol variety: A clean plan with a limited number of distinct symbols is easier for everyone to understand.
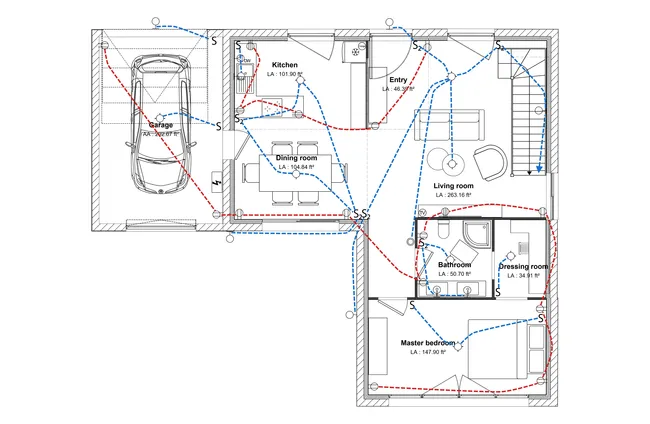
- Use a clear color code: Differentiate circuits (e.g., lighting, receptacles, specific appliances) with distinct colors to provide clarity at a glance.
- Create a detailed legend: The legend should clearly define all symbols used on the plan. You can also include references to chosen appliance models to avoid any misunderstandings on site.

- Annotate non-standard heights: Note any non-typical installation heights on the plan. While common field practice often places switches at 48 inches and receptacles at 16 inches from the floor to the top of the box, always verify if project specifications, local codes, or accessibility standards (e.g., ADA) require different heights.
- Note protective devices: On the electrical plan, it’s important to denote the type of protection required. Place the notation ‘GFCI’ next to any receptacles or circuit breakers requiring ground-fault protection. Similarly, note ‘AFCI’ or ‘DF’ (Dual-Function AFCI/GFCI) for any circuits requiring ground fault and arc-fault protection. This information should also be reflected in the panel schedule.
- General notes: Professional drawings always include a section for general notes. This is where the designer specifies the governing NEC edition, default mounting heights, conduit/wiring methods, and other instructions that apply to the entire project.
Draw Your Next Electrical Plan Online with Cedreo

Creating a professional house electrical plan drawing is faster and more accurate with the right tools. Cedreo is the all-in-one design software that helps you eliminate errors and speed up client approvals by keeping your entire design process (from floor plans to landscaping to electrical) in a single, easy-to-use platform.
With Cedreo, you can:
- Quickly draw 2D floor plans with a complete library of ready-to-use U.S. electrical symbols.
- Instantly visualize your electrical layout in 3D to check for conflicts with furniture or doors.
- Generate professional presentations with 2D plans and 3D renderings to get faster client approvals.
- Create a complete project design in as little as 2 hours.
Ready to create professional electrical plans in less time? Try Cedreo for free today!
Electrical Plan Drawing FAQs
Start by creating a basic floor plan and then mark the precise location for all electrical outlets, switches, lighting fixtures, and other electrical devices. Use a standard set of electrical symbols to represent each of these components accurately. Use a tool like Cedreo to do this in less than 2 hours.
The best electrical plan maker is user-friendly and robust enough to handle the complexities of a residential electrical installation. It should offer a comprehensive library of corresponding electrical symbols and a drag-and-drop interface to speed up your design process.
While closely related, a house wiring diagram and a comprehensive electrical plan are not the same. An electrical plan shows the physical placement of all electrical components on a building layout. A wiring diagram is a technical drawing that shows the actual electrical connections and circuits.
The best software for drawing electrical wiring layouts balances professional-grade features with ease of use. It should streamline the planning process by allowing you to create a floor plan, show the placement of outlets and other electrical components, generate 3D visualizations, and automatically update your drawings as you make changes.