Before building a house—you need a blueprint.
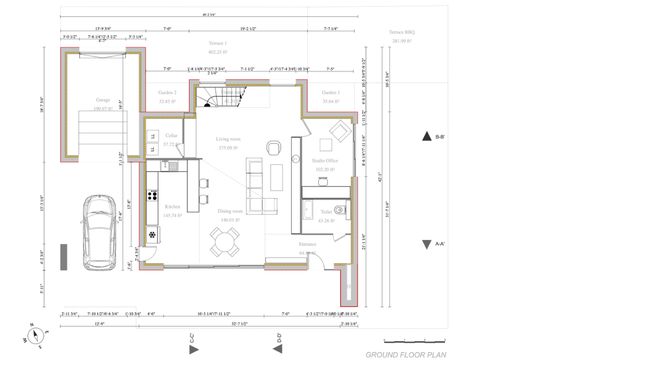
A blueprint is a highly detailed, scaled drawing of a house plan. It shows room dimensions and orientation, materials, furnishings, exterior structures, and other details not included on a basic floor plan.
The problem is that, historically, blueprint designs have become a bottleneck in the home building and remodeling process. Housing professionals often get bogged down and frustrated trying to navigate and learn needlessly complex software.
In this article, we’ll walk through an easier way for home builders and remodelers like you to draw accurate blueprints for prospective clients.
Why trust us? Here at Cedreo, we’ve got 20+ years of experience working with home design software. So we know what it takes for professional contractors, designers, and remodelers to streamline their design workflow and save valuable time and money.
3 Options for How to Make a Blueprint for a House
When it comes to drawing house blueprints, residential interior designers, home builders, contractors, and remodelers have three main options: outsourcing to an architect, using CAD software, or leveraging user-friendly tools like Cedreo. Each option has its advantages and drawbacks depending on your budget, time, and skill level.
Here’s an overview of each option.
1. Outsourcing to an Architect
Outsourcing your blueprint creation to a professional architect is a traditional approach. Architects have the expertise to produce detailed and precise blueprints, including technical drawings for complex building plans.
However, this option comes with significant drawbacks for small residential construction professionals:
- High cost: Hiring an architect can strain your budget, especially if you frequently need blueprints for multiple projects.
- Delays: Outsourcing means waiting for revisions, approvals, and updates, which can slow down your design process.
- Limited control: Relying on an external professional may reduce your ability to make on-the-fly changes for clients.
While architects are invaluable for large-scale or highly technical projects, this option may not be practical for fast-paced residential design workflows.
2. Drawing Blueprints with CAD Software
Computer-aided design (CAD) software offers powerful tools for creating professional blueprints and technical drawings. Popular among architects and engineers, CAD programs can produce highly detailed designs with precise dimensions and scale.
That said, CAD software has some key challenges for smaller firms and individual professionals:
- Steep learning curve: CAD programs are notoriously complex, requiring extensive training and practice to use effectively. For interior designers and contractors juggling multiple roles, learning CAD can be time-consuming.
- High cost: Many CAD solutions are subscription-based, with expensive licenses that may not align with tight budgets.
- Time-intensive: Even with experience, creating blueprints in CAD can take significant time, making it less efficient for projects with quick turnarounds.
CAD software is a solid choice for those who need to make a blueprint for a large commercial building, but it’s often overkill for when you need to design a house or remodel for residential projects.
3. Drawing Blueprints with Cedreo
Cedreo strikes the perfect balance between ease of use, affordability, and professional-quality results, making it ideal for home builders, remodelers, and interior designers.
Here’s why Cedreo is a game-changer:
- User-friendly tools: Cedreo’s drag-and-drop interface eliminates the steep learning curve associated with CAD software, allowing you to create floor plans and blueprints in minutes.
- Comprehensive features: Design entire house plans, including walls, doors, windows, furniture, and even landscaping. Cedreo also generates 2D floor plans and photorealistic 3D views simultaneously.
- Affordable: With budget-friendly pricing, Cedreo provides an accessible solution for professionals working with cost-conscious clients.
- Efficiency: Cedreo’s streamlined design process allows you to deliver polished blueprints faster, helping you win more business and impress your clients.
Using Cedreo, you can follow simple steps to draw your own house blueprints, such as creating walls, assigning room names, inserting windows and doors, and adding technical elements like electrical outlets. With tools tailored for residential construction professionals, Cedreo helps you bring your clients’ dream home to life without breaking the bank or getting bogged down by complexity.
Want to learn more about Cedreo’s blueprint creation process? Check out our step-by-step guide next.
How to Create Blueprints for a House – 17 Steps
Here we’ll show you step-by-step how to draw walls, add doors and windows, generate 3D renderings, and output professional presentations without needing a professional CAD background.
Step #1. Research city rules and regulations
Before drawing a home blueprint, it’s essential to understand what can (and can’t) be built according to a client’s city regulations.
Every city and locale has different rules on what type of house can be built, square footage, setbacks, maximum building height, and accessibility requirements. You can determine what regulations apply by visiting local government websites or code offices, which will explain what needs to be included in your client’s blueprint.
Step #2. Start house blueprint from scratch or import an image
Once you’ve taken care of regulatory red tape, it’s time to start drawing.
Cedreo makes it easy to begin your house blueprint, whether you’re starting with a blank slate, a rough sketch, or you’re building on an existing design.
- Importing a floor plan: Already have an initial layout? Cedreo allows you to import existing floor plans in formats like PNG, JPEG, PDF, DWG, or DXF. This feature is especially useful for remodelers or architects working with technical drawings that need to be updated or reimagined. Just import the existing plan and draw over it. Cedreo’s smart magnetism tools ensure what you draw perfectly matches the design you’re tracing.
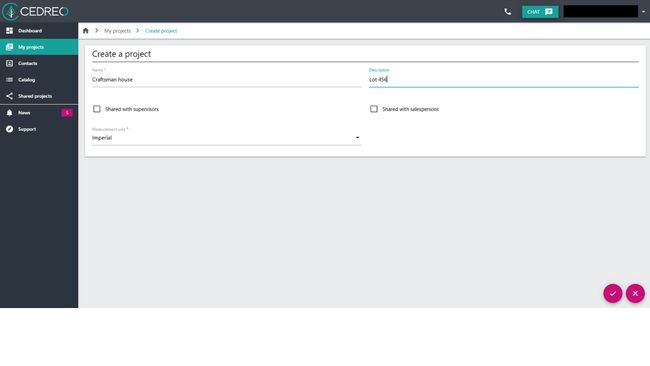
- Starting from scratch: Open Cedreo, select create a new project, and fill in the project information. This approach is perfect if you’re designing a custom home for a client or from the ground up.
Step #3. Draw walls
Walls are the backbone of any blueprint. Cedreo’s floor plan software lets you outline exterior walls and interior partitions with just a few clicks.
- Exterior walls: Start by creating the house’s outer walls. Adjust wall thicknesses to match construction standards.
- Interior walls: Add inner walls to create different rooms in the house. Cedreo allows you to resize or reposition walls with a single click, so you can refine the layout quickly.
- Hidden walls: Hidden walls are a unique feature that allows you to create separate zones within a larger room. This lets you divide open spaces to create specific areas with different flooring and labels such as entryways and dining areas. By separating these areas with hidden walls, they also get their own separate surface area calculations on the surface area table.
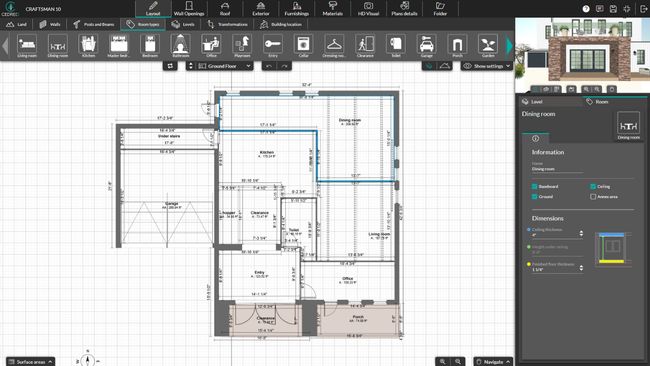
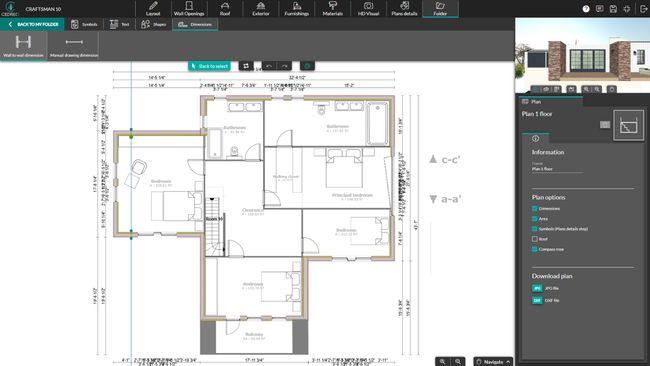
Here’s an example of a simple layout in Cedreo.
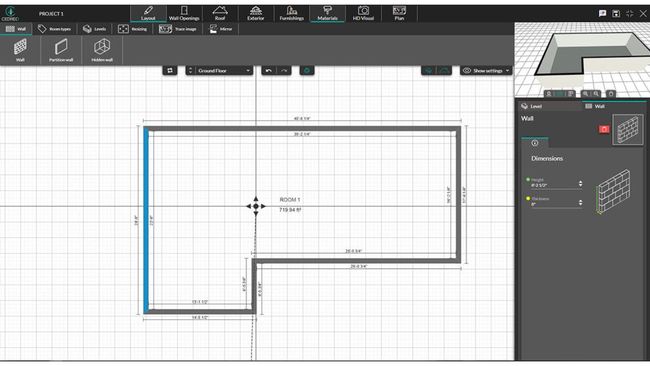
When adding the walls for a given room, Cedreo will automatically calculate the dimensions.
Step #4. Double-check measurements and resize as needed
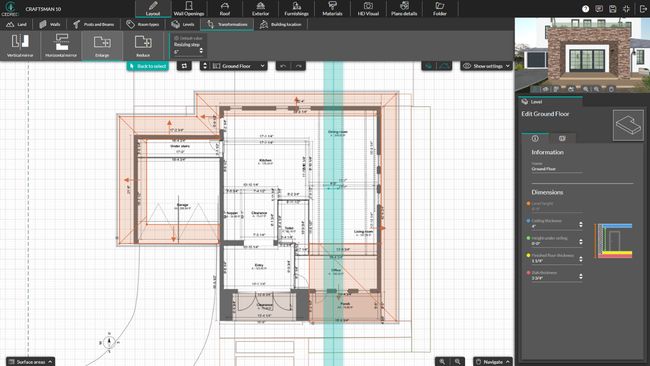
One of Cedreo’s time-saving tools is the One-Click Resizing feature, which allows you to adjust the entire layout’s dimensions. Whether your client requests a larger living area or a slightly smaller footprint, this tool ensures that resizing is quick and accurate.
- In the Layout section, select the Transformation tool.
- Select the Enlarge or Reduce option.
- Next, select a wall in the room you would like to enlarge or reduce and drag the handles to select the resizing dimension.
- Cedreo will automatically adjust the entire layout while maintaining proportions and relationships between walls and rooms.
- You can also click and drag individual walls to adjust their location.
This feature is especially helpful for remodelers and designers who often deal with evolving project requirements
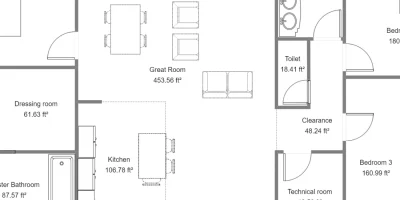
Step #5. Assign room types and names
To keep your blueprint organized and easy to read, use Cedreo’s Room Types tool under the Layout section to label each space and assign its function.
- Click on a room, and select the appropriate room type (e.g., kitchen, master bedroom, or bathroom) and drop it on the correct room.
- Use the text editing feature to add custom names, like “Guest Bedroom” or “Home Office.”
- Cedreo automatically displays room dimensions, helping clients understand the scale of each space in the design.
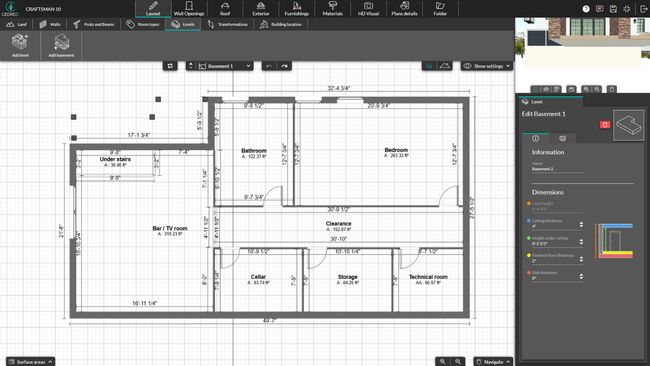
Step #6. Add levels or a basement
If the building has multiple levels or a basement—now is the time to add them.
This is where using software really beats drawing a blueprint by hand. You can duplicate the ground floor of a building, so the upper floor has the exact same measurements. Doing so makes it easier to know exactly where to add elements like staircases, doors, plumbing, and windows.
- Under the Layout section, choose the Levels tab
- Select either Add Level or Add Basement
- Then select the desired level from the dropdown menu and edit its layout
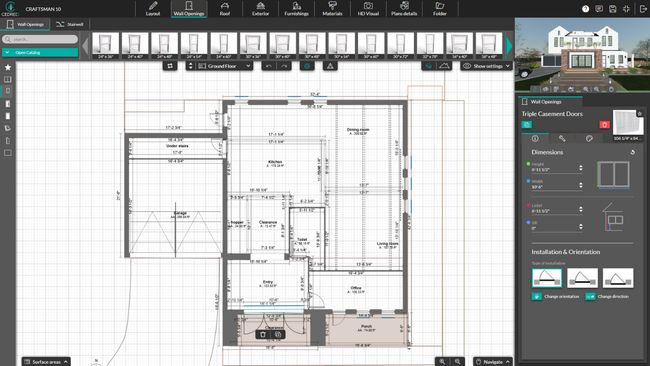
Step #7. Insert windows, doors, and wall openings
Once levels and internal walls have been added, the next step is to draw wall openings such as doors and windows. Cedreo’s drag-and-drop interface makes it easy to add windows, doors, and other openings to your walls.
Cedreo has a library of hundreds of window and door types to suit various openings in the house — from bi-fold doors to sliding glass doors to bay windows and more.
- Go to the Wall Openings section.
- Open the catalog of types of wall openings.
- Find the one you want. Then drag and drop it in place.
- Use the panel on the right to customize the opening as needed.
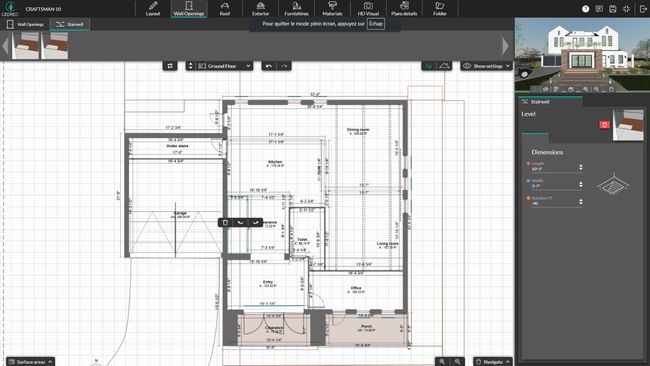
Step #8. Add stairwells, mezzanines, and lofts
If the client’s property is split over two or more levels, you’ll need to add stairs for access.
- From the Wall Openings section, select the Stairwell tab.
- Drag and drop the opening where needed. This creates an opening in the ceiling/floor.
- To make the opening larger in order to create a mezzanine or loft, adjust the dimensions in the side panel.
- To add a staircase, go to the Furnishings section, open the catalog and select Staircase to see available options.
- Drag and drop it where needed.
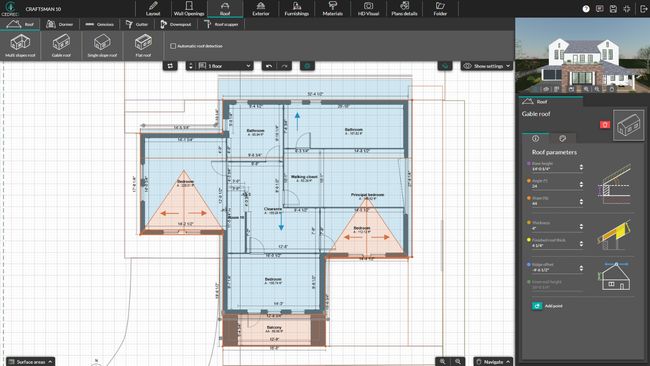
Step #9: Add the roof
A complete house blueprint includes a well-designed roof. Here’s how to draw one with Cedreo.
- Go to the Roof section.
- Select the top floor of the home.
- Select the Roof tab and then the type of roof — multi-slope, gable, single slope, or flat.
- Cedreo saves you time by automatically detecting the exterior walls and suggesting a customizable roof design.
- If needed, you can manually draw the edges of the roof around the exterior walls.
- Adjust the dimensions and slope in the side panel.
- In the Roof section, select options like dormers and gutters to add them as needed.
- Go to the catalog in the Wall Openings section to find and insert skylights.
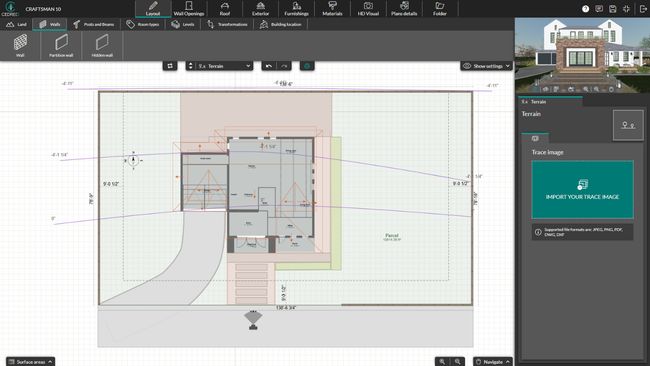
Step #10. Draw property lots
A great house blueprint includes an accurate representation of the property itself.
- Start under the Land tab in the Layout section. Use the drawing tools to define the shape and size of the lot.
- This step is essential for ensuring that your house design fits the space and aligns with zoning requirements.
- Here is also where you’ll use Cedreo’s terrain modeling tools to adjust the terrain elevations to match the property.
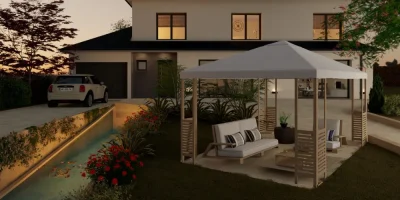
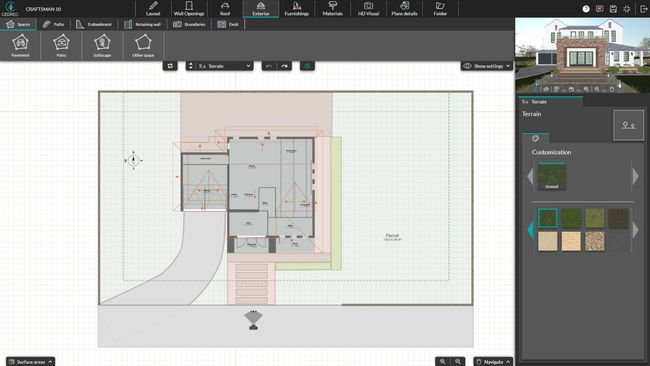
Step #11: Draw exterior elements
A complete house blueprint isn’t just about the interior floor plans. Cedreo’s exterior design tools allow you to incorporate outdoor features for a well-rounded design.
- Go to the Exterior section
- Choose one of the tabs — Spaces, Paths, Embankment, etc.
- Use the tools to draw driveways, walking paths, retaining walls, fences, and patios.
By including these exterior details, you’ll provide clients with a full visual of how the building integrates with its surroundings,
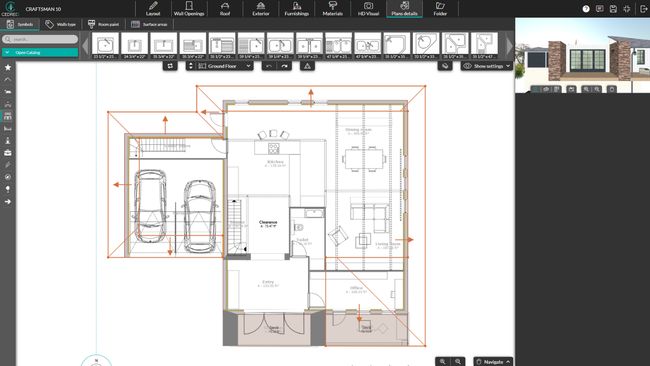
Step #12: Add blueprint symbols
Blueprint symbols are essential for making your designs easy to interpret, both for clients and builders. Cedreo’s blueprint software includes a wide range of symbols for technical elements and household features, so you can make a blueprint that is professional and attractive.
- Go to the Plan Details section.
- Select the Symbols tab.
- Open the catalog where you’ll find technical symbols (outlets, HVAC, plumbing) and other symbols (furniture, appliances)
- Drag and drop the symbols onto the floor plans
- Like all the other elements added so far, you can change the dimensions of every symbol using the control panel to the right of the sketch.
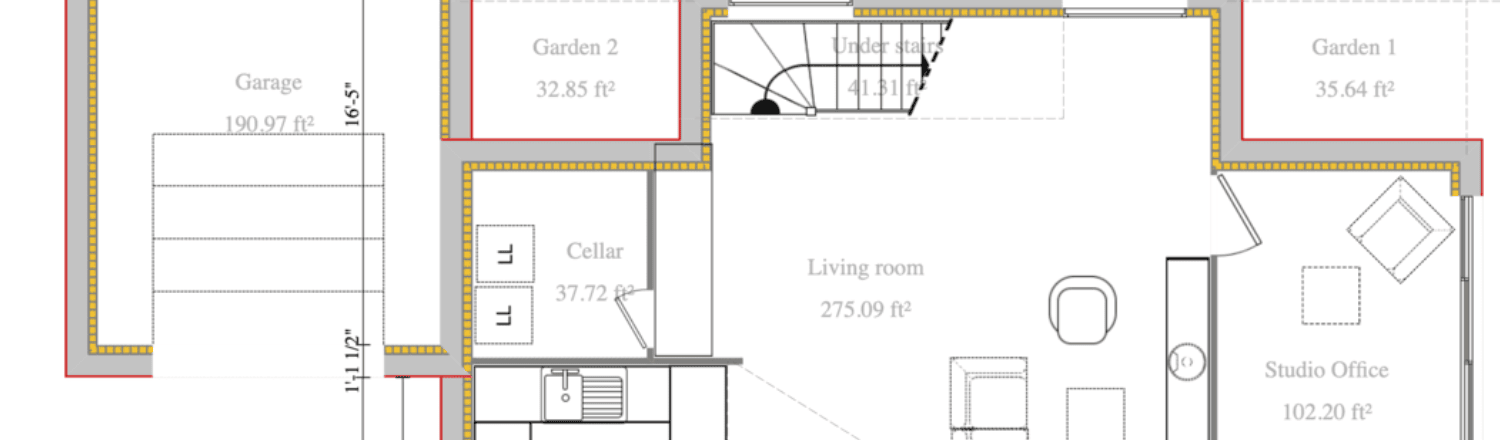
Step #13. Dimensions, Annotations, and Surface Areas
Another thing that can make a blueprint more useful is dimensions and notes. When creating your own blueprints, Cedreo has tools for marking up floor plans, adding building dimensions, and making notes to highlight other features. Plus, it automatically calculates surface areas for each room and glazed areas for the north, south, east, and west sides of the building.
- Go to the Folder section.
- Select one of the floor plans.
- Go to the Dimensions tab to add necessary building dimensions.
- Go to the Text tab to make notes and then to the Shapes tab to add arrows and lines as needed.
- Go to the Plan Details section, then the Surface Areas tab to access summaries of surface and glazed areas from the floor plan.
By including dimensions, notes, and surface areas, you provide all the technical information needed for construction while maintaining a polished, professional look.
Step #14. Furnish and decorate
Once the walls are up, roof is on, and stairs are in— it’s time to decorate.
Adding furnishings to rooms is one of the best ways to not only figure out how rooms will be decorated, but also determine how well certain appliances like refrigerators, washing machines, and stoves will fit into the space.
Instead of drawing them individually, you can use Cedreo’s 3D furnishing library to access more than 7,000 customizable pieces of 3D furniture, objects and surface coverings and then add them to each room.
- Go to the Furnishings tab.
- Open the catalog and search for the items you need.
- Drag and drop furniture. Then customize it in the side panel.
- Drag and drop textures and materials to walls, floors, and ceilings.
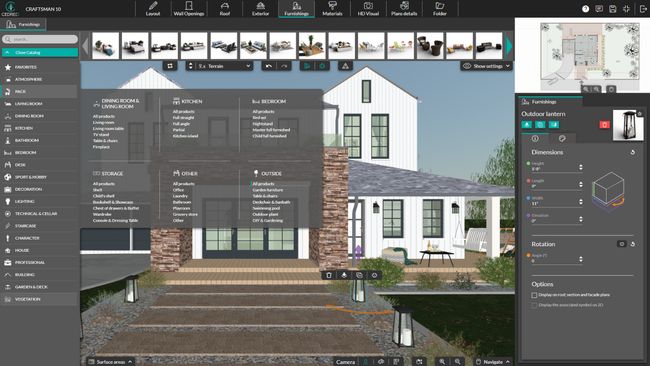
The entire catalog is searchable using keywords, and you can also use it to find other objects like textiles, decorative objects, and even indoor plants to make the blueprint as accurate as possible.
There is also an anti-collision feature that stops you from accidentally placing items on top of each other when adding them to the blueprint. If the client does want objects placed together (like a textile underneath a sofa), then simply disable the feature, and you’ll be able to move products freely through other elements and even walls.
Step #15. Download and print 2D blueprints
Once the design is complete, it’s time to create professional-grade blueprints for review or construction.
- Go to the Folder tab.
- Select the floor plan you would like to download.
- Download it as a Jpg or Dxf file.
- Select the scale, format and other print options.
- Then select download.

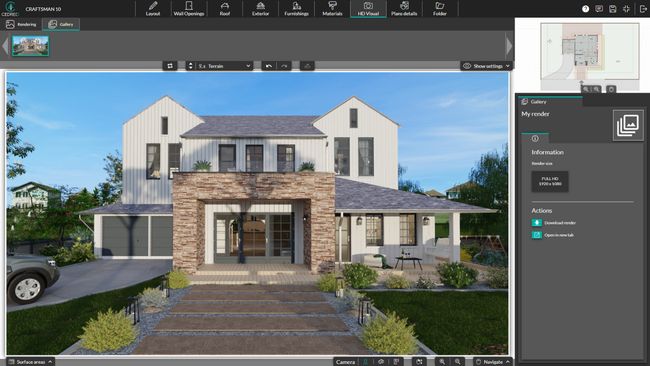
Step #16. Generate a 3D visualization
Bring your blueprint to life with Cedreo’s powerful 3D visualization tools. These visuals help clients better understand and connect with the design by showing how the completed home will look and feel.
- Go to the HD Visual section.
- Select the Rendering tab.
- Adjust your point of view and lighting options in the side tab.
- Click the Ask for a Rendering Button and in less than 5 minutes you’ll have a 3D photorealistic rendering .
- Once complete, the rendering will be accessible in the gallery, where it can be downloaded or opened in a new tab.
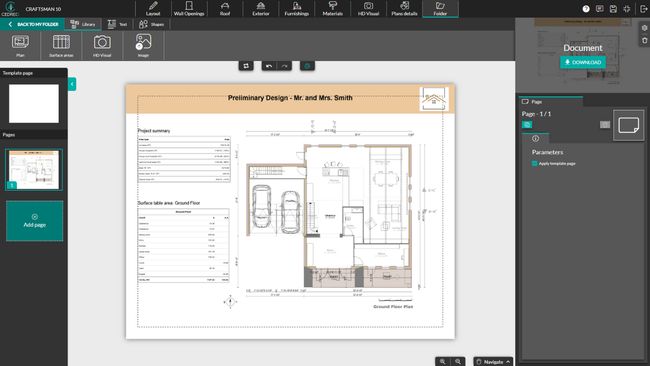
Step # 17. Create blueprint project presentations
The last step in creating your own blueprints with Cedreo is to combine your floor plans and 3D floor plans and realistic renderings to create a professional project presentation.
- Go to the Folder section.
- On the right-hand side, select Create a New Document.
- Choose from the Library, Text, or Shapes tabs to add renderings, floor plans, surface area tables, and other images.
- Here is where you can add your company’s logo and business information.
- Download the documents and print or send them to your clients.
You’ve Learned How to Draw House Blueprints – Give it a Try!
It has never been easier (or more affordable) to create a complete house blueprint from scratch, especially when you use software like Cedreo.
Use Cedreo as your blueprint maker and you’ll enjoy a host of easy-to-use features like these:
- 2D floor plan creation – Draw detailed floor plans with precise dimensions and customizable room layouts.
- 3D floor plans – Generate 3D floor plans of your designs fully-furnished.
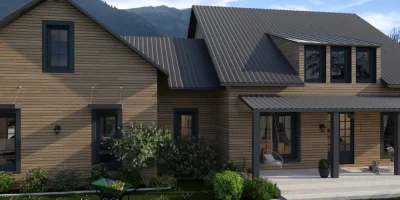
- Photorealistic 3D renderings – Create high-quality interior and exterior visualizations with realistic textures, materials, and lighting.
- Roof design – Add and customize roof styles like gable, hip, and flat, with adjustable pitch and overhangs.
- Technical and blueprint symbols – Add symbols for furniture, appliances, electrical outlets, plumbing fixtures, and stairs.
- Exterior design tools & terrain modeling – Draw property lots, and add landscaping features like patios, gardens, driveways, and fences, customize terrain elevations and contours to match real-world project conditions.
- Cross sections and elevations – Generate cross-section views and elevations to showcase structural and design details.
- One-click layout resizing – Quickly resize entire building plans while maintaining proportions.
- Multi-level design – Add basements, upper levels, and mezzanines with automatic alignment.
- Import floor plans – Upload existing floor plans in PNG, JPEG, PDF, DWG, or DXF formats for tracing or updates.
- Surface area tables – Generate and customize tables to display room-by-room area breakdowns.
- Project presentations – Export projects with 2D plans, 3D renderings, and annotations for client-ready presentations.
Stop paying expensive architect fees or dealing with complicated design programs. Use Cedreo as your blueprint maker and save loads of time and hassle.