Drawing your own house plans saves time and money, and hands you a set that sells the job. Here’s how to draw them, so nothing gets missed.
Drawing your own house plans saves time and money on every project.
But if you’ve never done it before, knowing where to start (and in what order) makes all the difference.
Maybe you’ve been outsourcing your plans for years.
Maybe you’re tired of waiting a week for a revision that should take ten minutes.
Or maybe you’ve got a house plan idea in your head and no fast way to get it on paper.
Either way, learning how to draw house plans in-house puts you back in control of your schedule, your budget, and the client meeting.
A clean set of plans is also one of the strongest sales tools you’ve got when you’re across the table from a buyer.
Better yet, the right software lets you create the whole set yourself and save money on every job.
This guide is for contractors, builders, and remodelers who want to draw their own plans.
Think of it as the roadmap: the order to draw each plan in, what each one has to do, and how to turn it into a set that wins the job.
Key Takeaways
- Start by drawing the floor plan. Every other house plan in the set is built from it.
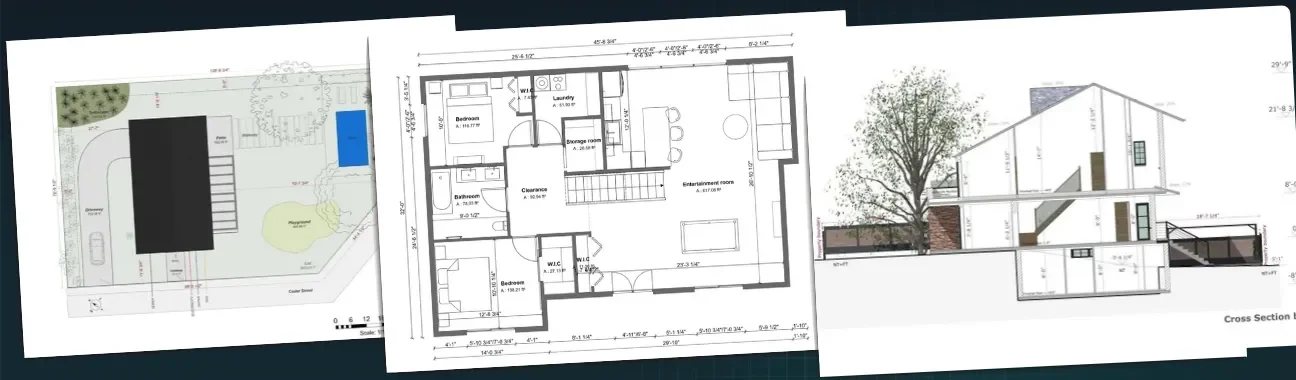
- A full set of house plans includes at least the floor plan, site plan, elevations and cross sections.
- 3D floor plans are a great way to add clarity and interest to your plans, and they help you stand out as a contractor.
- With Cedreo, one model generates all of these plans in sync (including the 3D version), so a change to the floor plan updates every related view automatically.
Why trust us? Here at Cedreo, we’ve got 20+ years of experience working with housing pros in the home design space. So we know what it takes for contractors and builders to create house plans that help them land more clients!
See How You Can Create Complete Projects with Cedreo
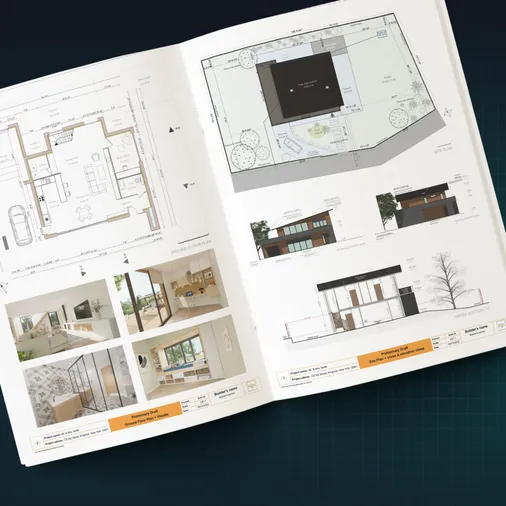
Plans – Get site plans, 2D floor plans, electrical plans, cross sections and elevation views — with all the technical details you need for a comprehensive project overview.
3D Visualizations – Use interior and exterior 3D renderings as well as 3D floor plans to help clients understand the finished project.
Documentation – Manage all your visual documents in one place, so it’s easier to present and sell your projects.
No credit card required, no commitment
What You Need Before You Start Drawing Your House Plans
Good plans start before you ever open the software.
A few minutes of prep saves hours of redrawing later.
Here’s the short list of what to have on hand in preparation for drawing your house plans:
- Lot dimensions and orientation: You’ll need these for the site plan, including which way the house faces and where the sun tracks across the lot.
- Existing measurements (for remodels): Record precise measurements for room sizes, ceiling heights, and door and window dimensions.
- Project scope: Know whether you’re drawing a new home, an addition, or an interior renovation. The scope decides which plans you actually need.
- How the family will use the space: A quick note on how the family lives day to day helps you lay out a floor plan that fits real life, not just square footage.
- Local constraints: Note any zoning setbacks or building code limits that affect the floor plan layout.
The goal here isn’t to plan the whole build.
It’s to arrive at Step 1 prepared, with the numbers you need to create a clean set within reach on your computer.
Not sure which drawings your project calls for? The types of house plans guide breaks down each one.
Step 1: Draw the Floor Plan
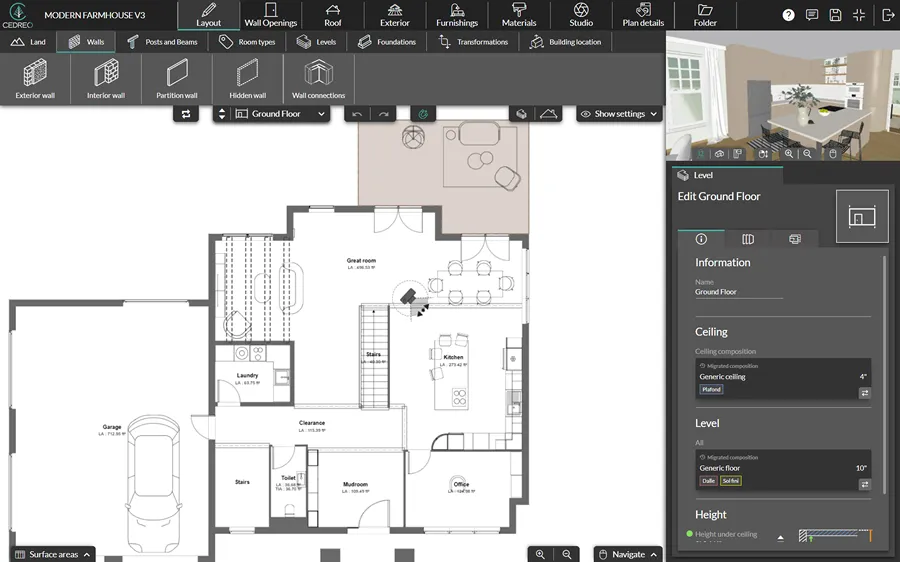
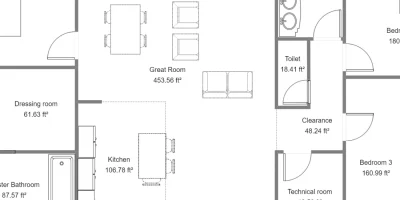
The 2D floor plan is the foundation of the entire set.
Every other drawing, from the elevations to the site plan, is built from it.
Get the house plan right here and the rest of the set falls into place.
Here’s the order most builders follow to draw a floor plan:
- Draw the exterior walls. Outline the footprint shape of the house first, setting wall thickness as you go.
- Add interior walls. Place partitions to define each room, then label the room sizes and types so it’s clear how each room connects to the next.
- Place doors and windows. Set the swing direction on doors and the sill height on windows, and pick from different window styles to match the design.
- Position the stairs. Locate stairs early on multi-story homes so the runs line up between floors.
Once the layout is roughed in, many builders drag furniture into the plan to check scale and flow.
Swapping furniture around takes seconds, and it shows a client how a house plan actually lives.
Good furniture placement also makes it obvious when a room is too tight before anyone signs off.
You can also drop in fixed installations like plumbing fixtures and built-in cabinets to confirm everything fits.
A clean, accurate, and detailed floor plan like this makes every step that follows faster.
Check out our full guide on how to draw a floor plan the easy way, in software like Cedreo.
Step 2: Create the Site Plan
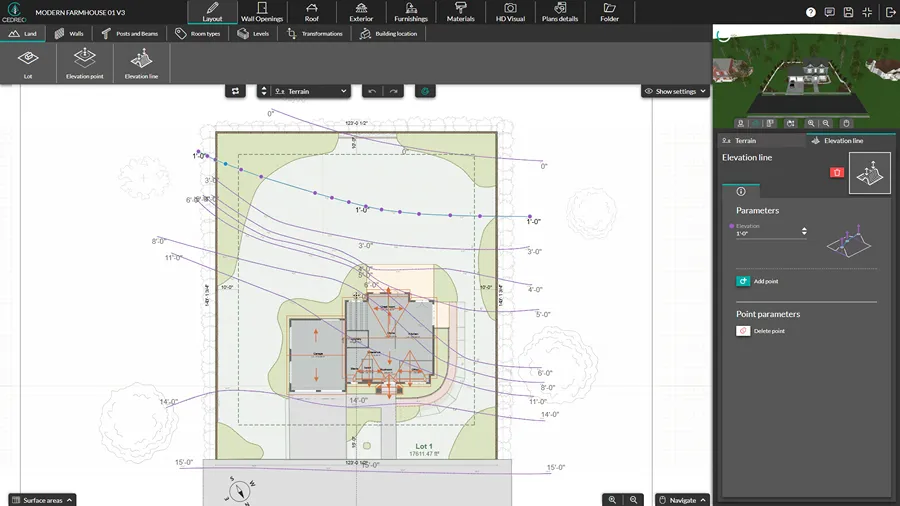
A site plan places your finished house on its lot, drawn to the same scale as the rest of the set.
Here’s how to draw a basic site plan:
- Draw the property boundary. Lay out the lot lines to scale from your survey, matching the shape of the parcel and labeling the length of each edge.
- Mark the setbacks. Measure in from each property line to show the buildable area, because the house has to sit inside it.
- Place the building footprint. Drop the outline of the house inside the setbacks, then dimension it to the nearest property lines.
- Add the site features. Draw the driveway, walkways, and any deck, patio, or other outdoor spaces, then add a north arrow so orientation is clear.
The real decisions here are which way the house faces and where the driveway meets the street.
Cedreo Advantage Cedreo builds the site plan from the same model as your floor plan, so there’s no redrawing the footprint by hand. Position the house, add the property lines and landscaping in just a few clicks, and the plan stays in sync with every change you make.
When you’re ready to draw one, our step-by-step on how to make a site plan walks through the mechanics start to finish.
Step 3: Draw the Roof
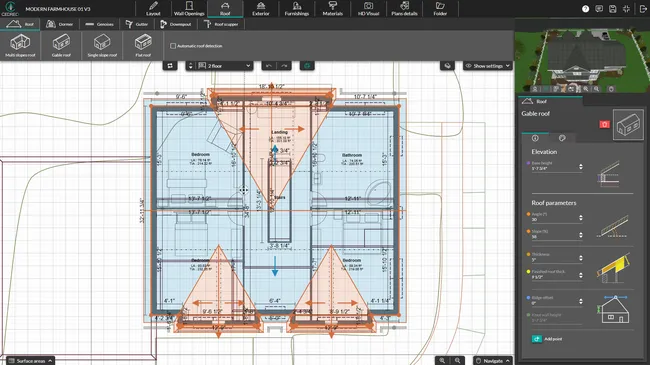
A roof turns your floor plan footprint into a three-dimensional house.
It also drives your elevations and 3D views, so it’s worth locking in before you draw those.
Here’s how to draw a basic roof:
- Pick the roof type. Choose the style that fits the design, like gable, hip, shed, or flat, based on the footprint and the look you’re after.
- Set the pitch. Dial in the slope, since a steeper pitch changes both the profile and the attic space underneath.
- Add the overhangs. Set how far the eaves extend past the walls to control shade and the roofline’s proportions.
- Work in the details. Add dormers, valleys, or a chimney.
On a simple rectangular house, the roof comes together fast.
The more corners and bump outs in your footprint, the more roof planes you’ll have to work out.
Step 4: Select the Materials and Finishes
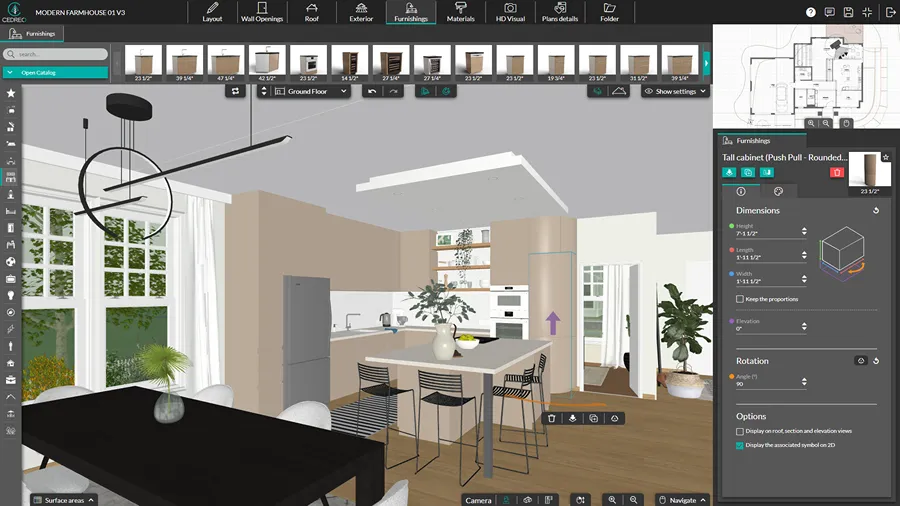
With the structure and roof in place, it’s time to decide how the house actually looks.
Materials are what turn a plain model into something a client can picture, inside and out.
Here’s how to choose materials for a basic set:
- Start with the exterior. Pick the siding, roofing, and trim materials and colors, since these carry your elevations and exterior renderings.
- Work through the interior surfaces. Set the flooring, wall, and ceiling finishes for each room.
- Keep a consistent palette. Repeat a handful of core materials and colors across the house so the design feels intentional, not scattered.
You don’t need every finish locked down at this stage.
Get the materials that show up on your elevations and client-facing 3D views right first, then refine the rest.
Step 5: Draw the Elevation Views
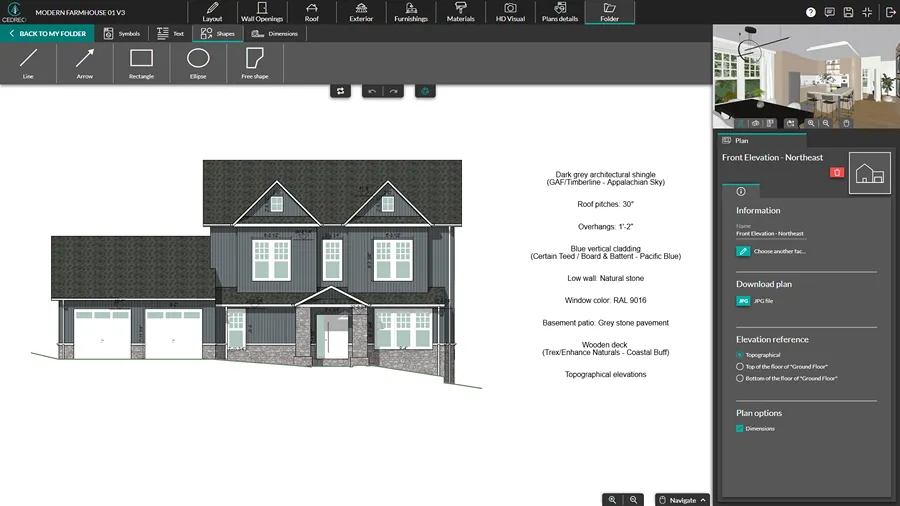
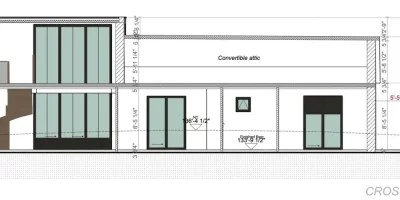
An elevation is a straight-on view of one exterior face of the house, drawn to scale.
A standard residential set has four: front, rear, left, and right.
Because you’ve already drawn the floor plan, added the roof, and picked your materials, software like Cedreo can generate elevations automatically.
But if you have to manually draw an elevation, here’s how..
- Line it up with the floor plan. Project straight up from the plan so every wall, window, and door lands in the right spot on the face of the elevation.
- Set the heights. Draw the ground line, then measure up for the finished floor, ceiling height, window sill and head heights, and the top of the wall.
- Draw the roofline with your chosen pitch and overhang.
- Show the materials and add dimensions. The siding, trim, and finishes you already chose appear on the face, so label them and add your overall height dimensions.
The Cedreo advantage Drawing elevations manually can be tedious. With Cedreo, it’s just 3 clicks. And if you make changes to the floor plan, the elevations and sections update automatically! See how it works in our guide on how to draw an elevation.
Step 6: Add Cross Sections
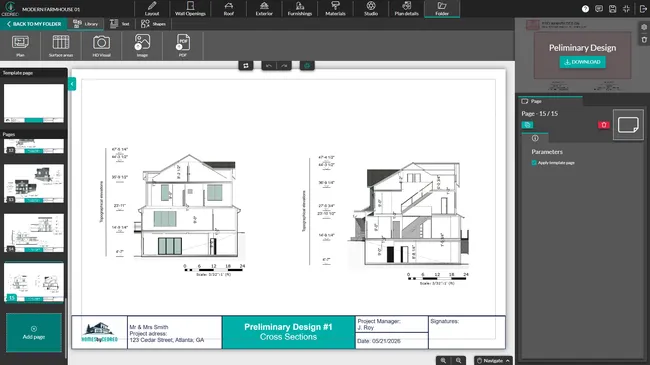
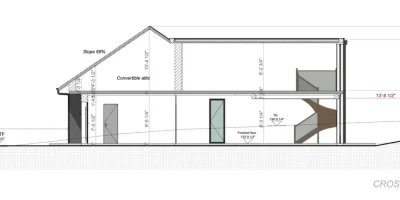
A cross section is a vertical cut through the house that shows the heights a floor plan and elevations can’t.
Picture slicing the home in half and looking at the face inside.
You draw sections similarly to elevations.
However if you’re using smart architectural software, a lot of the work is already done for you.
Since you’ve already built the model, the section is generated from it once you place the cut, so your real job is choosing where to cut and what to call out.
Here’s how to get a clean cross section:
- Choose where to cut. Run the cut line through the most telling part of the house, usually the stairs or a spot where the ceiling changes.
- Know what it needs to show. Ceiling heights, stair runs, and how the levels stack up are the whole reason a cross section exists.
- Let the model do the drawing. With the floor plan, levels, and roof already in place, the vertical view comes straight from them, so in most software, you’re placing and labeling it, not redrawing it by hand.
- Label the heights. Call out ceiling heights and headroom so the level-to-level relationships are clear.
Cross sections earn their keep on multi-story projects, where vertical space is hard to picture from a flat plan.
Here’s our walkthrough on cross section drawing and how to generate them in a few clicks with Cedreo.
Step 7: Add the Electrical Plan
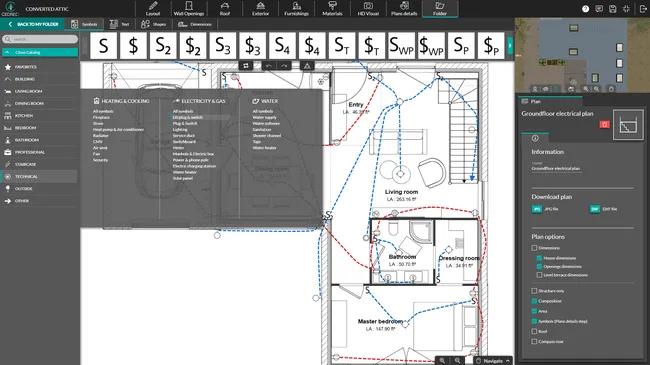
An electrical plan is your floor plan marked up with the electrical layout: the outlets, switches, and lights.
It works as a layout reference for you and a coordination tool for your electrical sub.
Here’s how to draw a basic electrical plan:
- Start from the floor plan. Work on a clean copy of the finished floor plan so the walls and rooms are already in place.
- Place the outlet symbols. Go through each room and mark receptacles along the walls to code spacing, plus dedicated ones for big appliances.
- Add switches and fixtures. Drop in the ceiling and wall light fixtures, then put a switch by the door of each room.
- Connect switches to fixtures. Draw a line from each switch to the light it controls so the electrician can read your intent.
Keep the level of detail appropriate to the design stage.
IMPORTANT: Keep in mind that electrical plans drawn with Cedreo are presentation and coordination drawings, not licensed or stamped documents for permit submission.
For more details, check out our guide on house electrical plan drawing.
Step 8: Assemble and Export the Full Set of House Plans
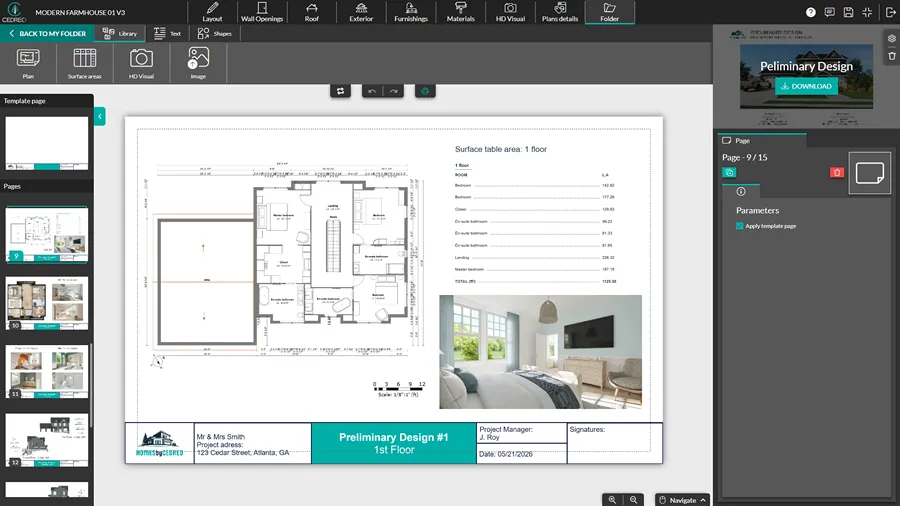
A complete set of house plans is delivered as a single, organized PDF.
This is where every drawing you’ve made comes together into one professional document.
Here’s what a clean set includes:
- Each drawing type on its own sheet
- A consistent title block on every page
- Scale notation and a north arrow
- Sequential sheet numbering
- Additional notes and callouts for clarity
Once it’s assembled, you can export it in a few formats depending on who it’s going to:
- PDF: The standard for a full, print-ready set.
- Image (JPG): A single-image export of one plan, ideal for a proposal, a website, or a text to a client.
- DXF: A CAD vector file. Reach for it when someone downstream needs to open or edit the drawing in CAD software, like handing a plan off to an engineer or a draftsperson for further detailing.
Pay attention to print scales and paper sizes.
- Paper size: Choose from common architectural sizes: ARCH A (9×12), ARCH B (12×18), and ARCH C (18×24), with full sets usually on ARCH C.
- Print scale: Floor plans and elevations run at 1/4″ = 1’0″, while site plans use a smaller scale (like 1/8″ = 1’0″) so the whole lot fits.
- Resolution: For image exports, choose 300 dpi for print or 150 dpi for on-screen and email.
A well-assembled set is what turns a stack of drawings into something you can print, hand to a client, and present with confidence.
Cedreo advantage: Assembling a set by hand in a document editor is tedious and easy to get wrong. Cedreo pulls every drawing into one place and exports the whole set as a print-ready PDF, a shareable image, or a DXF for CAD, at the size, scale, and resolution you choose.
If you don’t have an account yet, you can create a free one now and export your first set today.
Tips for a Professional Result
A few habits separate plans that look professional from plans that look improvised.
These are the small things the professionals we work with do on every set, no matter which software they draw in:
- Keep scale consistent: Use the same scale across the full set so dimensions read the same way on every sheet.
- Use a title block on every sheet: Include the project name, drawing type, scale, date, and your company name.
- Dimension every drawing: Don’t stop at the floor plan. Elevations and sections need precise measurements too.
- Label materials directly: Call out materials on elevations and sections instead of relying on the reader to guess.
- Run a final review before you print: Confirm every drawing reflects the latest version of the floor plan.
None of these take much effort.
But skip them, and a smart design can still read as sloppy on paper in front of a client.
How to Draw House Plans with Cedreo
You’ve seen the steps to drawing a house floor plan.
Here’s where each one actually happens inside Cedreo, tab by tab.
Layout tab: Build the structure and the lot
- Import an existing blueprint (PDF, image, or DWG/DXF) to trace over
- Draw exterior walls, then partition walls to divide up the rooms
- Add upper stories or a basement with the Levels tool
- Set wall thickness and ceiling heights, and place your stairs
- Handle the lot layout and terrain modeling with the Land tool
Wall Openings tab: Add doors and windows
- Drop in doors, windows, sliding doors, and garage doors from the wall opening library
- Set each opening’s size, sill height, and swing direction in the side pane
- Add skylights and stairwell openings where you need them
Roof tab: Design the roof
- Auto-generate a gable, hip, shed, or flat roof from the footprint
- Fine-tune the pitch and overhang, then add dormers
Exterior tab: Lay out key areas around the site
- Add driveways, walkways, patios, and decks
- These are the site features that show up on your site plan
Furnishings tab: Furnish the rooms
- Drag furniture, fixtures, and decor from the 3D library into each room
- Resize, recolor, and rotate pieces to fit the space
- Use it to show a client how the finished rooms will feel
Materials tab: Apply the finishes
- Apply flooring, wall, and ceiling materials from the library
- Create custom structural shapes, like columns, with the Shape tool
Studio tab: Generate photorealistic 3D views
- Use Auto Mode to let Cedreo choose the best viewpoint for you, based on the room type
- Or you use Manual Mode to set your camera angles, day or night lighting, and sun orientation to sell the design
Plan Details tab: Add the 2D details
- Drop in 2D symbols for built-in fixtures like cabinets, appliances, and plumbing
- Define wall types and fine-tune surface area tables.
Folder tab: Assemble the house plans
- Generate the floor plan, site plan, elevations, cross sections, and roof plan
- Add dimensions, a title block, and notes to every sheet
- Generate multiple floor plans and add different levels of detail depending on the intended recipient
- Combine it all into a branded presentation document and export a print-ready PDF
Prefer to watch first? This Cedreo’s video walks through the workflow from start to finish:
Cedreo is the practical alternative to outsourcing your plans or juggling separate tools that don’t talk to each other.
It runs as a web app in your browser on any computer, so you can start a plan at the office and finish it on a site visit.
The contractors we work with love getting a client-ready set out the door fast.
Thousands of housing professionals already use Cedreo to draw better house plans and land more clients.
Sign up for a free Cedreo account today!
How to Draw House Plans FAQs
Can I draw house plans without an architect?
Yes, builders and contractors draw their own house plans for design and presentation without an architect by using software like Cedreo.
Cedreo makes it easy for builders and contractors to draw their own house plans even if they don’t have any CAD or drafting experience.
What home design software can I use to draw house plans?
Home design software like Cedreo lets you draw a full set of house plans from a single project, right in your web browser.
It’s built for housing professionals who want professional results without learning complex CAD tools.
How long does it take to draw a complete set of house plans?
If you use design software like Cedreo, it only takes about 2 hours to draw a complete set of house plans.
Cedreo makes the house drawing process faster thanks to an intuitive workflow and smart automations.
Do I need all drawing types for every project?
No, you don’t need all drawing types for every project since the drawings you need depend on the project scope.
A new build usually needs the full set, while a remodel or interior project may only need a floor plan and the affected elevations.
What scale should I use when drawing house plans?
For most residential floor plans, 1/4″ = 1’0″ is the standard scale and fits most homes on a single sheet.
Keep the same scale for all floor plans across the set so every sheet reads consistently.