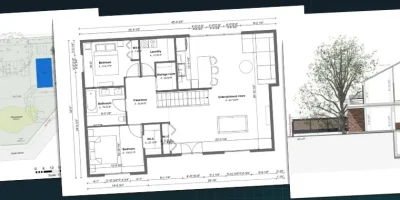
Skip the CAD headaches. Here’s how to draw cross sections the easy way so you can win client buy-in faster.
A cross section drawing helps you tell the full story of your project.
It shows your project sliced open, top to bottom, and every contractor and builder runs into the need for one eventually.
Think of the client who can’t picture how a split-level sits on a sloped lot, the plan reviewer who wants to see ridge height, or the sub squinting to find a floor-to-floor dimension.
Get the cross section wrong and you’re back to square one: confused clients, stalled approvals, and costly redraws.
Get it right and everyone reads the same project the same way.
This guide walks you through how to draw a cross section of a house in 7 clear steps, with no drafting degree required.
Key Takeaways
- A cross section drawing is a vertical cut through a house that reveals structural elements, floor heights, roof pitch, and how the build meets the ground.
- The most useful cross section drawings put existing grade next to finished grade, so everyone sees the project’s real impact on the site.
- You can draw cross sections yourself with a simple 7-step method: draw the plan, model the roof, set the terrain, cut the section, adjust the view, annotate, and export.
- With Cedreo, you draw the house once in 2D and 3D, then generate clean cross sections (plus floor plans, site plans, and elevations) from the same model in minutes.
Why trust us? Here at Cedreo, we’ve got 20+ years of experience working with housing pros in the home design space. So we know what it takes for contractors and builders to create cross section drawings and other plans that help them land more clients!
See How You Can Create Complete Projects with Cedreo
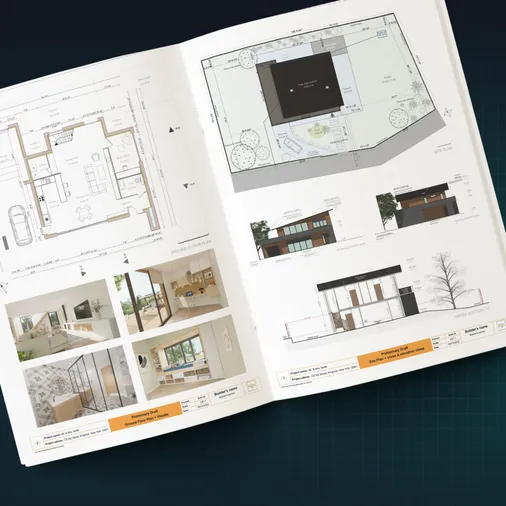
Plans – Get site plans, 2D floor plans, electrical plans, cross sections and elevation views — with all the technical details you need for a comprehensive project overview.
3D Visualizations – Use interior and exterior 3D renderings as well as 3D floor plans to help clients understand the finished project.
Documentation – Manage all your visual documents in one place, so it’s easier to present and sell your projects.
No credit card required, no commitment
Cross Section Drawing: Definition and Purpose
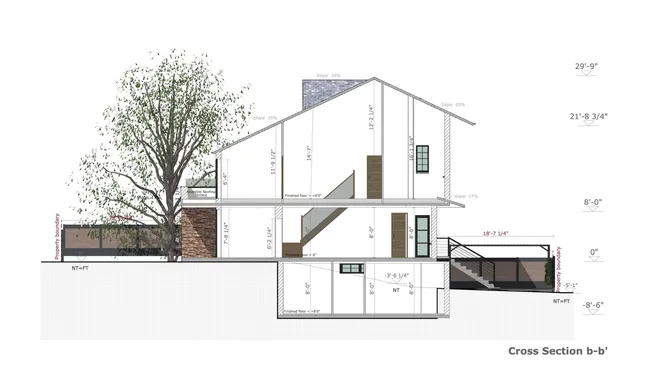
A cross section drawing is a scaled, vertical slice through a house that shows what you’d see if you cut straight down through the building and faced the cut.
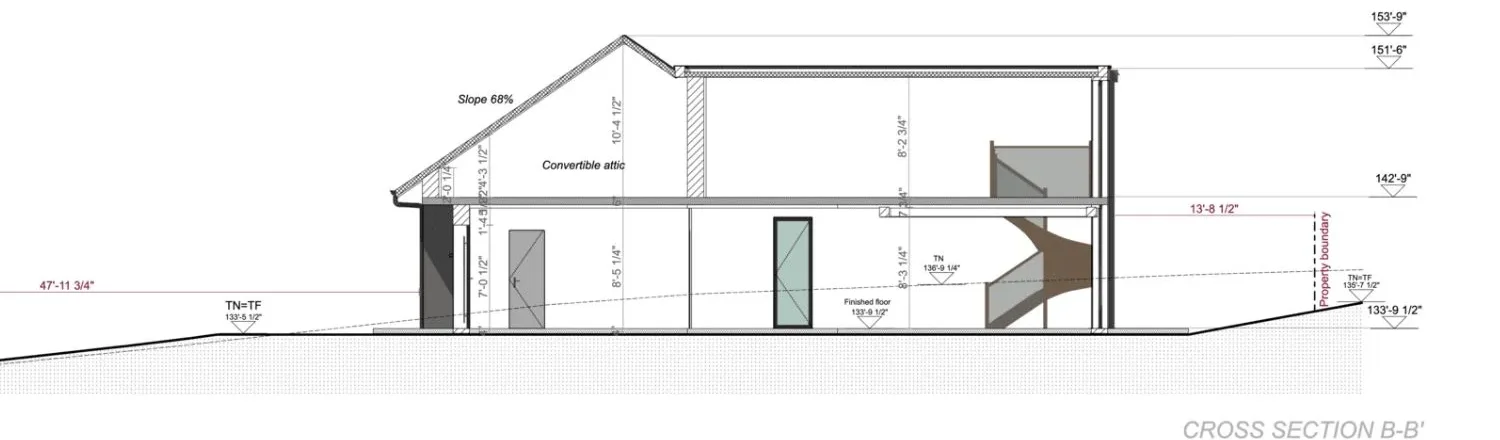
That means on one drawing you can see the wall assemblies, floor and ceiling heights, roof pitch, stairs, and where the build meets grade.
Unlike a floor plan (seen from above) or an elevation (the outside face), the cross section shows the vertical relationships inside.
That’s why it turns up in most house construction drawings and is commonly required as part of a permit set.
For contractors and builders, a clear cross section does three jobs:
- It helps clients picture the design
- Makes it easy for plan reviewers to see the heights and grade
- Gives your crew and subs key vertical dimensions.
For the full definition and info on different types of sections, see our complete guide to the house cross section.
What a Cross Section Drawing Needs to Include
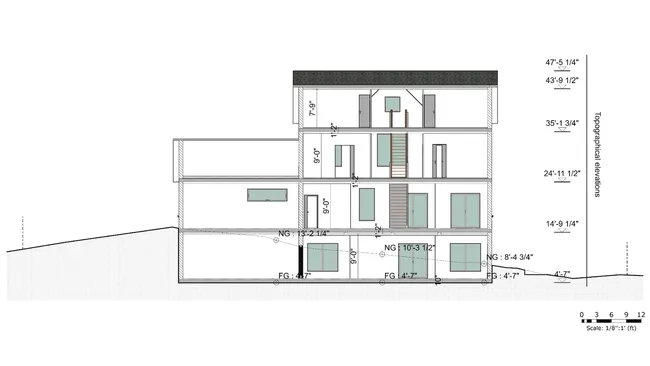
Here’s what belongs on a cross section drawing:
- Proposed finished grade
- Floor-to-floor heights and finished floor elevations
- Roof pitch and ridge height
- Structural elements: the walls, floors, beams, and posts the cut passes through
- A size scale (typically 1/4″ = 1′ or 1/2″ = 1′)
- A section label (A-A’, B-B’) tied to its location on the site plan
- Material callouts and special conditions, like a retaining wall or a sloped lot
- Other key dimensions and annotations for clarity
Leave one out and you’ll usually get a request for more information.
Together, these cover the heights, interior details, and exterior construction details a plain floor plan leaves out.
How to Draw a Cross Section of a House in 7 Steps
Ready to draw cross sections without wrestling with CAD?
Here’s how to use Cedreo to go from a blank slate to a finished cross section.
Step 1: Draw the Floor Plan and Set Heights
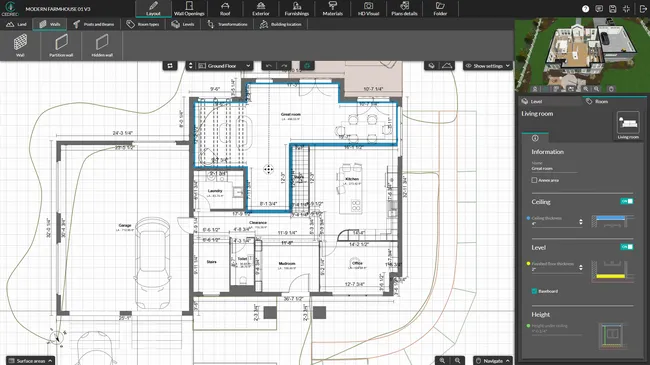
Start with the bones: draw the walls for every level and lock in the dimensions.
The cross section can only be as accurate as the model behind it.
Creating an accurate section really starts here, with an accurate model.
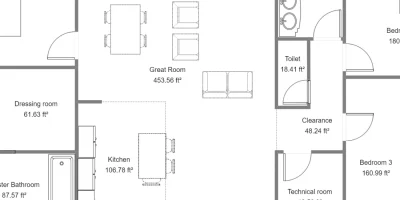
- Draw the outer shell with the exterior wall tool, then use the partition wall tool for interior walls.
- Use the levels tool (add level / add basement) to stack upper floors and basements. Exterior walls copy up automatically, with the option to bring interior walls along too.
- Set ceiling heights, slab thickness, and finished floor heights so the vertical dimensions read correctly once you cut the section.
- Add stairs between floors so the section shows how you move up through the house.
As you draw, the in-app 3D view builds in real time, so you can spot things that look off before you ever generate a render.
Step 2: Draw the Roof
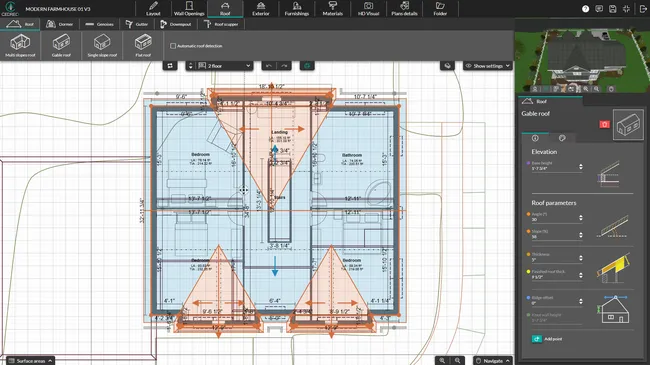
Draw the roof next, because it sets your ridge height and the whole top half of the cross section.
- Select the style of roof you want (gable, hip, shed, flat, and more)
- Let Cedreo automatically select the house outline and generate the roof.
- Set the pitch and overhangs in the side pane.
Step 3: Model the Site and Terrain
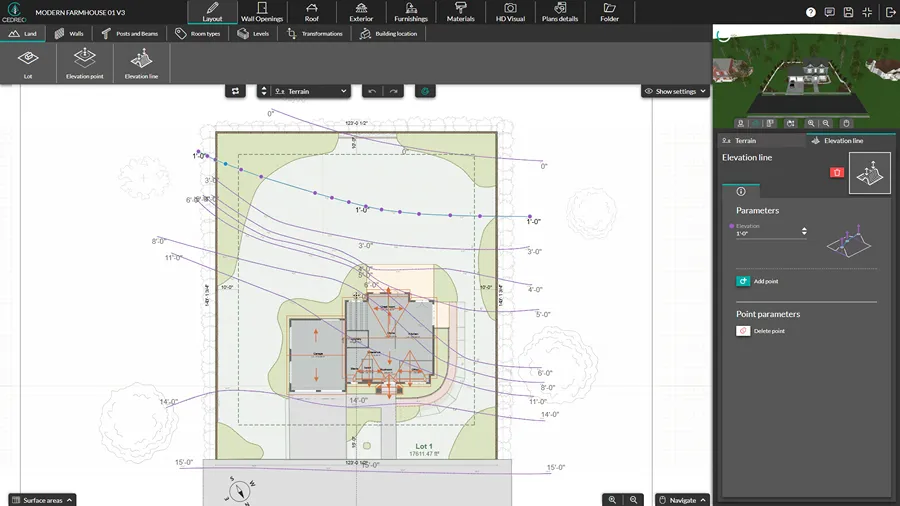
Grade is where a cross section earns its keep, so define the proposed grade next.
- Use the terrain modeling tools to shape the existing ground, then set the proposed finished grade.
- You can import a survey or site plan (DWG/DXF) as a background layer to trace over.
- Draw the property boundaries so the section shows the building in its real setting.
Cedreo advantage Sloped lots are exactly where a cross section carries the most weight, and Cedreo lets you model the proposed grade so the drawing shows the true impact on the terrain.
Step 4: Generate the House Cross Sections
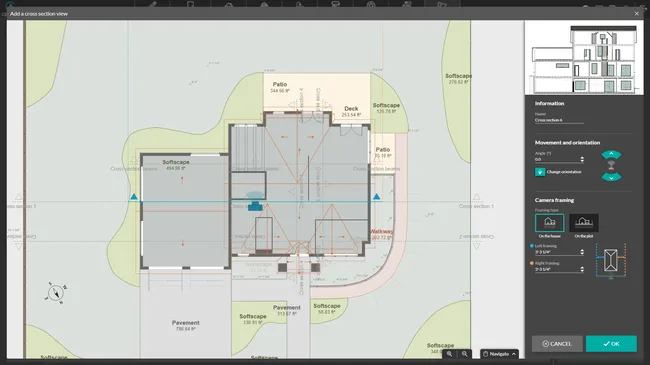
Here’s the payoff: in Cedreo the cross section generates itself once you place the cut line.
No hand-drafting the section face line by line.
Here’s how.
- Position the cross-section line and set its orientation to place your cut plane. This is your cross section line.
- Configure the framing to show just the house or the house plus surrounding terrain.
Best practice: run the cut through the highest point of the project, and through the most complex part (think stairs or a vaulted ceiling), so the view captures maximum height.
Creating the view takes one click once the camera is set.
Cedreo renders the resulting figure automatically, with grade lines, floor heights, and roof geometry all in place.
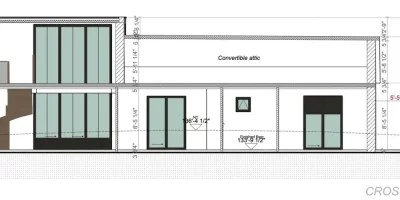
Any windows or doors that land on the cut show as a resulting opening in the cut face
Cedreo advantage Because the section is generated from the same 3D model as your floor plans and elevations, every drawing stays consistent automatically. Change a wall height once and the section updates with it, so there’s nothing to reconcile by hand.
Step 5: Adjust the Cross Section View
Fine-tune the framing so the drawing reads clean and answers the question at hand.
- Crop to show the building only, or pull back to include the full lot with its boundaries.
- Add more cuts (labeled B-B’, C-C’, etc.) when a project is complex or sits on a steep slope, so several cross sections together tell the full story.
- Flip or angle the cut plane to capture a tricky part of the design from the best direction.
On a big remodel, creating several cross sectional views is a great way to provide a clear overview of the project.
Step 6: Annotate the Cross Section
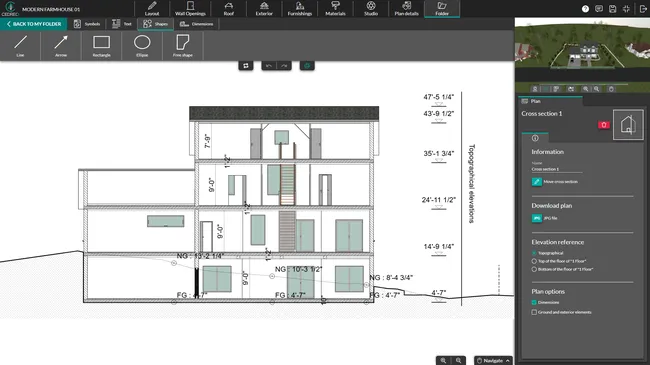
Annotations turn a picture into a document with the right details for the right people.
- Use the text and shapes tools to call out materials, retaining-wall notes, and special conditions.
- Add arrows to point from a note to the exact spot, and use arrows or boxes to highlight a specific assembly.
- Label each callout so trades can identify it fast.
- Add dimensions for heights, grade elevations, floor levels, etc.
Think of dimensions and annotations as instructions on the drawing: the clearer the instructions, the fewer questions later.
Just be careful not to overload the drawing.
PRO TIP Create multiple section drawings for different people, each with a different level of detail. For example:
- For your client, create a section drawing with minimal dimensions and annotations related to finishes.
- For your crew or subs, create another cross section with more manual dimensions and callouts on how it is constructed.
Step 7: Export Your Cross Section
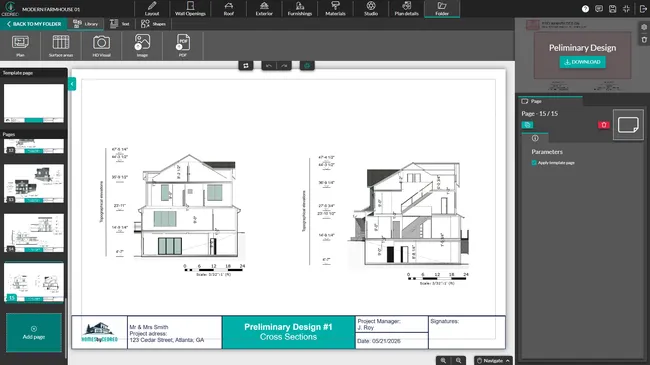
Export in the format you need and the job’s done.
- Choose your layout, scale, and orientation.
- Pick the quality: digital for emailing clients (72 dpi) or high-resolution output (300dpi) and export in JPG..
- Or drop it onto a page in a branded presentation document with your logo and colors, alongside the site plan, floor plans, elevations, and 3D images.
These few steps replace hours of hand-drafting.
Since the whole set comes from one model, you save time and skip the redraw-and-reconcile dance most tools force on you.
Tips for Drawing a Clean Cross Section
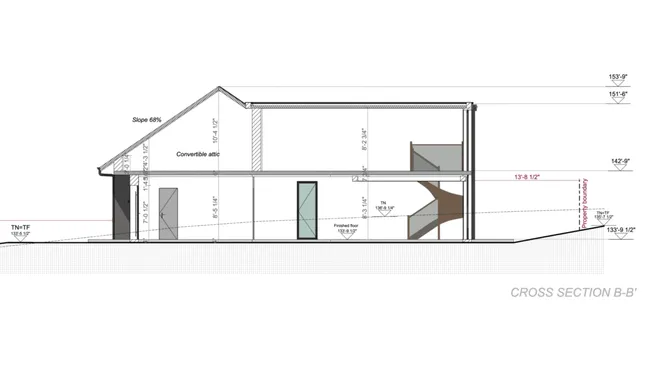
A little prep up front makes any cross section drawing easier to read and quicker to approve.
Run through this quick checklist before you export:
- Use the 3D view to compare existing and proposed grade, so you catch a bad terrain match before the drawing goes out.
- Check that floor heights and ridge height fit within your local zoning height limits.
- For sloped lots or additions, include at least two section cuts.
- Make sure the section label matches its location on the site plan.
- Think…what questions would clients or subs have? Then add clarifying notes and dimensions.
How Cedreo Simplifies Cross Section Drawing
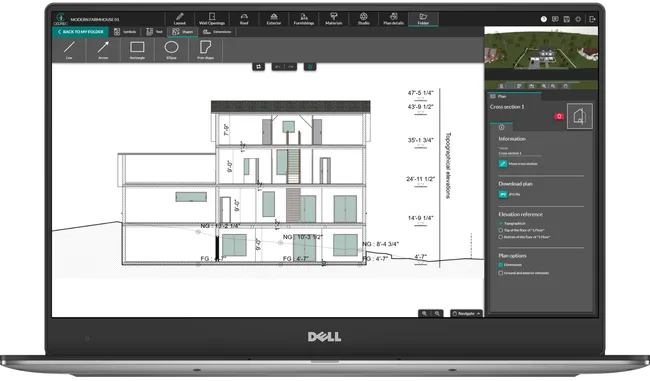
Cedreo lets you draw the house once and generate all the house construction drawings you need from that single model.
The cross section is just one output of the work you’ve already done.
We know that keeping multiple sections, floor plans, and an elevation in sync by hand is a nightmare.
That’s the headache Cedreo removes, and the builders we work with feel the difference on the first project.
- One model, every drawing: Draw in 2D and 3D once, then generate cross sections, floor plans, site plans, and elevations from it.
- Automatic consistency: Section, floor plan, elevations, and site plan update together, so nothing drifts out of alignment.
- No CAD skills needed: You can draw cross sections without any drafting experience and still get a clean, professional result.
- Fast, flexible export: Download JPGs directly, ready to present or share.
- Fits any project: New construction, additions, and ADUs are all fair game.
That means you save loads of time and hassle while getting project documents that make it easier to land more clients.
Sign up for a free Cedreo account today!
Cross Section Drawing FAQs
How do you draw a cross section of a house?
Draw the floor plan and heights, model the roof and terrain, then place a cut line to generate the section.
Doing this in Cedreo is easy since you draw the house once in 2D and 3D and generate the cross section automatically, so there’s no separate drafting step.
What should a cross section drawing include?
As one of the core house construction drawings, a cross section should show existing and finished grade, floor-to-floor heights, roof pitch and ridge height.
It can also include structural walls and other elements like floors and stairs, a size scale, and a section label tied to the site plan.
What scale is a cross section drawn at?
Residential cross sections are usually drawn at a scale of 1/4″ = 1′ or 1/2″ = 1′, though your region may have its own conventions, and the scale should always be labeled on the drawing.
How do I create a cross section without CAD software?
You model the house in an easy 3D tool and let it generate the section for you instead of hand-drafting in CAD.
Cedreo does exactly this: draw the plan, set the cut line, and export a clean cross section, no CAD experience required.
What is a cut line on a cross section?
The cut line (or cross section line) marks the exact point where the building is sliced and which direction you’re looking, usually labeled A-A’ or B-B’.
In Cedreo you set the cut line by positioning the cross-section camera, and on a complex build you can add several cross sections, each with its own cut line tied back to the site plan.
Can I show materials and finishes on a cross section?
Yes, you can add material callouts, interior details, exterior construction details, and other details as annotations so the drawing communicates finishes as well as structure.
Cedreo lets you label materials, wall layers, and any special construction details on the page.
What’s the difference between a cross section and a 3D rendering?
A 3D rendering shows the house as a lifelike object with perspective, lighting, and surface texture, while a cross section is a flat, measured cut that makes the interior structure visible.
Cedreo gives you both, plus a movable 3D perspective, all from the same model.