Having a site plan for your property is important for many reasons, like obtaining building permits, maintaining regulatory compliance, and optimizing available space.
Whether you’re building a new home on an empty lot or adding additional structures to an existing plot, a comprehensive site plan is the first step.
For builders and contractors, creating a site plan drawing helps you raise (and answer) important questions:
- Are there any environmental features (like wetlands or wildlife habitats) that need to be preserved or worked around?
- How can we ensure that the site’s natural lighting and ventilation are maximized in the design?
- What is the most efficient way to arrange parking and access roads to ensure smooth traffic flow and safety?
And so much more!
Today, we’ll walk through the ins and outs of creating a site plan. You’ll also learn how to draw a site plan and why that’s much easier to do with Cedreo’s streamlined site plan software.
Let’s get started.
Before You Make A Site Plan, Get The Cadastral Plan For Your Site
To begin creating a site plan, it’s essential to start with a cadastral plan. A cadastral plan, also known as a surveyor’s plan, is a legal document that accurately measures and records the boundaries of each property. It is produced by a registered or licensed surveyor and serves as the foundation for a country’s cadastre, which is the register of property titles.
A cadastral plan is crucial for several reasons:
- Accurate Property Boundaries: It provides precise information about the dimensions and shape of your property, ensuring that any construction or development stays within legal boundaries.
- Legal Documentation: It serves as a legal document that verifies property ownership and rights, which is essential for real estate transactions and land development projects.
- Compliance with Regulations: By using a cadastral plan, you can ensure that your site plan complies with local zoning laws and building codes, reducing the risk of disputes or legal issues.
How to Use a Cadastral Plan in Cedreo
To create a site plan in Cedreo, you’ll need to import your cadastral plan into the software. This can be done using various file formats such as PDF, JPEG, PNG, DWG, or DXF. Once imported, you can use it as a base layer to draw your site plan accurately, ensuring that all elements are correctly positioned within the property boundaries.
How To Make A Site Plan With Cedreo
Cedreo is a fast and efficient platform for creating site plans, allowing you to streamline your design process without relying on time-consuming and costly external partners.
Learn how to leverage Cedreo’s site plan software, terrain modeling tools, and presentation documents to enhance your projects.
Let’s see how to make a site plan in Cedreo.
Step 1: Sketch Property Boundaries
OOnce the lot plan is in the tool, your next step is to draw the property borders—where your property begins and ends. This tells you the space you’re working with and the area you’re ultimately liable for. Property borders (and property corners) are super useful as you’re considering features like fences, pools, garages, and other elements.
Here’s how this looks in the tool:
- Go to the “Layout” section
- Select “Terrain Level”
- Toggle to “Trace Image”
From there, you can load your image on the righthand menu.
Once you’ve uploaded your image, go to “Land” and select “Lot” so you can start drawing the lot lines the same way you’d draw the walls in a floor plan. To finish a property line, click the circular icon at the end of the line.
Once the lot is outlined, you can set custom setback lines by selecting the property line it affects and adjusting the setback dimensions on the right-hand panel.
Step 2: Adjust Exterior Components and Terrain
Once you’ve outlined the lot dimensions you’re working with, you’ll want to adjust the exterior components and terrain, like existing trees, structures, roads, adjacent properties, and more.
When adjusting the position of exterior components, consider the natural terrain of your site. Terrain modeling allows you to modify the existing landscape to fit your design needs. This involves importing a surveyor’s plan or land plot into your design software, tracing the plot, and then managing terrain elevation points.
You can draw finished land areas such as vegetation zones, parking lots, and patios, choosing between flat or custom elevations. This step helps ensure your exterior components are well-integrated with the site’s natural features.
In the tool, you’ll:
- Head over to the “Layout” tab and select “Land” to manage elevation of natural ground. Note you can set default heights for different outdoor areas. For instance, lawns, by default, are flush to the ground, while any other areas (driveways, decks, etc.) will automatically be at a higher elevation.
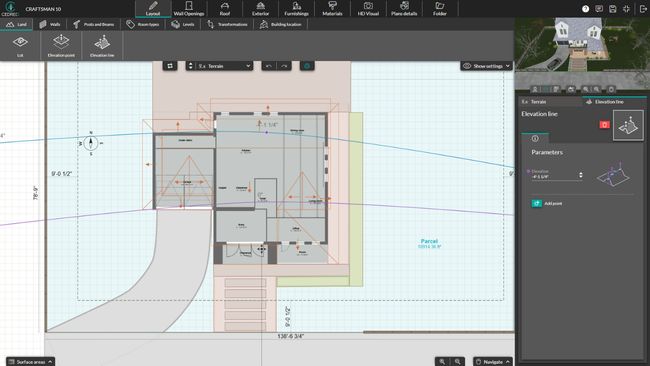
- From there, give the default elevation point to match the plot of land you’ll be working with, using the “Elevation point” and “Elevation line” tool.
- Then, place the elevation points and preview changes in 3D as you make them. These tools allow you to define different elevation levels of the project, creating a precise representation of the site’s topography.
Additionally, Cedreo provides tools to manage sloping terrain effectively. In the “Exterior” step, you can access the “Embankment” and “Retaining Wall” menus to handle uneven ground.
The retaining walls and slopes are automatically positioned on the sides you select, and you can customize them further by choosing the type of wall, adjusting height and thickness, and modifying the slope point by point. This level of control ensures that your design looks great and functions well with the site’s natural conditions.
Step 3: Draw The Site Plan To Scale
Drawing your site plan to scale is crucial for accuracy.
Terrain modeling can assist in this process by providing a precise representation of the site’s topography. By visualizing your terrain in both 2D and 3D, you can ensure that all elements of your site plan, including buildings and outdoor features, are correctly positioned relative to the natural terrain. This helps maintain the integrity of your design and ensures compliance with local building regulations.
To do this in the tool:
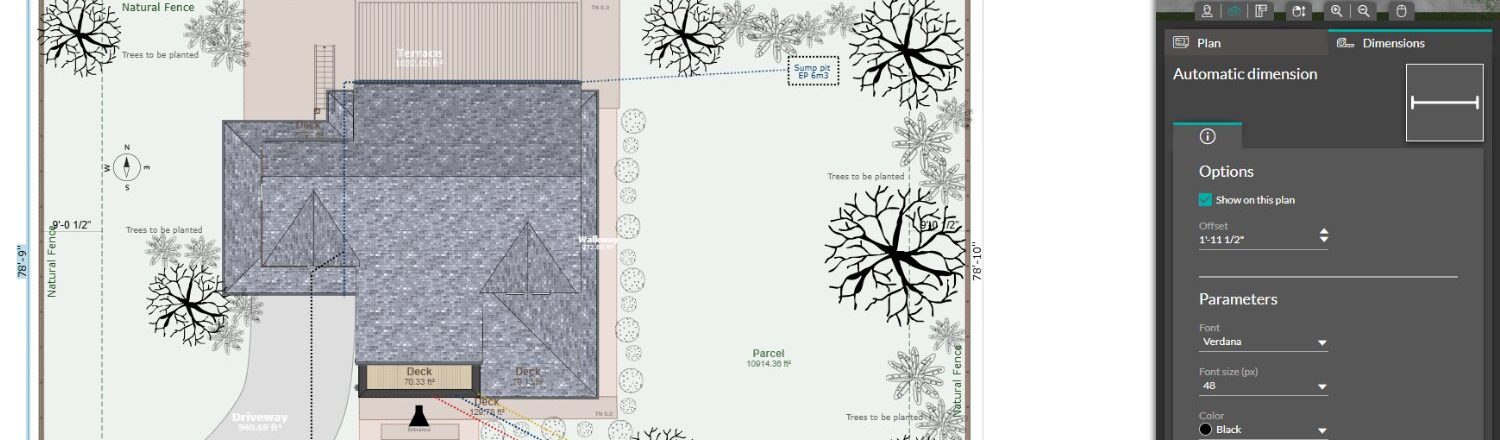
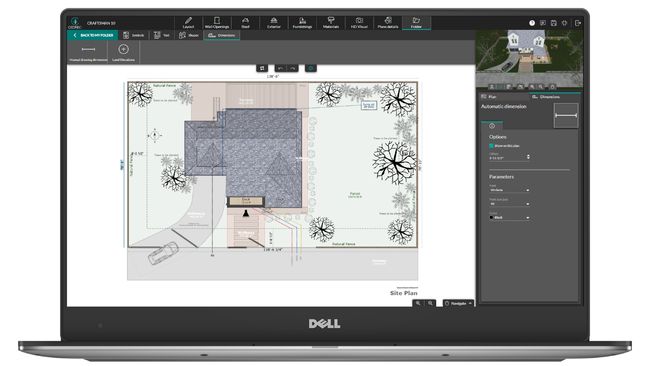
- Select the “Folder” tab from the top menu, “Add a site plan” and edit it and select the information you want to see on the 2D site plan like dimensions, symbols, compass rose…
- Then, you can add dimensions, text and symbols to customize your site plan. Keep in mind that when you change the length of an object, the width will automatically update to maintain the same proportions.
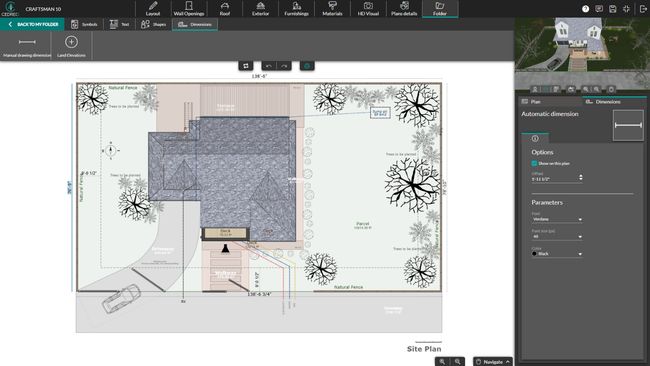
If at any point you need to add dimensions to the plan:
- Click on the “Dimensions” tab.
- Select the “Manual drawing dimension” in the top left corner to create custom dimensions by dragging the mouse around the screen.
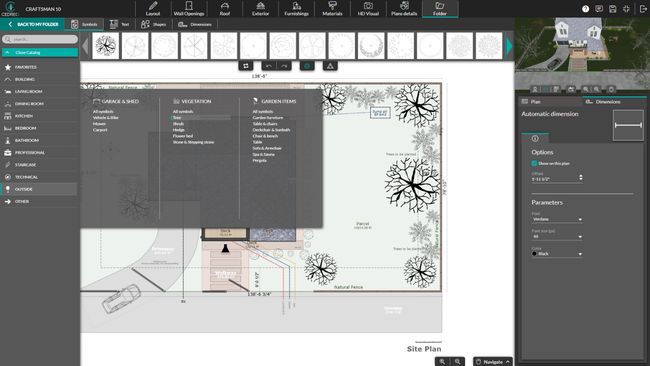
Additionally, you can add symbols to your plan by selecting “Symbols”. This allows you to give additional information.
From the “Folder” tab, you can download the plan to your chosen scale, in JPG or DXF.
Step 4: Add Lawn and Hardscapes
Next, you’ll want to add lawn and hardscape elements to organize your site.
To do this:
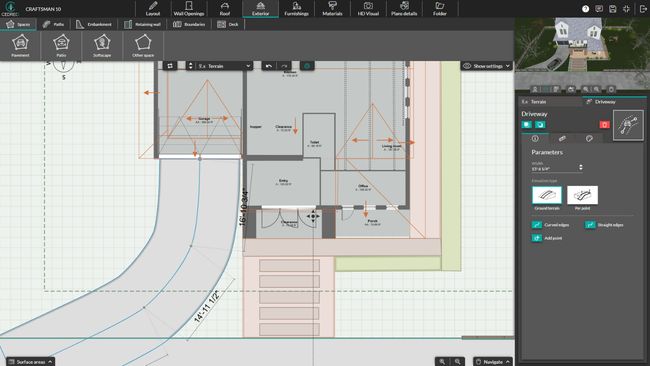
- Navigate to the “Exterior” tab and draw in your lawn, driveways, pavements, and decks/patios.
To add or modulate functional spaces on your plot, consider using regions and paths. Spaces are ideal for defining areas like parking lots, courtyards, or vegetation zones. Paths can represent driveways, walkways, or even free-form paths, allowing you to customize the layout of your site.
This feature helps you visualize how different elements interact with the overall landscape, ensuring that your design is both functional and visually appealing. By incorporating these elements, you can create a cohesive and well-organized site plan that integrates both natural and built features effectively.u can create a cohesive and well-organized site plan that integrates both natural and built features effectively.
Step 5: Bring Your Site to Life with 3D Objects
To bring your site design to life, navigate to the “Furnishing” tab. Here, you can access Cedreo’s extensive library of 3D objects, which includes over 7,000 customizable items.
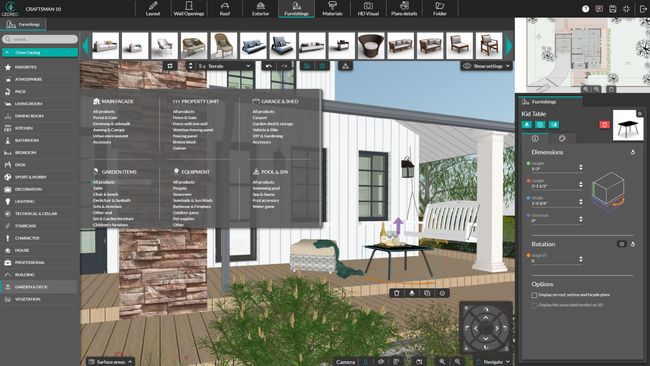
This library is not just limited to interior furniture but also offers a wide range of exterior objects. You can add landscaping elements like trees, shrubs, and flowers, as well as outdoor furniture such as swing sets, patio furniture, and other decorative items. These objects can be customized to fit your design style, allowing you to create a vibrant and realistic representation of your outdoor space.
By incorporating these exterior objects, you can visualize how different elements will interact with each other and with the natural environment, making your site plan more engaging and comprehensive. This step helps ensure that your design is functional and aesthetically pleasing, which is crucial for presenting your project to clients or stakeholders.
The 3D elements placed in the “Furnishing” step can appear on your 2D site plan, select “Display the associated symbol on 2D” in order to get it on your site plan.
Step 6: Customize Surface Coverings and Materials
Once all external elements are in place, navigate to the “Materials” tab to customize the coverings and materials of objects and zones in your site plan. This step allows you to add depth and realism to your design by selecting from a wide range of materials available in the catalog. You can browse through the catalog or use the search function to find specific materials that match your design vision.
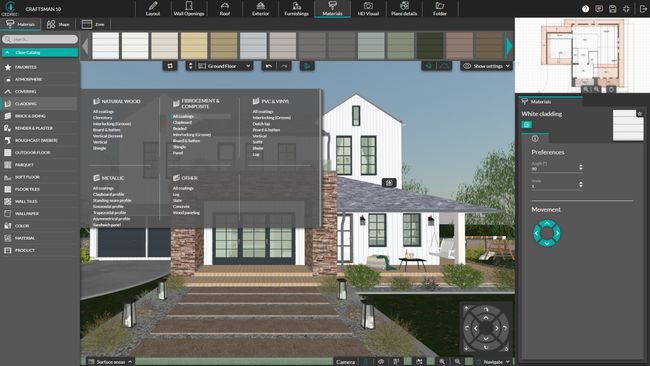
To apply a material, simply click on the area you want to modify, such as a low wall or a patio. Then, select your desired material from the top drop-down menu. If you want to apply the same material to similar items across the project, you can use the assistant feature to streamline the process.
Additionally, you can edit the properties of applied materials by clicking on the item in your project and adjusting its settings from the right options panel. This flexibility ensures that your site plan accurately reflects your intended design aesthetic and helps communicate your vision.
Step 7: Generate Photorealistic Renderings
To create a 3D rendering of your site plan, navigate to the HD Visual tab, then select “Rendering” from the top left corner.
First, you’ll want to use “Cameras” to set viewpoints. At the bottom of the page, you’ll find three types of cameras—eye level, 3D view, and top view.
The eye-level camera allows you to present your design from the perspective of a person standing in front of the physical structure. This creates an immersive experience that helps clients imagine themselves in the new home.
The 3D view mode (pictured below) is essential for communicating everything that relates to the project’s design—the house’s position on the land, landscaping elements, pathways, and exterior objects.
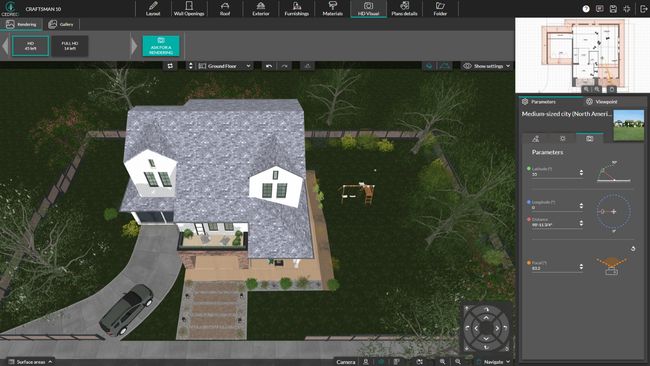
In both eye-level and 3D view modes, you’ll want to capture shots of the entire property. Use the window in the right sidebar to select the area you’d like to capture, then customize the camera angle by updating the parameters.
Finally, you’ll want to switch to top view mode to document your design from above—allowing you to show the interior and exterior layouts at the same time.
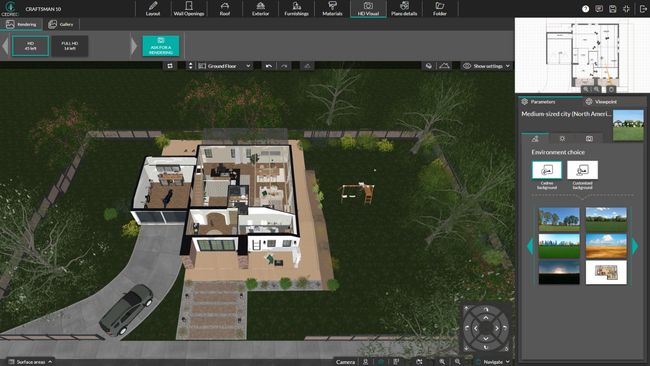
From there, you can select an environment for each shot and change the sun orientation and position. Again, use “Parameters” to customize the settings.
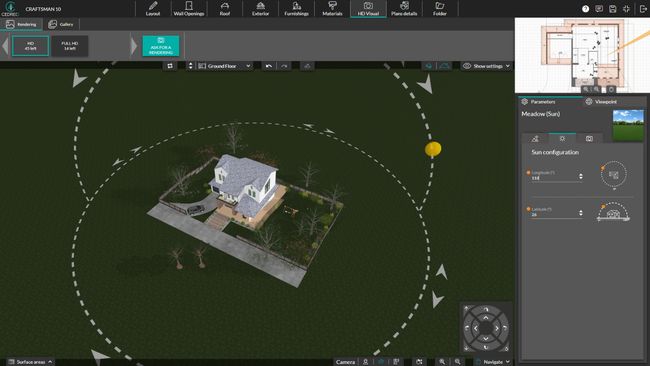
When you’re satisfied with your viewpoint, select a format from the top drop-down menu (HD, or full HD) and click the “Ask for a Rendering” button.
Step 8: Share and Present Your Site Plan
Once you’ve finalized your site plan design, it’s time to share it with clients, colleagues, or local building authorities (to secure building permits).
Cedreo makes this process seamless by saving all your 2D and 3D designs in a gallery. From there, you can easily download them as PDFs or JPGs, allowing you to share them via email, social media, or other digital platforms. You can also share directly from the Cedreo dashboard, streamlining communication and collaboration.
To create professional presentations, Cedreo offers a comprehensive solution for generating presentation documents. You can import your logo, graphics, and photos, and customize the layout with your corporate colors to create high-quality preliminary project drafts. This feature ensures that your presentations are always up-to-date, as any changes to the project plans automatically update the graphics in your documents.
Cedreo also allows you to manage all your visual documents, including 3D site plans, in one place. You can create multiple presentation documents for a single project, each tailored to different audiences or purposes.
The software provides a library of graphic elements that can be easily integrated into your documents at the desired scale. Additionally, you can import images, adjust document parameters like orientation and print margins, and add customizable text zones and annotations to enhance your presentations.
By leveraging these features, you can create compelling presentations that reflect your brand and vision, ensuring your site plan is effectively communicated to all stakeholders.
Bonus: Create The Perfect Floor Plan For Your New Site Plan
While this guide focuses on creating a site plan, Cedreo’s software offers even more functionality. You can also use it to draw floor plans, allowing you to seamlessly transition from outdoor to indoor design.
This capability makes Cedreo a versatile tool for architects, builders, and contractors who need to manage both site and building design elements in a single platform. Whether you’re designing a new home or renovating an existing one, Cedreo provides a comprehensive solution for all your design needs.
How To Draw A Site Plan Online, Fast
If you want to know how to create a site plan, look no further than Cedreo.
Being able to create professional site plans is important for builders and contractors as it gives you more agency and control over the process. Whether you’re in new construction, remodels, additions, or a combination, site plan software will help your project stand out.With Cedreo, you can create site plans with ease. If you’re interested in learning more, give it a try for free!