Looking to expand your project portfolio with modern, cost-effective designs? Learning how to design a container home is a smart move for today’s home builders, remodelers, and residential designers.
Shipping container homes are durable, eco-friendly, and packed with creative potential. It’s easy to see why they’re a popular choice among clients who want something unique.
In this step-by-step guide, we’ll show you exactly how to design a shipping container home online using Cedreo, a cloud-based home design software built for speed, precision, and client-ready 3D visuals. Plus, we’ll give you some quick tips for creating the best container home plans.
Why trust us? Here at Cedreo, we’ve got 20+ years of experience working with housing pros in the home design space. So we know how important it is for builders and designers to be able to create accurate house plans faster and easier.
How To Design a Shipping Container Home Online With Cedreo
Designing a shipping container home doesn’t have to be time-consuming or overly technical. With Cedreo’s cloud-based 3D home design software, container home builders and designers like you can quickly create accurate floor plans and photorealistic visuals, even if you have zero CAD or 3D modeling experience.
Here are the step-by-step instructions for designing your next container home from the ground up. So it’s easier to follow along, we suggest signing up for Cedreo’s FREE version. All it takes is 2 minutes and you don’t have to download anything to your computer.
Step 1: Set Up Your Site Layout

Start by creating the lot where the container home will be placed. This ensures your layout fits the site conditions and aligns with setback or zoning restrictions.
- In Cedreo’s Layout step, select the Land tab and then the Lot tool.
- Sketch the boundaries of your property lot.
- Zoom in for more precision and adjust the lot outline and dimensions as needed.
- Use elevation tools for accurate terrain modeling.
Establishing the site first gives you the flexibility to plan around outdoor features, terrain, and other project-specific constraints.
Step 2: Draw the Container Walls
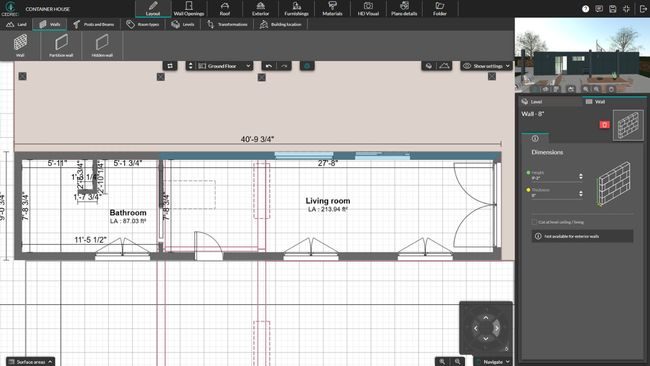
Next, outline the container structure — this forms the foundation of your design.
- Still in the Layout step, navigate to the ground floor level.
- Use the Wall tool to draw the perimeter of your container. A common starting point is 40×8 ft for a standard container size.
- Click on each wall segment to fine-tune the length, thickness, and height. Be sure to use feet/inch symbols if working with imperial measurements.
- Adjust wall height in the right-side panel to match standard (8’6″) or high cube (9’6″) containers.
Cedreo makes it easy to precisely scale and adjust wall layouts, which is especially useful when working with tight container dimensions.
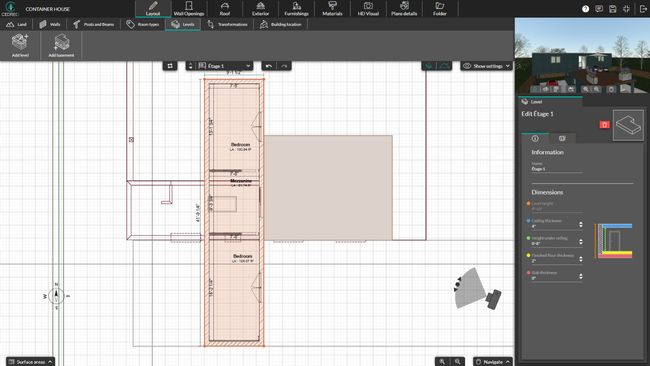
Step 3: Add a Roof Level

Even for single-story designs, you’ll need to create an upper level to add a flat roof properly.
- In the Layout step on the Levels tab, add a new level above the ground floor.
- Select the option to duplicate only the exterior walls from the floor below — this avoids duplicating internal partitions you may have already added.
- Name the level (e.g., “Roof”) and confirm.
This step prevents walls from visually collapsing once the roof is added.
Step 4: Add the Flat Roof
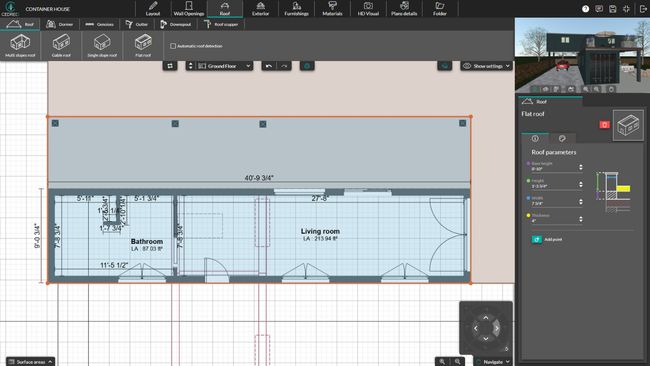
Now it’s time to cap the container with a realistic flat roof.
- Go to the Roof step and choose the flat roof option.
- Click on the outside edges of the upper-level walls to define the roof perimeter. IMPORTANT! – Avoid placing it on the inside edge of the walls.
- Zoom in and make sure snapping is enabled for accurate edge alignment to the outside edge of the exterior walls.
PRO TIP! Want a clean visual with no ceiling between levels? While in the Layout step and viewing the upper level, click inside the structure and then uncheck “Ground” and “Baseboard” in the side information panel to visually merge the levels.
Step 5: Add Container Doors
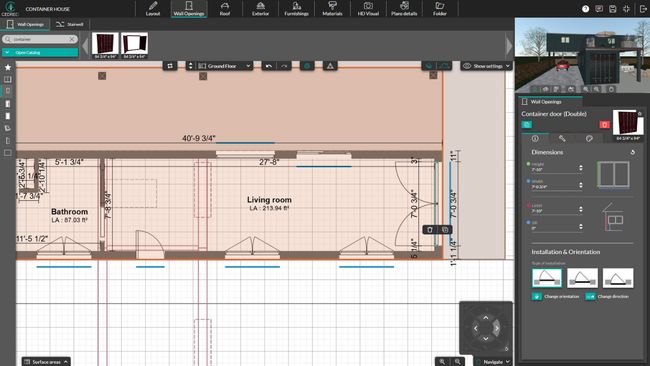
Now that the shell is in place, it’s time to add the signature container-style doors.
NOTE: If you’re planning on removing the doors to replace them with normal walls or cladding, you may decide not to add container doors.
- Open the Wall Openings step and make sure you have selected the ground floor level.
- Open the Catalog and go to the Exterior Doors > Other section.
- Look for open or closed container doors in the catalog. You can favorite them for quick access later.
- Drag and drop the door into your exterior wall. Don’t worry if it appears small — we’ll adjust that next.
- In the right-hand panel, modify the height and width to fit your design needs. (For example, standard container doors are 7’8” wide and 7’5” tall.)
- Still in the right-hand panel, click the paint palette icon to change the door’s frame or panel colors. This is where you can match branding, project colors, or blend with other finishes.
Step 6: Draw Interior Walls
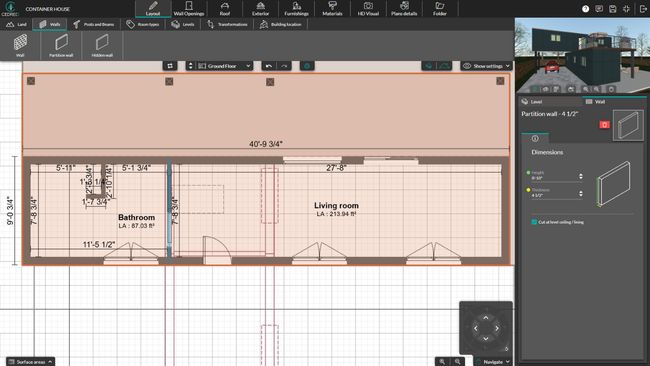
With the container house exterior structure defined, it’s time to add walls to shape the livable space inside.
- Go back to the Layout step and make sure the roof visibility is turned off (for easier access to the 3D floor plan).
- Use the Wall tool to draw internal partitions for bedrooms, bathrooms, closets, offices, etc.
Click and drag to reposition or resize walls as needed.
Cedreo’s flexibility makes it easy to adjust interior layouts on the fly.
Step 7: Add Doors and Windows
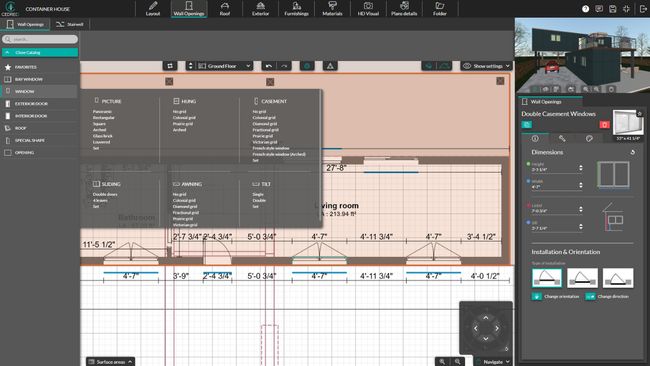
Now you can complete the shipping container floor plan with interior and exterior doors and windows.
- In the Wall Openings step, choose from the Interior Doors catalog for passageways like bedroom or bathroom entries.
- Select your desired style — swinging, sliding, or open — and drag it into place. There are even pocket doors, which are nice for saving space in container homes.
- Browse the Windows catalog. You’ll find everything from clerestory to sliding windows.
- Use the right-side panel to adjust dimensions, sill height, and even frame colors for both doors and windows.
TIP! You’ll find double sliding glass door options under the Bay Window category.
Step 8: Apply Metallic Cladding Materials
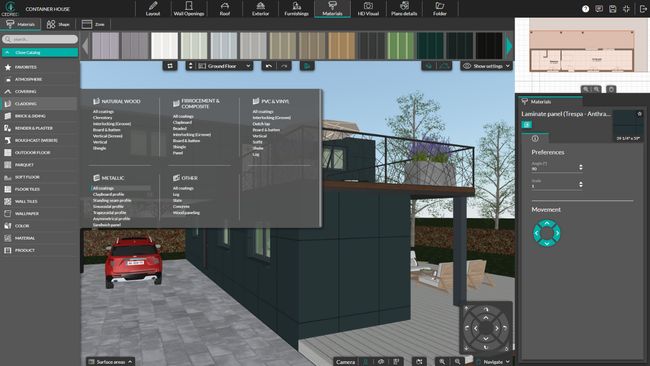
To give your design the authentic look of a steel shipping container house, apply the right exterior finishes and building materials.
- Head to the Materials step and open the Cladding > Metallic subcategory.
- Choose a texture that replicates corrugated metal. Most use the Clapboard profile.
- Apply the material to the exterior walls, interior surfaces, and roof for a cohesive container look.
- If needed, adjust the rotation of the cladding (especially on the roof) using the Preferences tab for proper alignment.
Step 9: Remove Roof Parapets
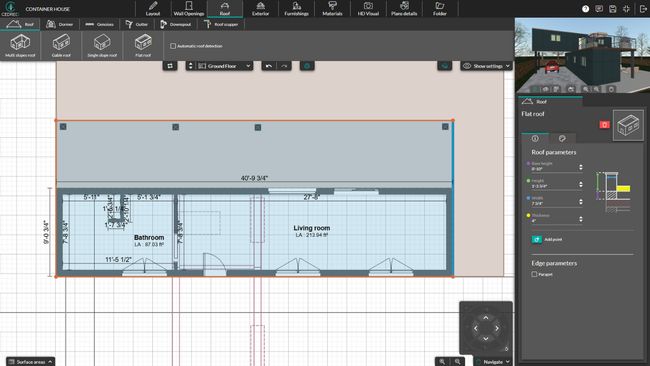
Shipping container homes typically have clean, flat rooflines — so removing parapets is a must for an accurate model.
- Go to the Roof step and select the top level.
- Select each roof edge.
- In the right-hand panel, uncheck the “Parapet” option to remove the raised edge or frame.
- Repeat for all sides of the roof to create a flat, minimal profile.
Step 10: Add Exterior Features
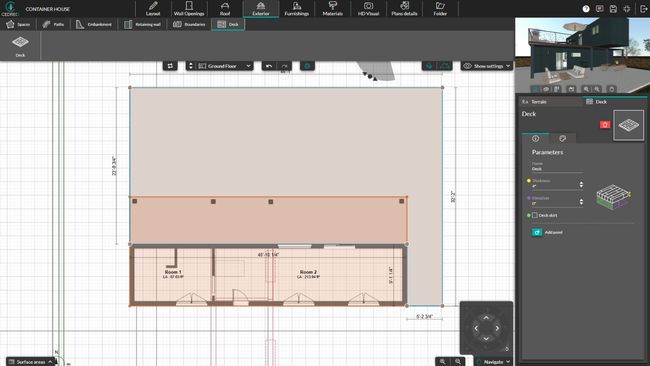
Now it’s time to build out the site and enhance livability with outdoor elements that complement the container layout.
- In the Exterior step, use tools like “Pavement,” “Deck,” or “Gravel” to draw patios, walkways, or driveways.
- Click to define the perimeter and close the shape to finish.
- Adjust base height and thickness in the right-hand panel to create raised decks or steps.
Step 11: Furnish the Interior and Exterior

Show clients how much space they really have by fully furnishing your design with Cedreo’s 3D catalog.
- Go to the Furnishing step and browse the extensive catalog of over 7,000 items.
- Add furniture, fixtures, and storage solutions room by room.
- Include appliances, bathroom accessories, and built-ins that demonstrate how each zone functions.
- Enhance the exterior with elements like carports, vehicles, or outdoor furniture.
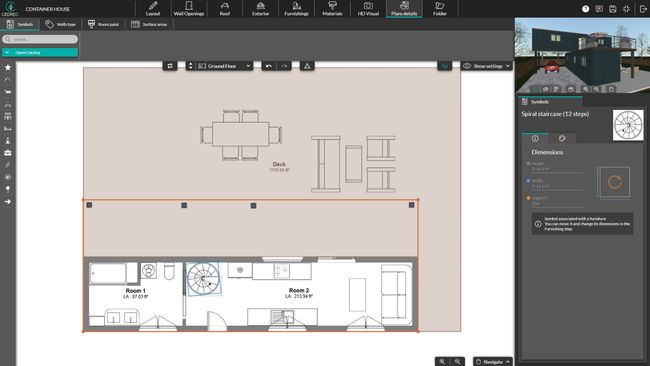
Step 12: Add Multiple Levels or a Rooftop Deck (Optional)
If your container home design includes multiple levels, a rooftop deck is a great way to maximize square footage.
- From the Furnishing step, search for outdoor stairs and place them near your container.
- Move them into place and fine-tune height or angle. Deactivate collision detection for more precise placement.
- Use the Railing tool to enclose the rooftop safely. Switch to top view for easier alignment.
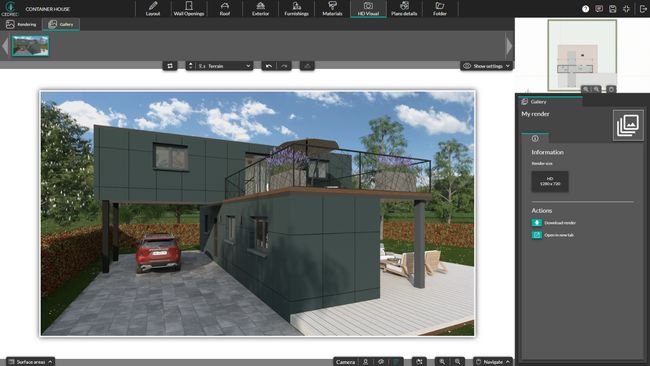
Step 13: View Your Container Home Floor Plans in 2D and 3D
Cedreo makes it easy to switch between 2D and 3D views so you can refine your shipping container layouts and impress clients.
- In the Layout step, use the 2D floor plan view to adjust walls, label rooms, and verify dimensions while viewing the shipping container in the 3D viewing window.
- Switch to a tab like Furnishings for a full 3D floor plan view.
- For high-impact presentations, go to the HD Visual tab and generate photorealistic 3D renderings in just minutes to showcase both interior and exterior views with realistic textures and lighting.
Visualizing your container home from all angles helps ensure design accuracy and speeds up client approvals.
Unsure about some of these steps? Watch this instructional webinar to see them in action.
Quick Tips to Design Container Homes
Here are several expert-backed container home design ideas. These will help you design better, build smarter, and avoid costly mistakes with container homes:
- Choose high cube containers when possible. That extra vertical foot gives you more breathing room, helps with airflow, and makes interior design easier, especially when adding ceiling fixtures or HVAC.
- Offset containers to expand outdoor living space. Shifting upper units creates natural overhangs for patios or balconies.
- Plan carefully before stacking or cutting. Containers are engineered to be strong at the corners. Any time you stack containers or cut large openings for doors and large windows, you’ll need structural reinforcements. This requires careful planning and can lead to unexpected expenses that greatly increase the construction cost.
- Check with local authorities. Since container homes are unique, it’s important to check local building code offices to see what types of permits you will need for the home’s location.
- Reduce energy consumption with insulation and ventilation. Steel walls trap heat, cold, and moisture. Use closed-cell spray foam or foam board insulation specifically made to fit the corrugated shape of container home walls for improved energy efficiency without taking up valuable space. Integrate passive ventilation or mini-split systems to control indoor climate and reduce cooling costs and heat loss.
- Design to reduce the cramped feel. Use lighter colors, continuous flooring, and an open-concept container home floor plan. Built-in storage and multi-functional furniture can help make even small spaces feel less cramped.
- How many containers? Small shipping container homes may use only a single standard 40 ft container. Larger container homes can use two, three, or more containers. A lot depends on how many bedrooms your client needs.
Design a Container Home Today!
It’s easy to see why more container home builders are switching to Cedreo. Whether you’re building with multiple containers or creating a single shipping container home design, Cedreo’s intuitive tools help you design smarter, faster, and more professionally.
- Create detailed floor plans and 3D renderings in hours, not days.
- Easily modify layouts, finishes, and furnishings based on client feedback.
- Avoid costly mistakes by designing with accurate dimensions and visuals from the start.
- Easily generate professional presentations that land you more clients!
Ready to design your next container home? Try Cedreo FREE today!