Skip the drafting table…with the right tools, you can produce clean, detailed elevation drawings in minutes, not days.
Drawing an elevation is one of those tasks that sounds simple but can eat up hours if you’re doing it by hand or working with clunky software.
But they’re usually an important part of most house projects.
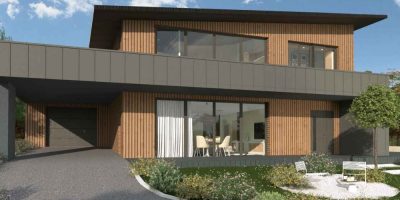
Elevations show the exterior faces of a building from each direction, giving clients a clear picture of what the finished structure will look like.
And getting them right matters.
A vague or incomplete elevation drawing leads to miscommunication, rework, and frustrated clients.
So this guide walks you through how to draw an elevation in 5 clear steps, with practical tips on what to include and how to produce a clean, professional elevation drawing every time.
Key Takeaways
- Elevation drawings show the exterior faces of a building to scale, capturing walls, roofs, doors, windows, and materials.
- Every elevation drawing should include key dimensions, material callouts, and clear visual detail of the building’s exterior.
- The four standard elevation views are front, rear, and two side elevations; interior elevation drawings are also common for room-level detail.
- Cedreo automatically generates elevation views from your 2D floor plan, cutting the time to create a complete set of architectural drawings from hours to minutes.
Why trust us? Here at Cedreo, we’ve got 20+ years of experience working with housing pros in the home design space. So we know what it takes for builders and designers to create elevation drawings that help them land more clients!
See How You Can Create Complete Projects with Cedreo
Plans – Get site plans, 2D floor plans, electrical plans, cross sections and elevation views — with all the technical details you need for a comprehensive project overview.
3D Visualizations – Use interior and exterior 3D renderings as well as 3D floor plans to help clients understand the finished project.
Documentation – Manage all your visual documents in one place, so it’s easier to present and sell your projects.
No credit card required, no commitment
Understanding the Elevation Plan
An elevation plan is one of the most important drawings in any home design or construction project.
It gives everyone on the team, from architects to contractors, a precise, scaled view of what the building looks like from the outside.
What Is an Elevation Plan Drawing?
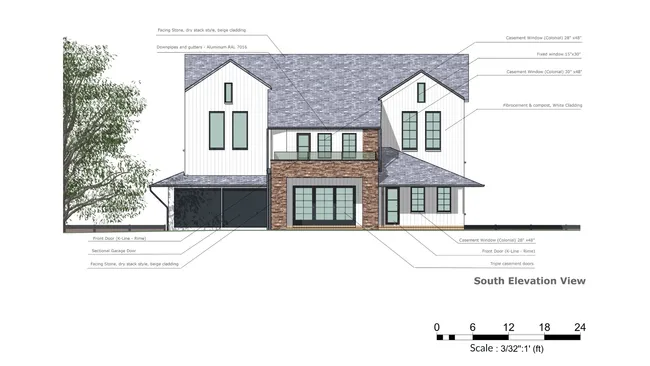
An elevation drawing is a 2D, flat view of a building’s exterior, drawn to scale and without perspective distortion.
It shows the vertical face of the house from a specific direction: front, rear, left side, or right side.
Unlike a 2D floor plan, which gives a top-down plan view of the room layout and living space, an elevation view captures everything visible on the wall surface, including windows, doors, roof lines, materials, and ceiling heights.
Builders, and contractors use elevation drawings to communicate the look and feel of a project before construction begins.
They capture details that a plan view can’t show:
- The slope of the roof
- Wall thickness
- The vertical placement of windows and doors
- Other architectural features that define the building’s character in residential architecture
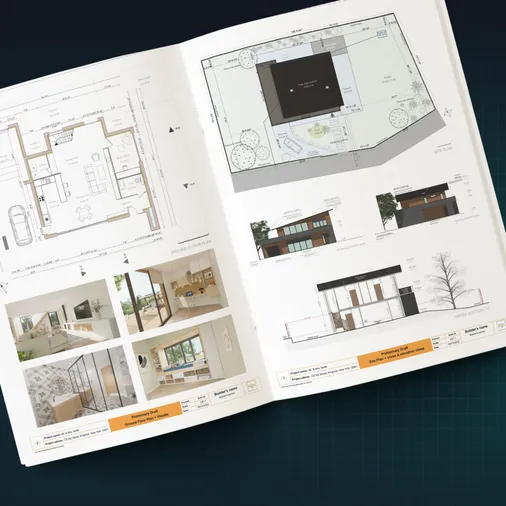
Elevation views work alongside floor plans, site plans, roof plans, and section drawings to form a complete project overview.
Together, these drawing types give clients a comprehensive picture of the house from every angle.
Drawing Elevation Views: Why Do It Yourself?
Drawing elevation plans in-house offers three major advantages:
- Fast, controlled production. Generate elevation views directly from the 3D model without waiting on an external draftsperson.
Adjustments to roofs, walls, openings, and landscaping update in real time, so you have more control over your space and making the entire process faster.
- Full control over detail. You decide exactly what each elevation drawing shows: dimensions, materials, textures, annotations, and callouts.
Every detail is in your hands, and you can create as many elevation views as the project requires.
- Reduced recurring costs. Outsourcing elevation drawings adds up quickly, especially when you’re running multiple projects at once.
Bringing the process in-house with the right software standardizes your workflow and cuts costs over time.
Essential Elements of an Elevation Drawing
A strong elevation drawing isn’t just a sketch of the building’s face.
It’s a detailed, annotated document that anyone on the project team can use.
The goal is clarity: every element in the drawing should be immediately readable, even when printed at a smaller scale.
Which Elevation Views to Include
Start by identifying which faces of the house need to be drawn.
For most new construction projects, you’ll need all four:
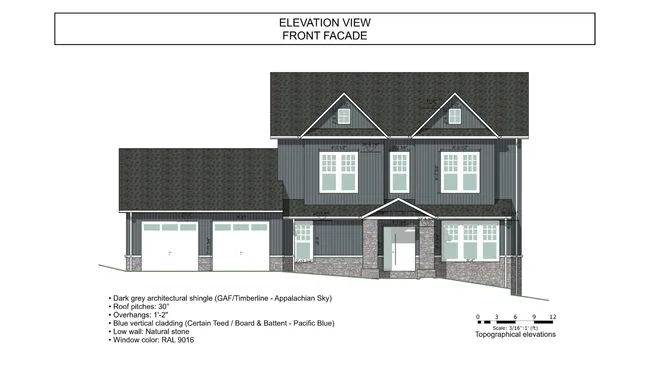
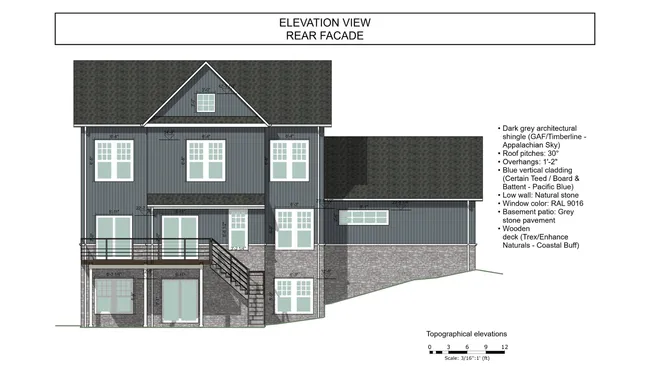
- Front elevation
- Rear elevation
- Right side elevation (right side wall)
- Left side elevation (left side wall)
For renovation or addition projects, you may only need the elevations that show the affected portion of the building.
When in doubt, include more views rather than fewer.
A complete set of elevation drawings reduces confusion during construction and results in a more professional project presentation.
Required Information
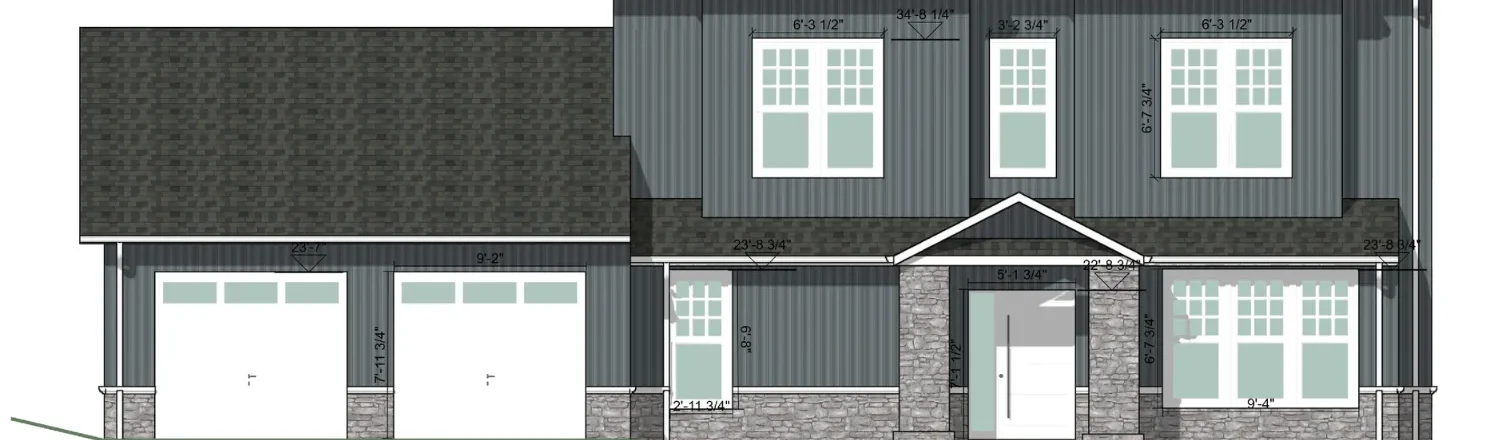
Within each elevation drawing, you should include:
- Overall dimensions, including height, width, and key vertical measurements in feet and inches
- Ground floor level line and finished grade lines
- Roof details: pitch or slope, overhangs, ridge height, and materials
- Window and door placement, sizes, and type
- Wall materials, finishes, and textures
- Visible architectural features such as columns, railings, dormers, stairs, and chimneys
- North or south orientation indicators where relevant to the site
Every detail you include on the elevation drawing reduces the chance of questions or mistakes in the field.
Notes and Annotations
Annotations are what turn a drawing into a truly useful reference document.
- Add written labels for materials, colors, textures, and surface treatments throughout the drawing.
- Note the function of key elements, especially those that affect structure.
- Include scale references and dimension lines so that anyone reading the drawing can take accurate measurements directly from the page.
Layers of annotation help contractors understand exactly what’s been specified.
How to Draw House Elevations from a Floor Plan: 5 Steps with Cedreo
These five steps take you from an initial floor plan to a complete, export-ready set of elevation drawings.
The process is easy even if you don’t have a lot of drafting experience.
Step 1. Set Up the Project
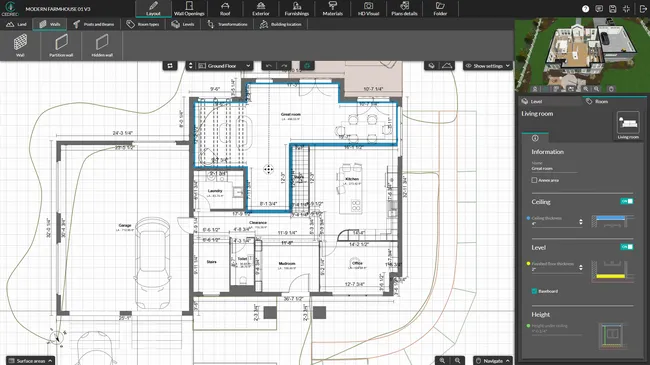
Start by defining the lot and positioning the building on the site.
If you have existing plans, import them into Cedreo as a background layer to trace over.
This makes it easy to place the structure accurately on the site plan and ensures the floor plan matches existing conditions.
Set your floor levels carefully.
The ground floor level, finished grade line, and any upper-floor heights all feed directly into how the elevation drawings are generated.
Getting these right from the start means your elevations will reflect the actual dimensions of the project, with accurate ceiling heights, roof lines, and wall heights throughout.
Then draw your walls and place your doors and windows to complete the initial floor plan layout.
This first step is the foundation for every elevation view that follows, so take time to get the room layout and building dimensions right before moving on.
Step 2. Customize the Roof and Exterior
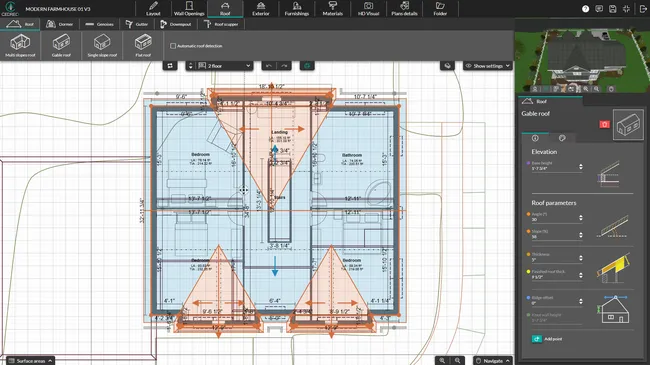
Configuring the roof plan and exterior wall details gives the elevation drawings their visual accuracy and makes the building’s vertical profile easy to read.
Elements to adjust:
- Roof: Choose the roof type (gable, hip, flat, shed, and more). Cedreo detects the roof position automatically and generates valleys with a single click, which speeds up the overall process and keeps the roof plan consistent with the floor plan below.
- Walls: Apply exterior wall finishes from the built-in material catalog. Options include stucco, wood siding, brick, composite, and more. Adjust roof thickness to match your project specifications.
- Exterior: Model the outdoor space by adding landscaping zones, natural vegetation, driveways, pathways, and boundary fences. These exterior elements add context to the elevation views and help clients understand the home design at first glance.
Step 3. Generate the Elevation Plan View
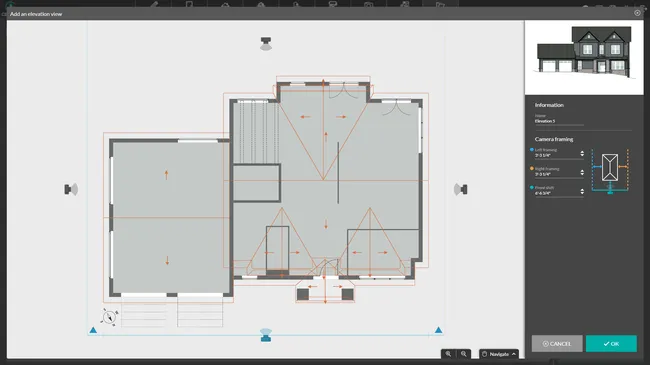
Create a first elevation view and configure it for each face of the building you want to draw:
- Choose the camera angle: front, rear, or side elevation
- Name the view
- Adjust the framing so the full elevation is clearly visible
- Confirm to generate the view and return to the elevation list
Any time you update the floor plan, every elevation drawing updates automatically to stay consistent, so no plan view ever falls out of sync.
This keeps your plan view and elevation drawings in sync throughout the entire project.
Step 4. Customize the Drawing and Configure Display
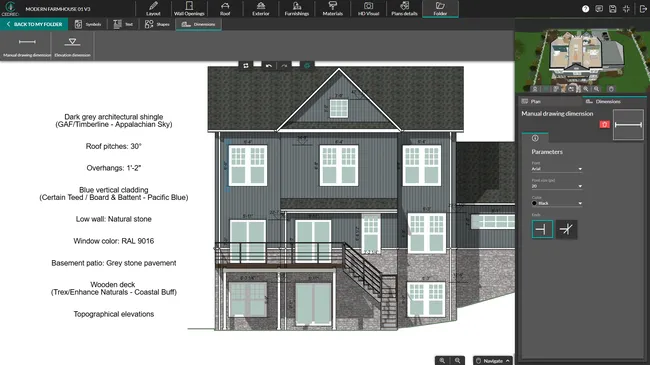
Once the elevation is generated, add information to get the level of detail you need : custom dimensions, elevation dimensions, annotations, symbols, and callouts to highlight specific architectural features or construction details.
Control which elements are visible, adjust the visual style, and configure textures so the drawing communicates exactly what you intend.
Step 5. Export the Elevation Drawing
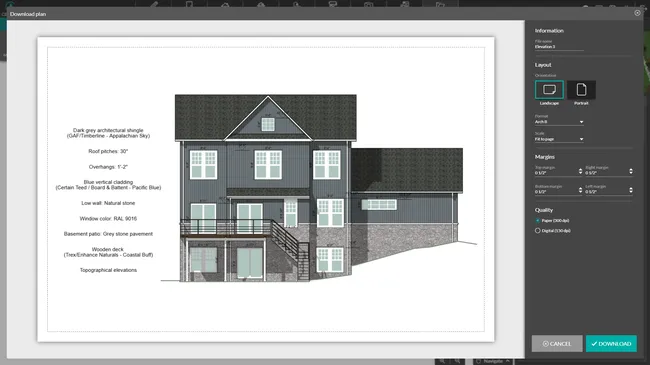
Set the print parameters before exporting: orientation, paper size, scale, and margins.
Export as a JPG for a clean, professional document that’s ready to share with clients or your team.
You can also add these elevation drawings to your project presentations in Cedreo.
Tips and Best Practices for How to Create an Elevation View
A great elevation drawing is one that anyone on the project team can read at a glance.
Keep these practices in mind as you work through each section view:
- Check the scale before exporting. An elevation drawing set to the wrong scale will be hard to read.
- Verify ground lines and grade levels. The relationship between existing and finished grade is one of the first details on an elevation.
- Review each section view for visual clarity. Step back and look at the overall vertical profile to confirm that the structure, materials, and architectural features all read clearly.
- Keep dimension lines legible. Even when printed at a smaller format, key measurements in feet and inches should still be easy to read.
- Adjust the camera framing so the entire elevation fits cleanly within the view, with no cropped walls, window frames, or roof lines.
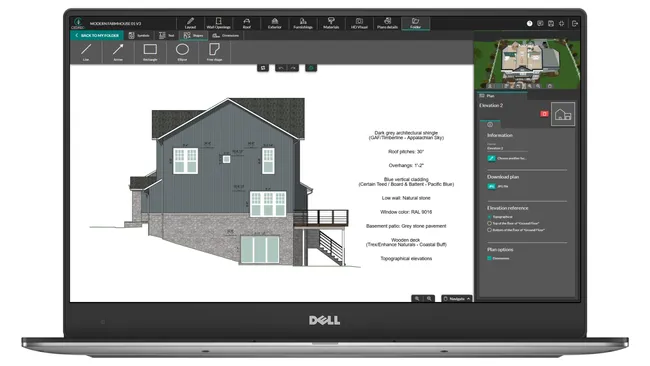
Why Use Cedreo for Drawing an Elevation?
We’ve noticed that contractors we work with are often frustrated with having to juggle multiple complicated design tools.
That’s not the case with Cedreo.
The process of creating elevation views, section perspectives, and floor plans all happens in one space, from initial building design through to final export.
That single-workspace approach cuts down on manual steps and reduces the risk of errors between drawing types.
That’s a huge win for busy contractors.
So here’s what Cedreo brings to your elevation drawing workflow:
- Automatic elevation views generated directly from your 2D floor plan
- Full control over exterior wall materials, and terrain modeling
- Annotation tools to add dimensions, written labels, and callouts in inches or feet
- Live updates across all plan types whenever the design changes
- JPG export with the correct scale and print-ready quality
You keep control over the entire production process and reduce back-and-forth, so projects are faster to finalize and easier to present to clients and contractors.
Ready to speed up your elevation drawings?
Try Cedreo for free and start producing professional house elevations and architectural drawings today.
How to Draw House Elevation Plans FAQs
The most common scale for elevation drawings is 1/4″ = 1′-0″, which gives enough detail while keeping the drawing compact enough to fit on a standard sheet.
For larger buildings, 1/8″ = 1′-0″ is also widely used (Cedreo lets you create elevations in 9 different types of scales).
Design tools like Cedreo let you generate elevation drawings automatically from your floor plan, without needing CAD experience or hand-drafting skills.
The elevation views update in real time as you adjust the design, keeping every section view and elevation consistent throughout the project.
The fastest approach is to use software that generates elevations automatically from a 3D model.
Cedreo does this from your 2D floor plan, producing a consistent, accurate elevation for each face of the house in just a few clicks.
Yes. Many builders, remodelers, and contractors use tools like Cedreo to create professional elevation drawings without hiring an external architect or draftsperson.
The software automates the creation of elevation views and section drawings, reducing both the time spent on each project and the overall cost of producing a complete architectural drawing set.