Juggling multiple projects can feel like a high-wire act. Mastering the architectural design phases is your safety net.
For a pro builder or contractor, it’s the playbook for maintaining control, ensuring profitability, and building client trust.
This guide breaks down each stage into a clear, manageable process. Implement these phases and you’ll prevent costly errors and deliver projects that elevate your reputation.
Key Takeaways
- Prevent Costly Mistakes: A phased approach creates a clear decision trail, holding both you and the client accountable and minimizing expensive changes down the road.
- Build Client Trust: Walking clients through a structured, transparent process demystifies the project, which reduces their anxiety and builds confidence in your expertise.
- Mitigate Project Risks: Each phase is designed to systematically identify and resolve uncertainties, from site issues to material lead times, before they become expensive field problems.
- Accelerate Approvals with Cedreo: Using 3D design software like Cedreo helps clients visualize the final project with photorealistic renderings. This closes the “imagination gap” and leads to faster, more confident decisions.
Why trust us? Here at Cedreo, we’ve got 20+ years of experience working with housing pros in the home design space. We know what it takes for home builders, contractors, and designers to implement a design process that leads to more successful projects!
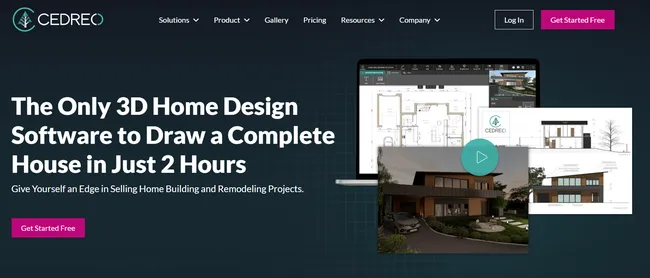
See How You Can Create Complete Projects with Cedreo
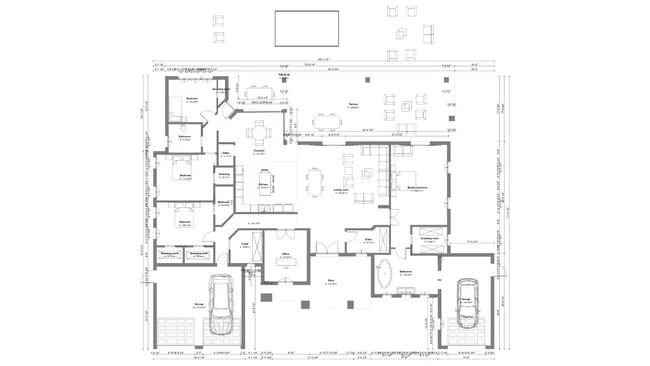
Plans – Get site plans, 2D floor plans, electrical plans, cross sections and elevation views — with all the technical details you need for a comprehensive project overview.
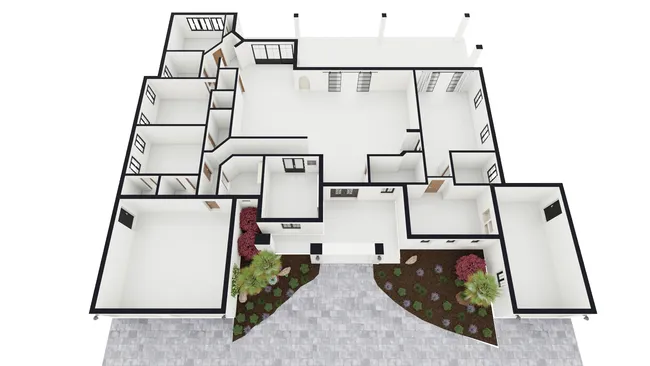
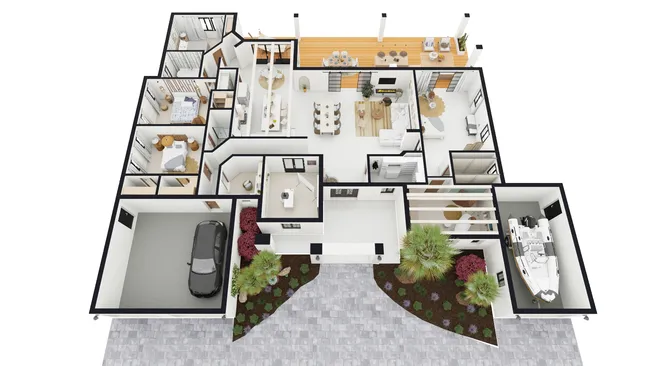
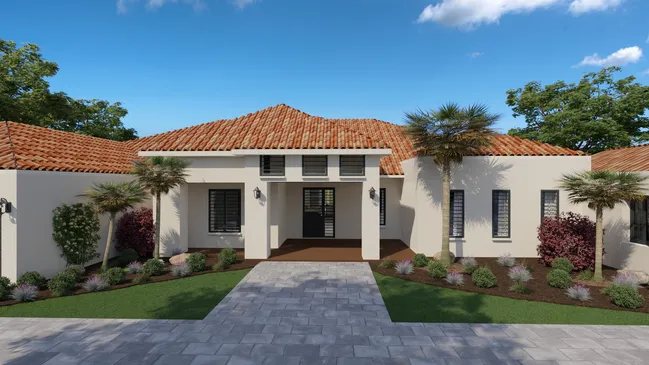
3D Visualizations – Use interior and exterior 3D renderings as well as 3D floor plans to help clients understand the finished project.
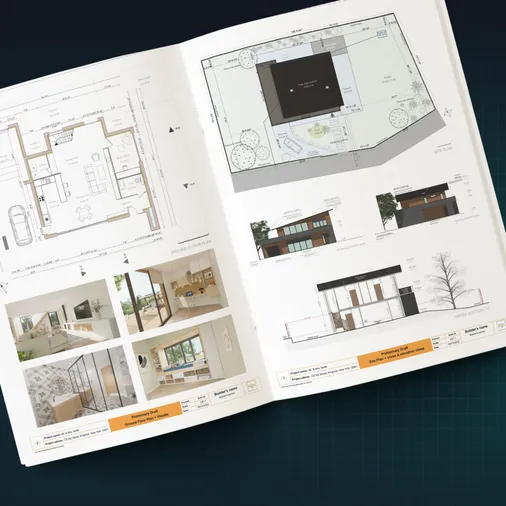
Documentation – Manage all your visual documents in one place, so it’s easier to present and sell your projects.
No credit card required, no commitment
Benefits of a Well-Thought-Out Architectural Design Process
Organizing a project into distinct architectural design phases is a critical strategic framework for builders and contractors. Here is how a structured design process helps both you and your clients.
For the Client: A Foundation of Trust
A well-managed architectural process is the bedrock of a positive client relationship.
- Prevents Costly Mistakes: Formal sign-off points through all the phases create a documented decision trail. This protects you from disputes and minimizes expensive changes down the road.
- Builds Trust: A phased approach demystifies the architectural process for homeowners. This proactive communication reduces their anxiety and builds confidence in your professionalism.
- Generates Referrals: Clients who feel expertly guided through a clear, transparent process become your most effective marketing tool.
For the Pro: Profitability and Risk Mitigation
For you, the benefits are directly tied to operational efficiency and financial control.
Improves Profitability: Formal sign-offs support a disciplined change order process, and making decisions early helps avoid costly delays.
Streamlines Project Management: A phased methodology allows you to systematize your operations with checklists and standardized workflows, which is essential for managing multiple projects.
Mitigates Risk: Each phase involves identifying and resolving uncertainties, from site issues to material selections, before they become expensive field problems.
Enhances Credibility: A professional, multi-phase process immediately differentiates you from competitors and serves as a powerful sales tool that justifies your price.
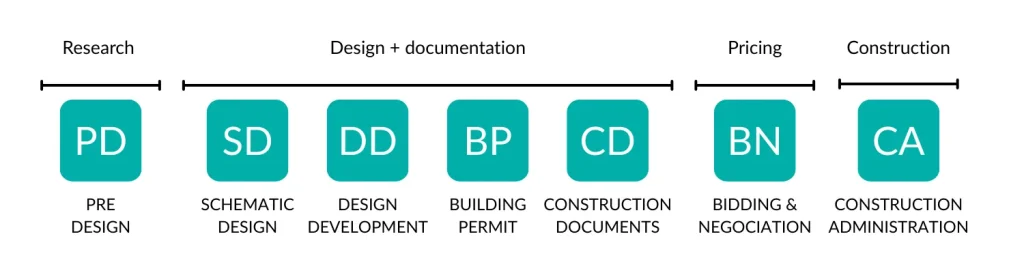
Step-By-Step Architectural Design Phases
Here is a practical guide to navigating the complete residential design and construction lifecycle, from initial client conversations to final handover.
Phase 1 – The Pre-Design Phase: Setting the Foundation
The pre-design phase is the most critical stage. It’s where you perform the foundational research and due diligence to de-risk the project before any major design work begins.
- Client Discovery and Consultation: This initial programming phase is where you go beyond a simple list of wants to understand the client’s “why.” Asking deeper questions about their lifestyle and frustrations helps you manage expectations and clearly define the particular project’s needs early on.
- Budget and Timeline Establishment: Be the voice of financial realism. Provide preliminary cost estimates and introduce the Total Project Cost, which includes construction costs, architectural fees, permits, and other soft costs. Frame the mandatory 10-20% contingency fund as a vital risk management tool for both parties.
- Site Analysis and Surveys: Go beyond property lines to uncover hidden liabilities. A proper site analysis can include a geotechnical report for soil stability, a utility survey, and a review of topography and solar orientation. This due diligence is a small price to pay for a massive amount of risk reduction.
- Code, Permit, and HOA Overview: Perform a preliminary zoning analysis to confirm setbacks, height limits, and lot coverage. You must also review all HOA covenants, which can be more restrictive than local codes. The primary goal is to identify if a zoning variance is needed, as that lengthy process is a major project risk.
Phase 2 – Schematic Design: From Vision to Viable Form
The next phase is the schematic phase, where you translate your client’s vision into a viable form. The goal of the schematic design phase is to agree on the big-picture concept (the general layout, form, scale, and how much space) before investing time in all the details.
- Site and Space Planning: The design should respond directly to the lot’s unique characteristics, including views, natural light, and privacy. Start with abstract bubble diagrams to establish functional adjacencies before moving to block plans that define the basic building form on the site plan.
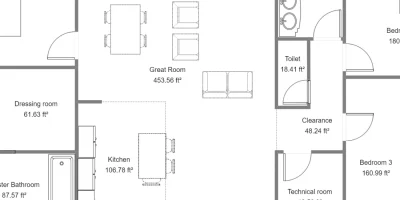
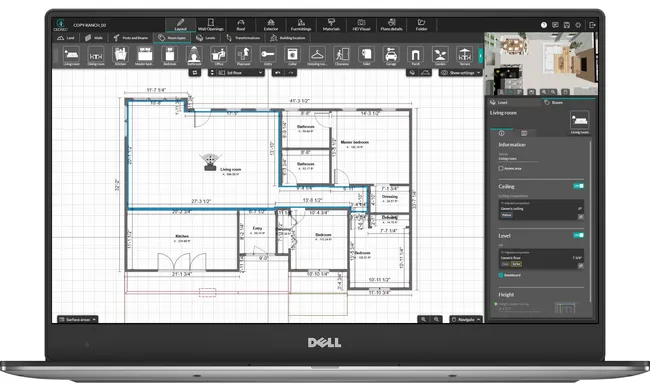
- Initial Layouts: For the schematic design phase, develop two or three high-level layout options to serve as conversation starters. These aren’t detailed construction drawings, but preliminary drawings showing room arrangements and basic 3D form. Simple 3D models are nice for helping clients understand the volume and feel of the space.
- Client Presentation and Revisions: Present the options to collaborate on a single, preferred design. To maintain project momentum, control the revision cycle by setting a clear policy, such as allowing two rounds of revisions. Document all feedback in writing to ensure mutual understanding.
- Before/After for Renovations: For renovation projects, a 3D before-and-after presentation is the ultimate sales and communication tool. Showing a cramped kitchen in an existing building transformed into a bright, open space helps the client visualize the value of their investment and overcomes the fear associated with major structural changes.
Phase 3 – Design Development: Adding Detail and Definition
In this design development phase, the approved schematic concept gets fleshed out with a greater level of detail. The project begins to feel tangible, and most major decisions about materials, systems, and finishes are locked in.
- Detailed Floor Plans: Conceptual plans are refined into rooms with precise dimensions and preliminary structural elements. It is critical to communicate that this is the point of no return for the basic design. After this, changing a wall’s location becomes a formal and costly change order.
- Material and Finish Selections: This stage involves selecting nearly every aesthetic component, from roofing and windows on the building’s exterior to flooring and fixtures. Act as a curator, not an order-taker. Present three to four curated choices (good, better, best) to prevent client “decision fatigue.” You should also investigate and track material lead times now to prevent future schedule disruptions.
- Systems Integration (MEP): This is the “unseen” work that dictates a home’s functionality. The design must now accommodate the physical realities of HVAC ductwork, plumbing lines, and electrical systems.
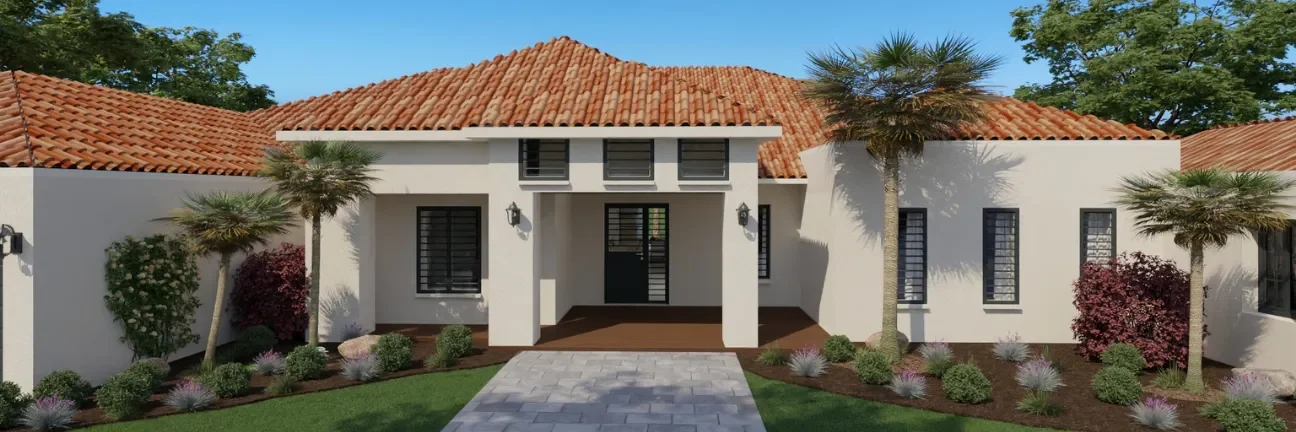
- The Importance of 3D Visualization: During this stage, photorealistic 3D renderings become an essential clarification tool, not just a marketing gimmick. A rendering allows a client to get a basic understanding of the interplay of light and materials in a way that 2D drawings cannot. Identifying and resolving perception issues in a digital model costs nothing…resolving them after drywall is installed can cost thousands and damage client trust.
Phase 4 – Construction Documents: The Official Blueprint for Building
The construction documents phase is typically the most labor-intensive design phase. It’s where the approved design is translated into a detailed set of technical drawings and specifications. These construction documents will be used to get the building permit, generate updated cost estimates, and guide the entire construction process.
- Technical Drawings: This is the builder’s bible. A complete construction set goes far beyond simple floor plans to include building elevations, sections, and electrical plans with enough detail for a subcontractor to build from with minimal questions.
- Specifications Writing: These notes, either on the drawings or in a separate book, are legally binding. They define the required quality standards and specific products, which eliminates ambiguity and protects you from subcontractors substituting lower-quality materials.
- Document Preparation for Building Permits: A specific set of drawings is prepared for the local permitting authority to verify compliance with regional building codes.
- Contractor Coordination: Before the plans are finalized, have your key trade partners, like a contractor or structural engineer, perform a “constructability review.” A final check of the construction drawings can flag potential field issues before they become expensive mistakes during the construction phase.
Phase 5 – Bidding & Negotiation: Assembling the Right Team
Once the construction documents are complete and the permit is approved, the bidding process is ready to begin.
- Subcontractor Selection & Communication: Your goal should be to build a reliable team, not simply find the lowest price. Always pre-qualify potential contractors by checking references and verifying insurance coverage. A responsive, high-quality subcontractor is often worth a price premium.
- Quality/Cost Comparison: To receive truly comparable, “apples-to-apples” bids, every bidder must be provided with the exact same set of construction documents and a detailed Scope of Work. When analyzing bids, look for what might be missing…a low bid may have omitted crucial costs for items like trash removal or specific materials.
Phase 6 – Construction Administration: Executing the Plan
The construction administration phase is the final phase and typically the longest part of the project, where the project breaks ground and the design is physically realized. Your role shifts to on-site management, quality control, and communication.
- Pre-Construction Conference: Before any work begins, hold a pre-construction meeting with all key stakeholders: the client, designer, and foremen for key trades. This meeting should cover the schedule, communication protocols, and the change order process to set a professional tone for the entire project.
- Progress Monitoring: This involves regular site visits to ensure work conforms to the plans and meticulously tracking progress against the schedule and budget. Modern project management software is essential for creating daily logs with photos, which provides an indisputable record of the project’s history.
- Change Management: Changes are almost inevitable, but the key is managing them with a rigid, disciplined process. No work on a change should ever begin until the client has signed a formal Change Order document. This discipline is often the difference between a profitable project and a losing one.
- Problem Resolution & Project Close-Out: Near the end of construction, conduct a final walk-through with the client to create a “punch list” of any minor items needing correction. When everything’s done, provide the client with a handover binder containing all product warranties and manuals. This final act of professionalism leaves a lasting positive impression and encourages referrals.
Standard Architectural Design Phase Fees
Breaking down architectural fees by stage is important to ensure that architects don’t spend more time on any one phase than they should. Here’s a breakdown of typical fee ranges for each of the phases of design.
Architectural Fees:
- Pre-Design & Schematic Design: 10-25%
- Design Development: 10-25%
- Construction Documents: 35-50%
- Bidding: 5%
- Construction Administration: 20-30%
A design professional can cut down on these fees substantially with modern architectural drawing software. This technology can considerably cut the time and effort spent making changes and reduce the risk of costly misunderstandings.
The Digital Toolkit: How Modern Software Accelerates Your Projects
In modern construction, digital tools are a necessity, not a luxury. They accelerate decision-making, reduce costly errors, and improve operational efficiency from design through project completion, leading to a more efficient building design.
Accelerate Design and Client Decisions with Cedreo
Cedreo dramatically improves the early phases of design. Instead of waiting days for revisions, you can make changes on the fly and present compelling visuals that accelerate client approvals.
- Create Project Plans in Hours: Go from a sketch or imported file to complete 2D and 3D project plans, including site plans with terrain, in as little as two hours.
- Streamlined Change Requests: With the ability to quickly edit plans on the go, you can handle change requests faster to avoid project delays.
- Generate Photorealistic 3D Renderings in Minutes: Secure faster approvals and prevent costly change orders by generating stunning 3D renderings in five minutes that close the “imagination gap” and clarify the design intent.
- Streamline Material Selections: Use a library of over 7,000 customizable items to help clients visualize material and finish selections, reducing their decision fatigue and locking in choices faster.
- Empower Your Entire Team: An intuitive interface eliminates the steep learning curve of CAD, allowing your entire design team, not just trained designers, to quickly create and modify plans.
Streamline On-Site Management with Procore

Platforms like Procore act as a central “source of truth” that professionalizes your contract administration process and keeps field and office teams in sync.
- Improve Communication and Documentation: Streamline communication with tools for RFIs and submittals, while creating an indisputable record of the project’s history with daily photo logs.
- Simplify Financial Tracking: Protect your profitability by simplifying the management of your budget, change orders, and the invoicing process.
Streamline Your Architectural Process with Cedreo
Mastering the architectural design process is essential for controlling project costs and risks. The right tools make all the difference.
Cedreo empowers you to accelerate the crucial Schematic Design and Design Development phases by creating…
- Detailed 2D drawings and 3D floor plans
- Stunning photorealistic renderings in minutes
- Professional project presentations
Ready to close deals faster and impress your clients? Start designing with Cedreo for free today!
Architectural Design Phases FAQs
The standard architectural design process consists of at least five phases: Schematic Design, Design Development, Construction Documents, Bidding, and Construction Administration. Many professionals also include a critical Pre-Design phase for foundational research and planning before the design process begins.
Design professionals use various programs throughout the architectural design process. During the schematic and design development phases, they use 3D home design software like Cedreo to create plans and renderings, while project management platforms like Procore are used during Construction Administration.
A construction company uses the phased architectural design process as a strategic framework to manage risk, control costs, and define the project scope. Following the phases of design, from Pre-Design through Construction Administration, ensures a project is thoroughly planned before it breaks ground.