Draw professional floor plans faster so you can spend less time designing and more time closing deals.
Knowing how to draw floor plans is one of the most important skills in residential construction and remodeling.
Without a clear, accurate floor plan, your clients can’t visualize the finished house.
And when clients can’t see the vision, deals stall.
Builders, contractors, and remodelers all face the same challenge: turning a property’s measurements into a professional layout that communicates the full scope of the project.
Miscommunication during this stage leads to costly mistakes, change orders, and lost revenue.
The good news? You don’t need a degree in architecture or years of CAD training to create great floor plans.
This guide walks you through the entire process, from measuring your space to adding doors, windows, and stairs, so you can create floor plans that help you land more clients.
Key Takeaways
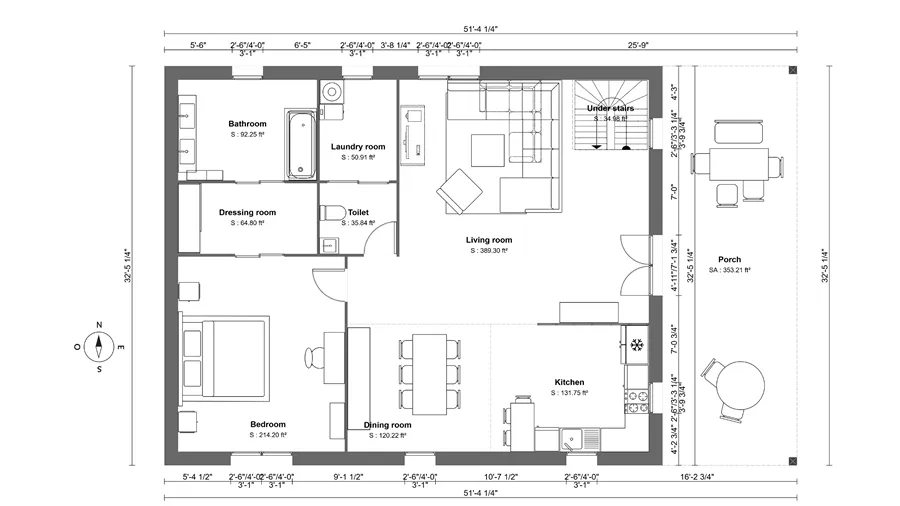
- A floor plan is a scaled, bird’s eye view drawing of a room or building that shows walls, doors, windows, and spatial relationships between rooms.
- Draw exterior walls before adding interior walls, doors, and windows, add levels and resize if needed.
- Each architectural element (doors, windows, stairs, sliding doors) has a standard symbol and specific drawing rules that professionals should know.
- Tools like Cedreo make it fast and easy for builders and contractors to create professional floor plans, even without CAD experience.
Why trust us? Here at Cedreo, we’ve got 20+ years of experience working with housing pros in the home design space. So we know what it takes for builders, remodelers, and contractors to create floor plans that help them land more clients!
See How You Can Create Complete Projects with Cedreo
Plans – Get site plans, 2D floor plans, electrical plans, cross sections and elevation views — with all the technical details you need for a comprehensive project overview.
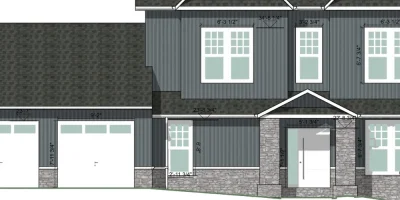
3D Visualizations – Use interior and exterior 3D renderings as well as 3D floor plans to help clients understand the finished project.
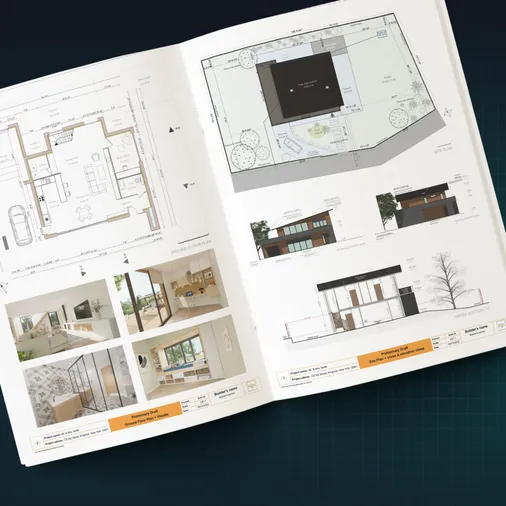
Documentation – Manage all your visual documents in one place, so it’s easier to present and sell your projects.
No credit card required, no commitment
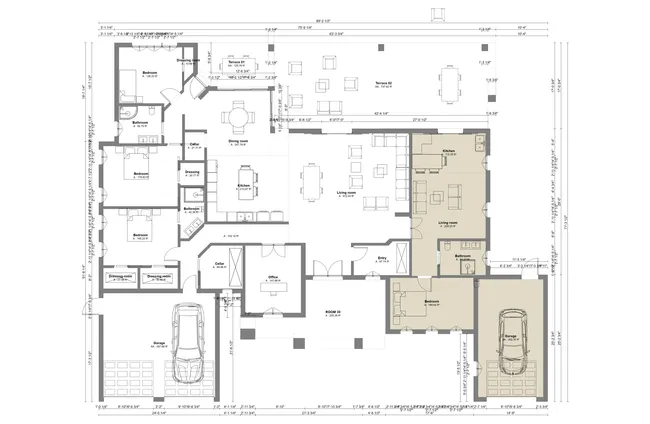
What Is a Floor Plan?

A floor plan is a scaled drawing that shows a room or entire building from above.
Think of it as a bird’s eye view of a property with the roof removed.
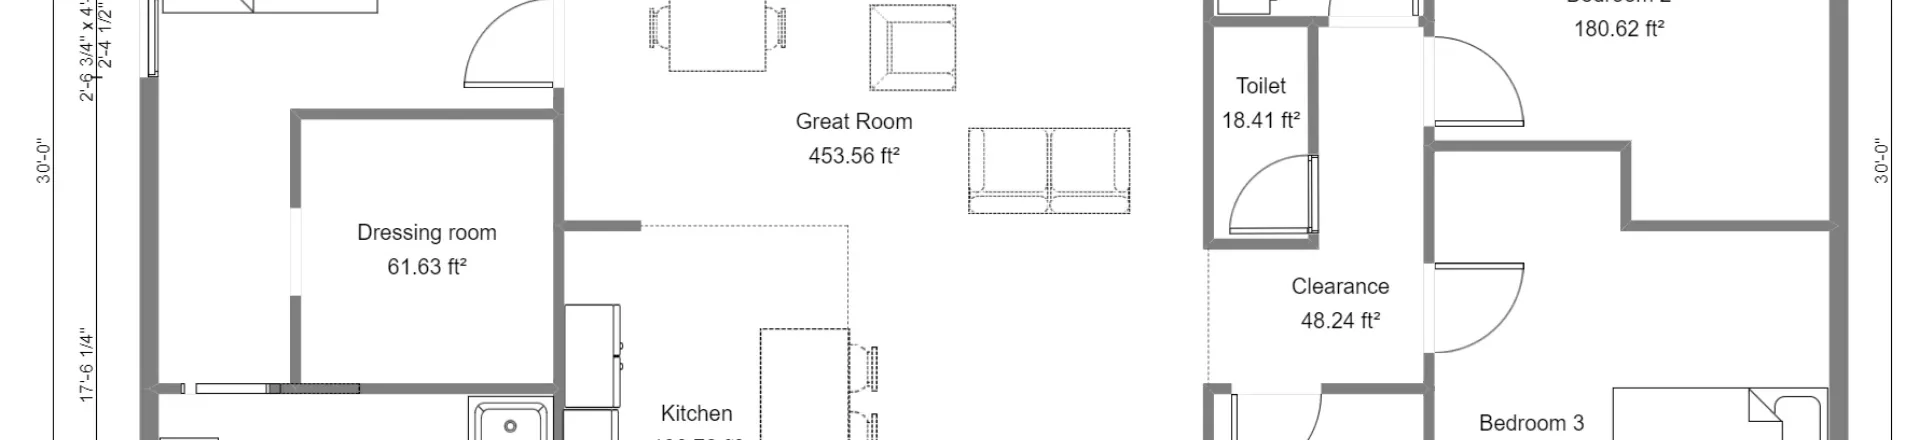
- It displays walls, doors, windows, stairs, and sometimes furniture arrangements within the space.
- Floor plans use standard architectural symbols to represent elements like door swings, window frames, and staircase directions.
- They communicate the layout, room dimensions, and flow of a property to clients, subcontractors, and your design team.
Basically, a well-drawn floor plan helps everyone involved in the project see key details of the finished space before any construction begins.
That’s why architects and builders rely on accurate floor plans as the foundation for every construction and remodel project.
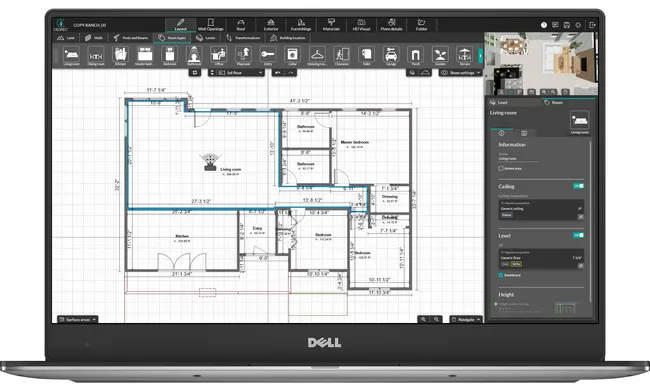
How to Draw a Floor Plan Step-by-Step with Cedreo
Cedreo makes it simple for builders, remodelers, and interior designers to create professional floor plans without CAD experience.
The basic structure of the process is the same whether you’re drawing a single room or an entire house.
Here’s how to do it step by step.
Step 1: Gather Your Measurements or the Existing Floor Plan
Before opening the software, check to see if you have an existing floor plan from a remodel project or the home’s construction
It helps to reference those old plans and import them into Cedreo.
If you don’t have an existing plan, measure every wall, door opening, and window in the space.
- Use a laser measure or tape measure for the most precise floor plans possible.
- Record the length and width of each room, plus the thickness of walls.
- Note the position of windows, doors, and any fixed elements like cabinets or built-in shelving.
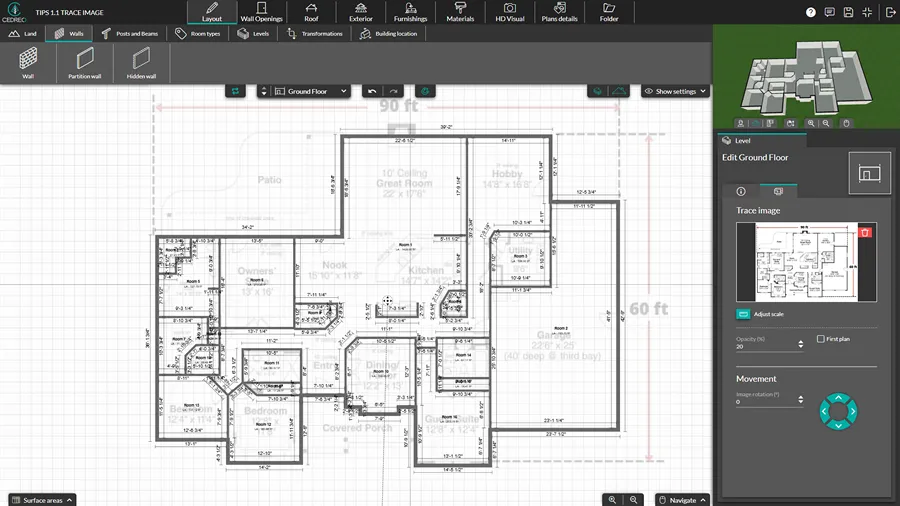
Step 2: Start Your Project in Cedreo
Now it’s time to head to Cedreo. If you don’t have an account, you can create a free one now.
- Log into your Cedreo account and create a new project.
- Go to the layout tab.
- Import an existing blueprint as a background layer to trace over.
Professionals love this feature since it saves them a lot of time right from the get-go.
As you draw walls over the imported plan, the floor plan software automatically adds measurements, so you don’t need to manually calculate and add dimensions like you would if you were just using graph paper.
PRO TIP – Since Cedreo is cloud-based software, if you have internet access at the job site, you can take your laptop and draw the floor plan directly in Cedreo as you take measurements.
But what if you’re drawing a brand new floor plan?
Then start from step three.
Step 3: Draw Ground Floor Exterior Walls
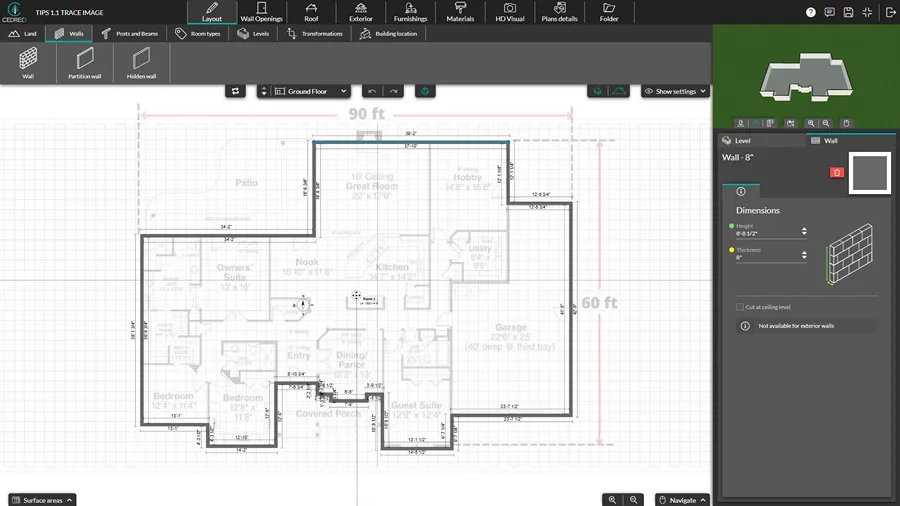
While in the Layout tab, select the Wall tool.
Click to place wall endpoints, and Cedreo’s built-in tools help you properly connect align walls at correct angles.
Exterior walls are automatically drawn with a default thickness, but you can customize them as needed.
Start with the outer walls of the building to define the overall footprint of the property.
Automatic wall snapping makes it easy to create precise floor plans, even for first-time users.
Step 4: Add Interior Walls
Select the Partition Wall tool to draw interior walls and divide the floor plan into rooms.
Cedreo’s room auto-detection kicks in as you close off areas, keeping your layout organized.
Think about room functionality and traffic flow as you lay out the interior layout.
Bedrooms, bathrooms, kitchens, and office spaces each have typical size ranges that professionals should keep in mind.
One thing builders say all the time is that getting interior wall placement right early saves major headaches during construction.
Step 5: Add Level and Stairs
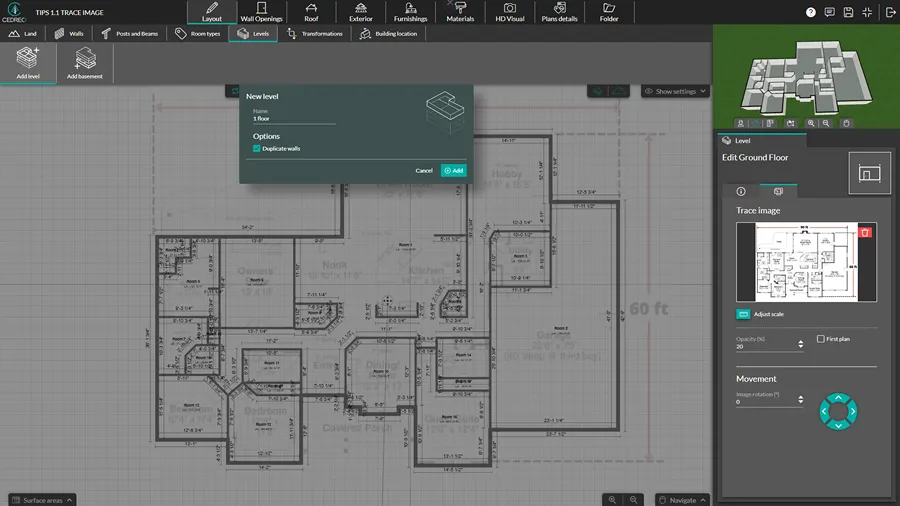
If your project includes a basement, second floor, or any additional level, this is the right time to add it.
In the Levels tool, under the Layout tab, click Add Level to add a level above or Add Basement to add a basement below.
The exterior walls are automatically duplicated and you have the option to duplicate the interior walls as well with each new level.
Then, add a stairwell from the Wall Opening tab and select and place an appropriate set of stairs from the Design Library in Furnishings tab.
PRO TIP! – Once your layout is done, use the Transformations tool under the Layout tab to resize the entire floor plan in any direction with a single click.
Step 6: Place Doors and Windows
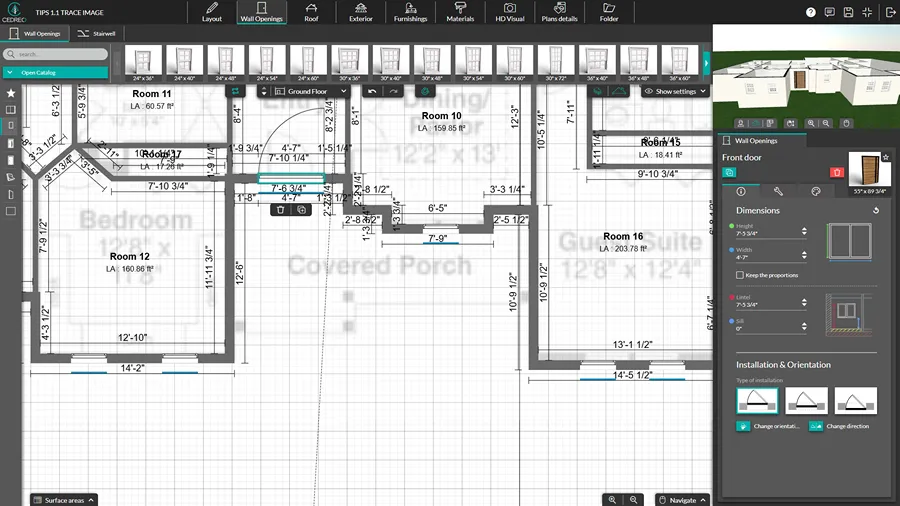
Go to the Wall Openings tab and select from Cedreo’s library of door and window styles, then click to place them directly on any wall.
The software automatically displays standard floor plan symbols for these architectural elements so that anyone reading the plan can understand it.
For example, doors show an arc indicating swing direction, and windows appear as parallel lines within the wall.
You can customize sizes to match your project specs.
We cover each element’s specifics in detail below.
Step 7: Include Fixtures and Furniture
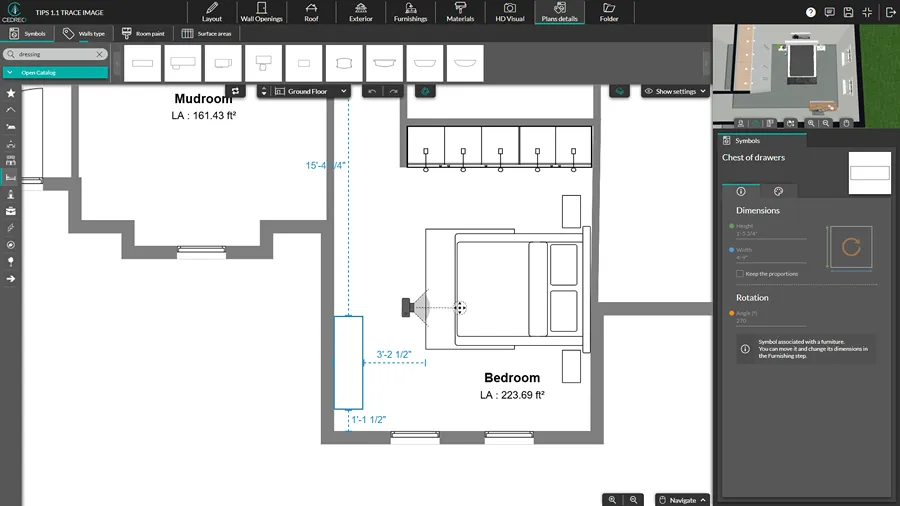
From the Plan Detail tab, drag and drop symbols for built-in fixtures like cabinets, sinks, bathtubs, and appliances to show the functional layout of each room.
You can also go to the Furnishings tab and drag and drop 3D design elements, many of which have corresponding symbols that transfer to the 2D plan.
A lot of designers say that clients love it when they include furniture arrangements for living areas, bedrooms, and dining spaces.
Adding furniture, decorative items, and decor items like rugs, artwork, lighting, and other furniture pieces really brings floor plans to life.
Fortunately, Cedreo’s library includes over 10,000 3D furnishings, so you can furnish an entire house in minutes.
Step 8: Add Dimensions and Labels
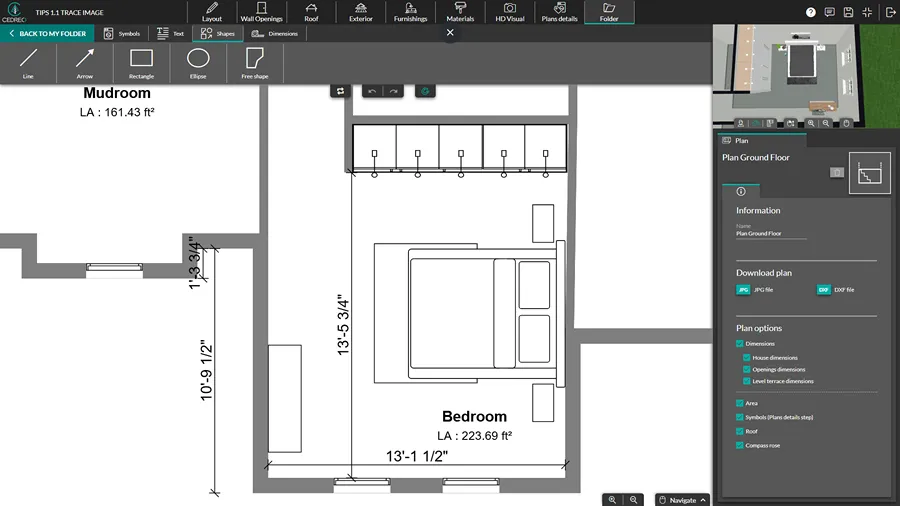
Cedreo’s dimension tools automatically generate dimension lines and label each room (bedroom, kitchen, office, bathroom) as you go, but you can customize them as needed.
The software also generates surface area tables automatically, so builders and contractors get construction details they need without manual calculations.
See the surface area tables in the Plan Detail tab.
Also in the Plan Details tab, select each wall and choose a more specific wall type to indicate how it should be constructed.
Step 9: Review and Refine
The finishing touches matter.
A polished, accurate floor plan builds trust with clients and supports better design decisions down the road.
So before sharing your floor plan, check that you’ve added all the necessary measurements, that door swings don’t conflict, and the overall flow makes sense.
And you may need to create different floor plans for different people.
- In the Folder tab, create multiple floor plans of the same level.
- Include different information on each plan.
- Make on with more dimensions, annotations, and symbols for construction teams
- Make another that’s cleaner and easier to read to present to clients.
And don’t forget to get a second set of eyes on the plans before presenting them to catch errors that could become big problems down the road.
BONUS Step With Cedreo: Generate 3D Floor Plans and Renderings
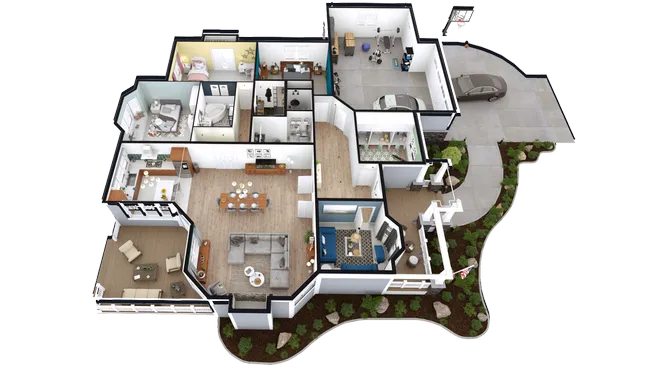
Don’t settle for just flat 2D plans.
As you draw your 2D floor plan, Cedreo automatically converts it into a 3D floor plan.
Then add floor and wall materials as well as furnishings from the 3D design library.
This gives you a complete 3D perspective of the furnished layout, which is far more intuitive for clients to visualize than a flat drawing.
From there, go to the HD visual tab to generate photorealistic 3D renderings of both interior and exterior views in about 5 minutes.
You can set camera angles, adjust day or night lighting, and even change the sun orientation for realistic shadows.
In our experience working with housing pros, this is the step that wins deals.
Clients who can visualize the finished project are far more likely to sign contracts.
How to Draw Windows on a Floor Plan
On a floor plan, windows are represented by a gap in the wall with two parallel lines running through it.
The lines show the glass pane within the wall opening.
Standard window widths range from 24 to 48 inches depending on the room and style (single-hung, double-hung, casement, or picture window).
In Cedreo, in the Wall Openings tab, you select a window style from the library, then click to place it on any wall.
The software automatically adjusts the wall opening and displays the correct symbol on the 2D floor plan.
In the side pane, you can customize the window size and other details such as finishes, glass type, etc.
Then when you generate renderings in the HD Visual tab, you’ll also see how natural lighting from each window looks in the 3D view.
How to Draw Doors on a Floor Plan
Standard doors are shown on a floor plan with an arc that indicates the direction of the swing.
A standard interior door is 32 inches wide, while exterior doors are typically 36 inches.
The arc (a quarter circle) starts at the hinge side and sweeps to show how far the door opens.
You need enough clearance for the door to open fully without hitting walls, cabinets, or other obstacles.
In Cedreo, in the Wall Openings tab, choose from a variety of door styles (interior, exterior, garage doors, and more), then click to place them on any wall.
Then go to the side pane to change the door direction, orientation, as well as other options and finishes.
How to Draw Sliding Doors on a Floor Plan
Sliding doors slide along a track instead of swinging open, so their floor plan symbol looks different.
Instead of an arc, sliding doors are drawn as two overlapping rectangles within the wall.
One rectangle represents the fixed panel and the other shows the sliding panel.
Sliding doors are common for patios, closets, and areas where a swinging door would take up too much space.
Standard sets of sliding glass doors can range from 60 inches to 96 inches wide, with the most common being 72 inches wide.
In Cedreo, sliding doors are available in the wall opening library alongside standard doors.
Just place one on a wall, and the floor plan updates with the correct symbol right away.
How to Draw Stairs on a Floor Plan
Stairs on a floor plan are drawn as a series of parallel lines (one for each tread) inside a rectangular outline.
An arrow indicates the direction of travel, pointing upward from lower floor to upper floor.
Standard residential stairs are 36 inches wide with treads about 10 inches deep.
Here’s what to include when drawing stairs on your floor plan:
- The number of treads (risers) in the staircase
- Direction of travel (up or down) shown by an arrow
- Stair width (typically 36 inches minimum for residential)
- Landing areas if the staircase has L-shaped or U-shaped turns
To draw stairs in Cedreo:
- From the Wall Openings step, add a stairwell opening.
- Go to the Furnishing tab and select an appropriate set of 3D stairs.
- Add them to the appropriate level, adjust the size in the side pane, and position them in the stairwell.
- Cedreo automatically adds the correct stair symbol to the 2D floor plans.
How to Design Open Floor Plans
Open floor plans combine two or more traditional rooms (usually the kitchen, dining area, and living room) into one large, continuous space.
They’re one of the most requested design options in new construction and remodel projects, and with good reason.
Homeowners love open layouts because they make the house feel bigger and allow better natural lighting throughout the space.
So how can you do this in software like Cedreo?
Once you have the basic floor plan layout drawn, head to the Layout tab.
- Choose the hidden wall tool.
- Draw hidden walls (invisible on 3D plans) to define specific areas such as the dining, kitchen, and living rooms, within the open layout.
- The hidden walls create spaces that let you get specific square footage calculations for each area and apply specific materials to each area.
When you remove interior walls, you often need posts and beams to carry the load.
Here’s how to do that in Cedreo.
- Go to the Layout tab.
- Select the Posts and Beams tool.
- Select the default size of each.
- Click to add posts and beams where required.
- Use the side pane to fine tune the size and height of each.
- Click and drag, or click and use keyboard arrows to move them.
- In the Material tab, select materials and apply them to the posts and beams.
Create Better Floor Plans, Faster
Learning how to draw floor plans is a foundational skill for builders, contractors and remodelers..
From importing existing plans to placing doors, windows, and stairs, every step matters.
And design tools like Cedreo provide a cost effective way to make the entire process faster and more accessible, whether you’re a seasoned builder or just getting started.
Cedreo is built for housing professionals who want to create polished designs without the steep learning curve of traditional CAD programs.
With Cedreo you can:
- Draw 2D floor plans quickly
- Furnish rooms with furniture, fixtures, and decor items from a library of over 10,000 options
- Generate photorealistic 3D renderings in about 5 minutes
- Create professional project presentations that help you close more deals
Ready to create floor plans that impress your clients?
Sign up for a FREE account today!
FAQs
Measure the property, then use floor plan software like Cedreo to draw walls, add doors and windows, and label each room (you can also import existing floor plans to trace over).
For real estate listings, Cedreo’s 3D floor plans give buyers a polished, furnished view of the layout that stands out far more than a flat 2D drawing.
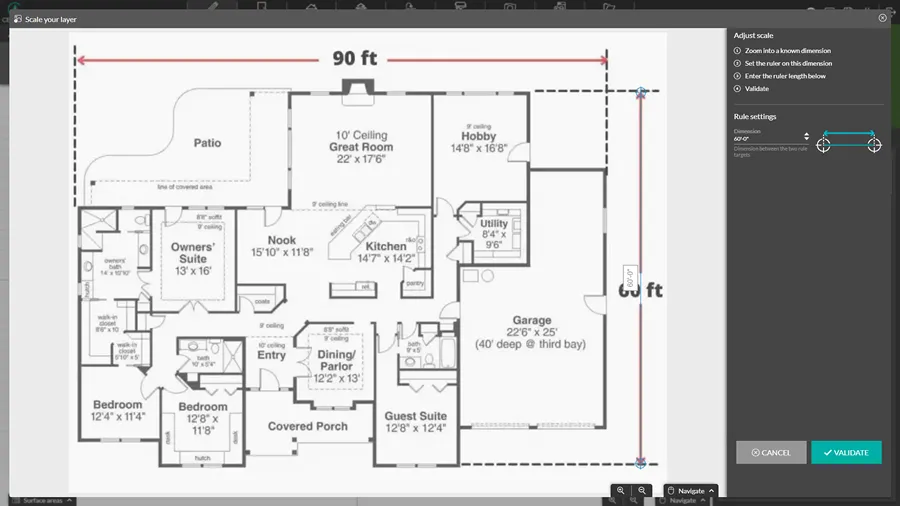
The standard scale for residential floor plans is 1/4 inch = 1 foot (1:48)
In Cedreo, the scale is handled automatically as you draw and when you export your plans as a JPG or DXF, you can choose different print scales from the same design without redrawing anything.
Doors are shown as a rectangle and arc (quarter circle) indicating swing direction attached to a wall opening, and windows appear as two parallel lines in a wall gap.
Cedreo automatically places the correct symbols when you add doors and windows to your plan.
Stairs are drawn as parallel lines (representing treads) inside a rectangle, with an arrow showing the direction of travel.
In Cedreo, choose from straight, L-shaped, U-shaped, or spiral stair templates that display the proper symbols automatically.
Yes, modern design tools like Cedreo are built for professionals without CAD backgrounds, and the interface is intuitive and user friendly.
You can start with a free account, explore different layouts, and get your design ideas flowing right away from any computer or mobile device.
With traditional methods it can take several hours or even days, but user friendly software like Cedreo cuts that time significantly.
In Cedreo, a simple room layout can take just a few minutes, while a full set of 2D and 3D house plans typically takes around two hours.
Contractors use a range of tools from basic apps to full CAD programs, but many prefer accessible, user-friendly options like Cedreo that balance functionality with speed.
Cedreo lets you create floor plans, 3D renderings, and project presentations in one platform accessible from any computer with an internet connection.
Measure every wall length, door and window sizes, ceiling heights, and the positions of fixed features like cabinets and stairs.
Having all measurements upfront makes it easier to create precise floor plans the first time, plus generate 3D renderings that help clients visualize how plans will look in real life.